網路相關
- 【Cisco】Switch相關指令
- 【Fiddler】玩轉 Fiddler-HTTP(s) 抓包能手
- 【Mac】透過console連接網路設備
- 【zabbix】自定義通知(轉貼)
- 學習相關連結
- smokeping install
- 【DNS】台灣地區常用 DNS IP 整合表
- 【常見問題】通訊協定&port 在呼叫上的差異
- 【常見問題】https 使用domain 與 ip 差異
- 【PowerDNS】
- 【PowerDNS】Lua Records
- 【PowerDns】dnsdist
【Cisco】Switch相關指令
LAB 2-1:Switch基本環境設定

清除Switch的組態設定
Switch>enable
Switch#erase startup-config
Switch#delete vlan.dat
Switch#reload

Switch設主機名稱
Switch#configure terminal
Switch(config)#hostname lab2

console閒置設0分,啟用logging訊息輸出後自動換行功能
lab2(config)#line console 0
lab2(config-line)#exec-timeout 0  (閒置登出)
lab2(config-line)#logging synchronous  (訊息同步)

停用網域名稱反查
lab2(config-line)#exit
lab2(config)#no ip domain-lookup

設定界面資訊(description),雙工(duplex)模式及介面速度(speed)
lab2(config)#interface fastEthernet 0/12
lab2(config-if)#description TORouter
lab2(config-if)#duplex auto (預設auto)
lab2(config-if)#speed auto  (預設auto)
lab2(config-if)#exit

設定Switch IP及Gateway (L2 Switch訂IP管理用)
lab2(config)#interface vlan 1
lab2(config-if)#ip address 192.168.0.250 255.255.255.0
lab2(config-if)#no shutdown
lab2(config-if)#exit
lab2(config)#ip default-gateway 192.168.0.254 (跨網段管理)

show 相關設定,存入NVRAM
lab2#show running-config
lab2#show vlan 1
lab2#show interfaces fastEthernet 0/12
lab2#copy running-config startup-config
LAB 2-2:Switch安全防護設定

設定Console及vty密碼
lab2#configure terminal
lab2(config)#line console 0
lab2(config-line)#password console
lab2(config-line)#login
lab2(config-line)#exit
lab2(config)#line vty 0 15
lab2(config-line)#password vty
lab2(config-line)#login
lab2(config-line)#exit

設定privileged mode的密碼並檢視
lab2(config)#enable password password
lab2(config)#enable secret cisco
lab2(config)#end
lab2#sh running-config

設定SSH
lab2#configure terminal
lab2(config)#ip domain-name example.com
lab2(config)#crypto key generate rsa
lab2(config)#username netadmin password netadmin
lab2(config)#ip ssh version 2
lab2(config)#line vty 0 15
lab2(config-line)#login local
lab2(config-line)#transport input ssh telnet

直接進入特權模式
lab2(config)#no username {netadmin}
lab2(config)#username {name} privilege 15 password {password}

啟用密碼加密服務
lab2#conf t
lab2(config)#service password-encryption
lab2(config)#do show running-config | begin line

設定Login banner
lab2(config)#banner login >
  HI !!!! >
LAB 2-3:Port Security(防非法MAC存取)


Port security 只能針對Access mode的Port設定
enable port security
(Optional)設定最大MAC數量,預設 1 sh不顯示,Cisco設備預設值通常不顯示
違規時switch的動作violation{ shutdown預設 | restrict | protect}
1~4只防阻MAC Flooding攻擊,每一個port只能有1個MAC通過,但還不能防止非法MAC接到設備上,把合法MAC寫到table,只要MAC有錯port shutdown
在Switch上查看MAC-Address-Table
lab2#show mac-address-table (有些版本 show mac address-table)

將FA0/24啟用Port-Security功能,指定只學習一筆MAC資訊,使用Sticky方式學習到PC的MAC,並設定違規處理方式為Shutdown
lab2#configure terminal
lab2(config)#interface fastEthernet 0/24  (多個Port可用range)
lab2(config-if)#switchport mode access  (將Port改成Access Mode)
lab2(config-if)#switchport port-security  (啟用Port Security)
lab2(config-if)#switchport port-security maximum 1  (設定最大的MAC數量)
lab2(config-if)#switchport port-security mac-address sticky
lab2(config-if)#switchport port-security violation shutdown(預設,處理err-disabled)
或
lab2(config-if)#switchport port-security violation restrict  (合法MAC接回就會通)


range 多個Port要設定
lab2(config)#interface range fastEthernet 0/4 - 7 , fastEthernet 0/9 - 11
lab2(config-if-range)#switchport mode accesss

檢查所有界面的狀態(Port,Description Name,Status,Vlan,Duplex,Speed,Type)
lab2#sh interfaces status

檢查Switch上有哪些Port啟用Port-security
lab2(config-if)#do sh port-security

檢查Switch上有哪些Port有sticky或手動輸入合法MAC Address
lab2(config-if)#do sh port-security address

檢查Fa0/24的Port-security的詳細設定
lab2(config-if)#do sh port-security interface fastethernet 0/24

檢查Fa0/24的介面狀態(注意err-disabled)
lab2(config-if)#do sh int fa 0/24


將Fa0/24接另一台PC,因為Fa0/24有啟用Port-security,並將之前自動學習到的MAC以Sticky記錄,檢查Fa0/24的介面狀態會出現err-disabled:以下處理方法
lab2#sh int fa 0/24
FastEthernet0/24 is down, line protocol is down (err-disabled)
lab2#sh run | begin FastEthernet0/24
!
interface FastEthernet0/24
 switchport mode access
 switchport port-security
 switchport port-security mac-address sticky
 switchport port-security mac-address sticky 0030.F22D.9A05
!
lab2#conf t
lab2(config)#int fa 0/24
lab2(config-if)#no switchport port-security mac-address sticky 0030.F22D.9A05
lab2(config-if)#do sh int fa 0/24
FastEthernet0/24 is down, line protocol is down (err-disabled)
lab2(config-if)#shutdown
lab2(config-if)#no shutdown
LAB 2-4:CDP與檔案備份練習

CDP查詢鄰近設備
lab2#sh cdp neighbors  (Device ID =>ro)
lab2#sh cdp entry ro

將Switch的fa0/3介面CDP功能關閉
lab2(config)#int fa 0/3
lab2(config-if)#no cdp enable

將設備dcp功能關閉
lab2(config)#no cdp run

將Switch的IOS與startup-config複製到TFTP
lab2#sh flash
lab2#copy flash tftp
lab2#copy running-config startup-config
lab2#copy startup-config tftp


show 的使用
lab2#sh running-config | begin line
lab2#sh running-config | include line
lab2#sh interfaces status
lab2#sh mac address-table
#
#
#
【Fiddler】玩轉 Fiddler-HTTP(s) 抓包能手
玩轉 Fiddler-HTTP(s) 抓包能手 & 常見「特殊」用途
https://ryanlee.tw/2021/08/23/fiddler/
【Mac】透過console連接網路設備
需求:一條usb - console 線
接上後,打開終端機,使用screen 登入設備
#找到 console 線
ll /dev/tty.*
crw-rw-rw-  1 root  wheel    9,   0  6 22 22:26 /dev/tty.Bluetooth-Incoming-Port
crw-rw-rw-  1 root  wheel    9,   2  6 24 09:58 /dev/tty.usbserial-A50285BI

#登入設備
screen /dev/tty.usbserial-A50285BI 9600
screen其他操作
退出後重連失敗

#找到screen pid
screen -list

There are screens on:
        15520.ttys004.Treeman-Mac       (Attached)
        9100.ttys003.Treeman-Mac        (Detached)
2 Sockets in /var/folders/px/8z7kvlwj5278qcf92c71q6_h0000gn/T/.screen.

#方法一 刪除socket 重新連線
#刪除sccket screen -X -S {pid} quit
# -X: 執行cmd, -S: screen socket name, quit: 離開
screen -X -S 9100.ttys003.Treeman-Mac quit
#在連線一次
screen /dev/tty.usbserial-A50285BI 9600

#方法二 使用screen pid.name重新連線
screen -R 9100.ttys003.Treeman-Mac

#方法三 重新連線上次中斷screen
screen -r
【zabbix】自定義通知(轉貼)
開啟 https://notify-bot.line.me/zh_TW/
登入帳號後,下拉選項,選取「個人頁面」→「發行權杖」→「透過1對1聊天接收LINE Notify的通知」
之後就會得到一組權杖「Token」,這組Token務必要記錄下來,出現後便不再顯示
設定Scritp
sudo vi /usr/lib/zabbix/alertscripts/line_notify.sh
|
#!/bin/bash # {ALERT.SUBJECT} # {ALERT.MESSAGE} curl https://notify-api.line.me/api/notify -H "Authorization: Bearer ${TOKEN}" -F "message=${message}" |
sudo chmod 755 /usr/lib/zabbix/alertscripts/line_notify.sh
sudo chown zabbix:zabbix line_notify.sh
1. 「管理」→「示警媒介類型」→「創建示警媒介類型」
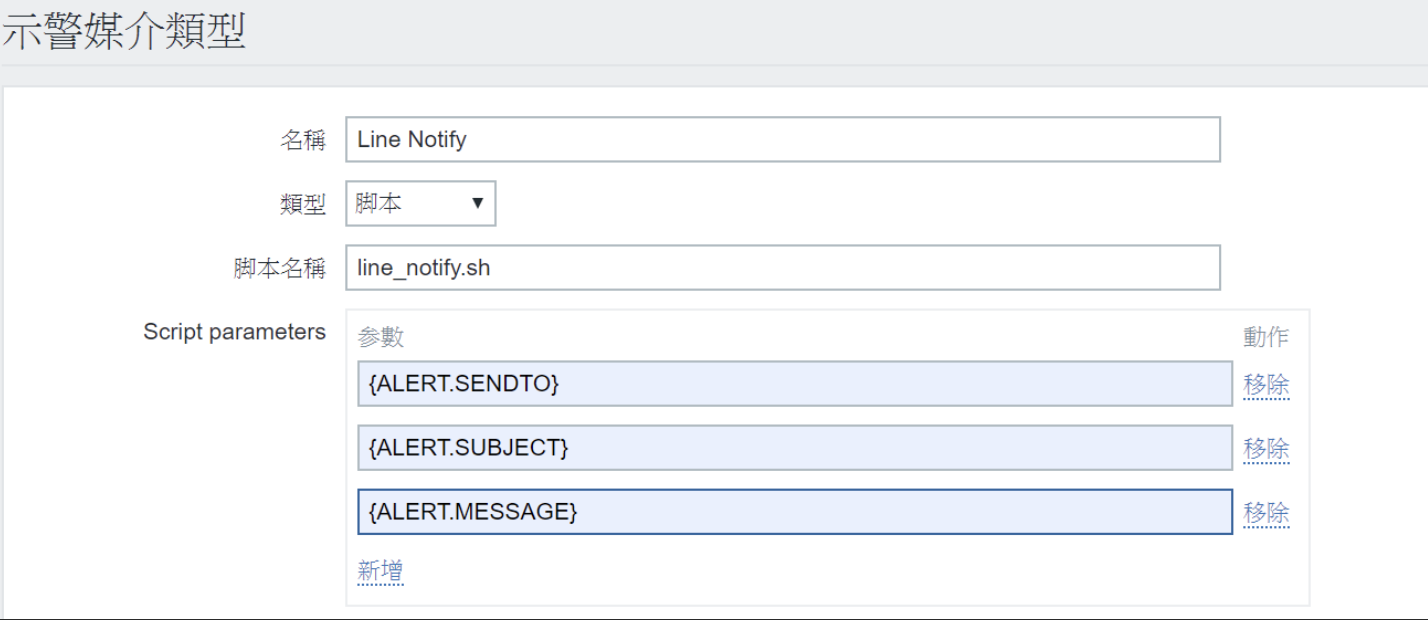
Name:Line Notify
Type:Script
Script name:line_notify.sh
Script parameters:
{ALERT.SENDTO}
{ALERT.SUBJECT}
{ALERT.MESSAGE}
2.「管理」→「用戶」→「Admin」→「示警媒介」→「新增」
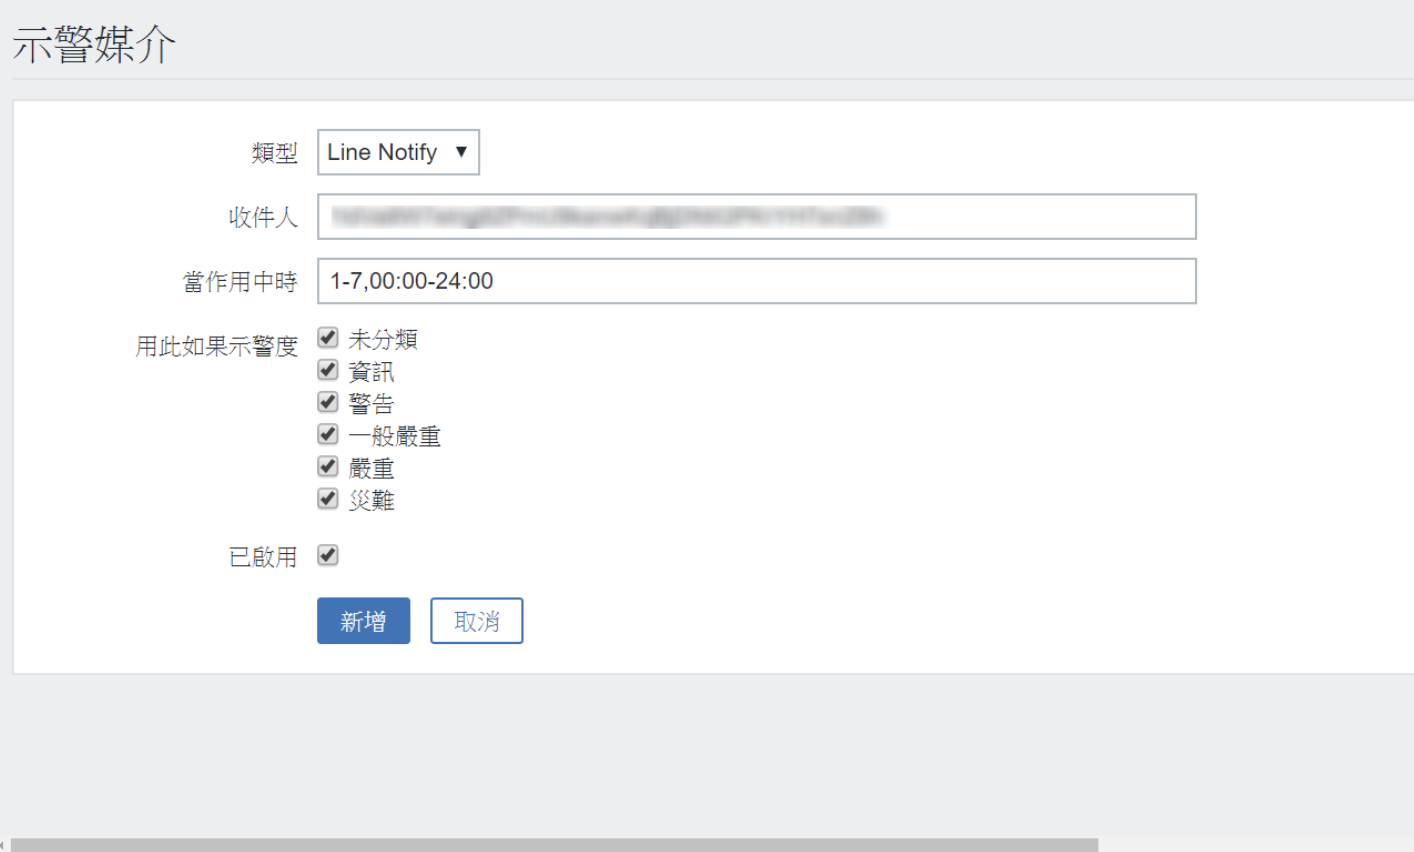
Send to:填入上面步驟拿到的ˊTOKEN
3.「組態」→「動作」→「創建動作」
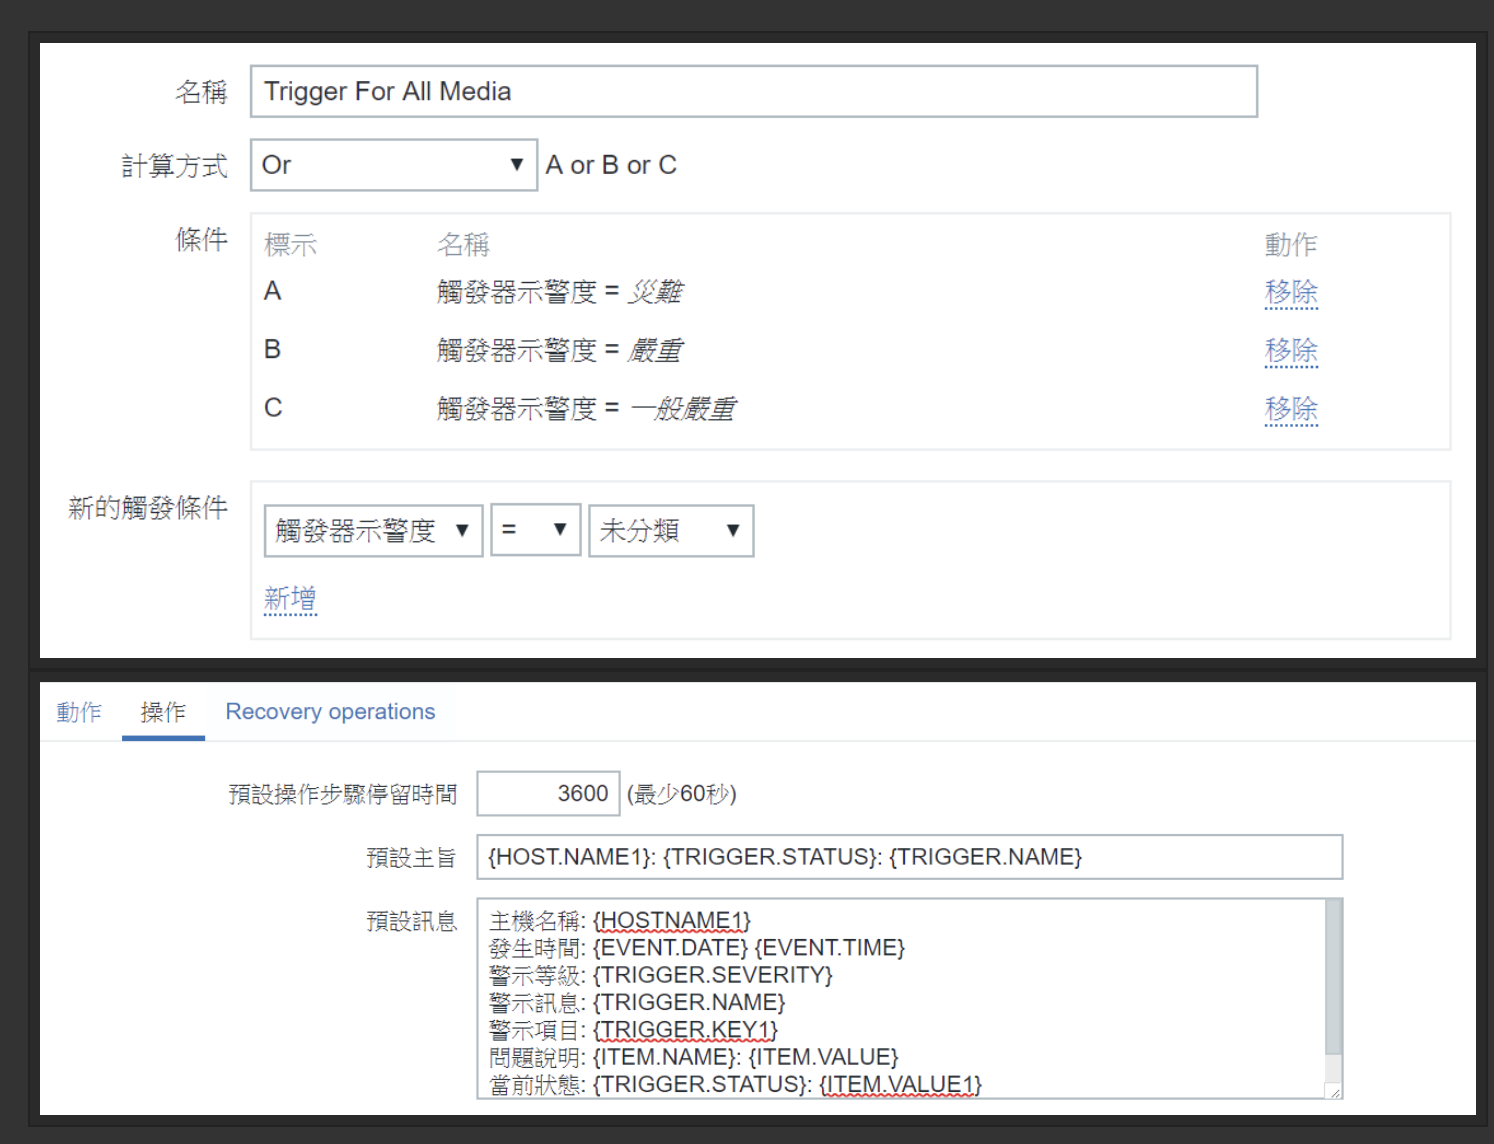
| {HOST.NAME1}: {TRIGGER.STATUS}: {TRIGGER.NAME} |
| 主機名稱: {HOSTNAME1} 發生時間: {EVENT.DATE} {EVENT.TIME} 警示等級: {TRIGGER.SEVERITY} 警示訊息: {TRIGGER.NAME} 警示項目: {TRIGGER.KEY1} 問題說明: {ITEM.NAME}: {ITEM.VALUE} 當前狀態: {TRIGGER.STATUS}: {ITEM.VALUE1} 事件ID: {EVENT.ID} |
備註:Recovery operations 的欄位主旨和訊息都和這邊一樣
Recovery operations 的操作配置

配置完成後,進行測試
將監控主機關機,五分鐘後,LINE就會進行報警
出處:﹝Linux﹞Zabbix LINE Notify 警報通知 | 工程師的江湖 - 點部落 (dotblogs.com.tw)
學習相關連結
《网络工程师的Python之路》教学文章、视频汇总 - 知乎 (zhihu.com)
smokeping install
timedatectl set-timezone Asia/Taipeiinstall docker
curl -fsSL https://get.docker.com | bash -s dockerrun smokeping in docker
mkdir -p /home/monitor/smokeping/config
mkdir -p /home/monitor/smokeping/data
chown -R monitor /home/monitor/smokeping/

systemctl enable docker
systemctl start docker

docker pull linuxserver/smokeping
docker run -d \
--name=smokeping \
-e PUID=1000 \
-e PGID=1000 \
-e TZ=Asia/Taipei \
-p 9080:80 \
-v /home/monitor/smokeping/config:/config \
-v /home/monitor/smokeping/data:/data \
--restart unless-stopped \
linuxserver/smokeping
fix config
路径 /home/monitor/smokeping/config/Targets
#!/bin/bash
docker rm -f smokeping

docker run -d \
--name=smokeping \
-e PUID=1000 \
-e PGID=1000 \
-e TZ=Asia/Taipei \
-p 9080:80 \
-v /home/monitor/smokeping/config:/config \
-v /home/monitor/smokeping/data:/data \
--restart unless-stopped \
linuxserver/smokeping
page
http://localhost:9080/smokeping/?target=InternetSites
https://www.ssvip.net/971.html
【DNS】台灣地區常用 DNS IP 整合表
🇹🇼 台灣地區常用 DNS IP 整合表:
| 業者 | 主用 DNS IP | 備用 / 區域性 DNS IP | 備註說明 |
|---|---|---|---|
| 中華電信 | 168.95.1.1 | 168.95.192.1 | 全台通用 |
| 台灣大哥大 | 203.73.24.1 | 203.73.25.1、61.31.233.1 | 固網與行動使用者常見 IP,會依區域調整 |
| 遠傳電信 (SeedNet) | 139.175.1.1 | 139.175.55.244、8.8.8.8(Google DNS)、其他區域性如下: | 官方資料來源 SeedNet |
| → 北區 | 139.175.55.244 | 139.175.252.16 | 台北、桃園、新竹等 |
| → 中區 | 139.175.150.20 | 139.175.55.244 | 台中、彰化、南投等 |
| → 南區 | 139.175.10.20 | 139.175.55.244 | 高雄、台南、嘉義等 |
| 亞太電信 | 多沿用中華電信 | 建議手動指定 168.95.1.1 | |
| 台固媒體 | 203.75.129.130 | 203.75.129.131 | 固定使用者常見 DNS |
🌐 國際公共 DNS(可自由選擇):
| 服務商 | 主用 DNS IP | 備用 DNS IP | 備註 |
|---|---|---|---|
| Google DNS | 8.8.8.8 | 8.8.4.4 | 全球穩定快速 |
| Cloudflare | 1.1.1.1 | 1.0.0.1 | 快速且注重隱私 |
| Quad9 | 9.9.9.9 | 149.112.112.112 | 防惡意網站 DNS |
| OpenDNS | 208.67.222.222 | 208.67.220.220 | 可選擇家長過濾功能 |
【常見問題】通訊協定&port 在呼叫上的差異
以下是針對你提到的三種不同 URL 呼叫方式:
1. https://a.b.com:3000
2. http://a.b.com:3000
3. http://a.b.com
✅ 一、三種呼叫差異總覽
| 呼叫方式 | 協定 | Port | 是否加密 | 對 Nginx 的需求 | 常見用途 |
|---|---|---|---|---|---|
https://a.b.com:3000 |
HTTPS | 3000 | ✅ 是 | listen 3000 ssl; |
測試自訂 HTTPS port |
http://a.b.com:3000 |
HTTP | 3000 | ❌ 否 | listen 3000; |
自訂 HTTP port 開發 |
http://a.b.com |
HTTP | 80 | ❌ 否 | listen 80;(預設) |
一般公開網站 |
✅ 二、為什麼會有差異?
1. 協定不同(HTTP vs HTTPS)
-
HTTP:明文傳輸,不需要 TLS 憑證。
-
HTTPS:加密傳輸,需要 SSL 憑證,並透過 TLS 握手。
2. Port 不同(預設 vs 自訂)
-
HTTP 預設是 80、HTTPS 預設是 443。
-
如果你指定其他 port(如 3000),伺服器端(如 Nginx)必須額外開啟對應的 port 並配置好 listen 與憑證。
✅ 三、Nginx 實際設定對應
1️⃣ 對應 https://a.b.com:3000
server {
    listen 3000 ssl;
    server_name a.b.com;

    ssl_certificate     /etc/nginx/certs/a.b.com.crt;
    ssl_certificate_key /etc/nginx/certs/a.b.com.key;

    location / {
        proxy_pass http://localhost:4000;
    }
}
🔒 加密連線,必須設定
ssl與有效憑證。
2️⃣ 對應 http://a.b.com:3000
server {
    listen 3000;
    server_name a.b.com;

    location / {
        proxy_pass http://localhost:4000;
    }
}
🔓 明文傳輸,不需要 SSL 憑證。適用於測試環境或內網。
3️⃣ 對應 http://a.b.com
server {
    listen 80;
    server_name a.b.com;

    location / {
        proxy_pass http://localhost:4000;
    }
}
🌐 最常見的網站 HTTP 配置。不需帶 port。
✅ 四、連線行為對照表
| 使用者輸入網址 | 瀏覽器或 curl 發出的請求會去到哪裡? |
|---|---|
https://a.b.com:3000 |
a.b.com 的 port 3000(用 TLS) |
http://a.b.com:3000 |
a.b.com 的 port 3000(無加密) |
http://a.b.com |
a.b.com 的 port 80 |
✅ 五、常見錯誤與排查
| 問題 | 原因 | 解法 |
|---|---|---|
curl https://a.b.com:3000 報錯 TLS |
你設定了 HTTPS,但 Nginx 未加上 ssl 或憑證有誤 |
加上 ssl 並設定憑證 |
只能用 http://a.b.com,其他都失敗 |
Nginx 只開 port 80,沒開 3000 | 增加對應 listen 3000 的設定 |
呼叫 http://a.b.com:3000 被拒絕 |
Server 未開啟該 port | 檢查防火牆、Nginx、Docker 映射是否有允許 3000 |
✅ 六、總結:選擇哪一種?
| 使用場景 | 建議呼叫方式 |
|---|---|
| 內部開發測試 | http://a.b.com:3000 或 https://a.b.com:3000 |
| 正式站公開服務 | https://a.b.com(預設 port 443) |
| Nginx 反向代理串接後端 | 視你要轉發的是 HTTP or HTTPS 及 port 而定 |
如你需要一份完整支援三種 port 的 nginx.conf 以及搭配 Express 的後端範例,我可以幫你整合好。需要嗎?
【常見問題】https 使用domain 與 ip 差異
好的,以下補上:
✅ 比較 https://a.b.com 與 https://168.23.1.1 的差異
這兩者協定一樣(都是 HTTPS),但主機名稱(Host)差異會影響 SSL 憑證驗證、DNS 解析、與 Nginx 的設定行為。
差異對照表
| 項目 | https://a.b.com |
https://168.23.1.1 |
|---|---|---|
| 協定 | HTTPS(加密) | HTTPS(加密) |
| 主機名稱 | 網域名稱(FQDN) | IP 位址 |
| DNS 解析 | 會經過 DNS 解析 → IP | 不經 DNS |
| SSL 憑證驗證 | 通常需要憑證中的 CN/SAN 包含 a.b.com | 需要憑證中包含 IP 位址(不常見) |
Nginx server_name 配置 |
server_name a.b.com; |
server_name 168.23.1.1;(不建議)或 _ |
| 常見用法 | 公網、正式站、內部網域皆可 | 測試、開發、內網 IP 使用 |
| 風險與限制 | SSL 憑證驗證容易通過 | 一般憑證不支援 IP → 會出現 TLS 錯誤 |
| 信任憑證 | 可用 Let's Encrypt、商業憑證 | 除非特別申請 IP 憑證,否則會有警告 |
SSL 憑證驗證差異舉例
https://a.b.com
-
若你使用 Let's Encrypt 為
a.b.com建立憑證:
✅curl https://a.b.com➜ 成功(CN/SAN 包含a.b.com)
https://168.23.1.1
-
若你拿
a.b.com憑證套用到 IP 上:
❌curl https://168.23.1.1➜ 失敗,出現SSL: certificate subject name does not match
解法(不建議用於正式環境):
-
為 IP 簽發 SSL 憑證(需自簽或企業憑證)
-
用
curl -k忽略憑證錯誤
curl -k https://168.23.1.1 # 跳過憑證驗證(不安全)
✅ Nginx 設定差異
a.b.com 對應設定:
server {
    listen 443 ssl;
    server_name a.b.com;

    ssl_certificate     /etc/nginx/certs/a.b.com.crt;
    ssl_certificate_key /etc/nginx/certs/a.b.com.key;

    location / {
        proxy_pass http://localhost:3000;
    }
}
IP 直接連線時,通常會用:
server {
    listen 443 ssl;
    server_name _;  # 匹配所有 hostname(或不設定)

    ssl_certificate     /etc/nginx/certs/selfsigned.crt;
    ssl_certificate_key /etc/nginx/certs/selfsigned.key;

    location / {
        proxy_pass http://localhost:3000;
    }
}
🧨 若直接用 IP,也許不會觸發
server_name對應,取決於 Nginx 設定順序與 SNI。
✅ 小結
| URL | 適用時機 | 憑證需求 | 風險 |
|---|---|---|---|
https://a.b.com |
公網、正常使用 | CN/SAN 需含 a.b.com |
正常通過憑證驗證 |
https://168.23.1.1 |
內部測試或特例 | 憑證需含 IP 或自簽 | 容易驗證失敗、跳警告 |
✅Curl Domain 與 ip 的 差異
這是一個非常關鍵的細節問題,涉及到 HTTPS、Host Header、SNI(Server Name Indication),我們來完整拆解:
你提供的兩個請求:
curl https://a.b.com
curl https://168.23.1.1 -H 'Host: a.b.com'
看起來類似,實際上在底層行為非常不同:
核心差異一覽
| 項目 | curl https://a.b.com |
curl https://168.23.1.1 -H 'Host: a.b.com' |
|---|---|---|
| 連線 IP | DNS 解析 a.b.com → IP |
直接指定 IP 168.23.1.1 |
| TLS SNI 傳送內容 | a.b.com(🔑 用來選擇憑證) |
168.23.1.1(🚨 TLS 層不包含 a.b.com) |
| Host Header(HTTP 層) | Host: a.b.com(由 curl 自動加) |
Host: a.b.com(你手動加) |
| SSL 憑證是否驗證成功? | ✅ 通常會成功 | ❌ 若憑證是發給 a.b.com 則會 mismatch |
| Nginx 是否能進到正確的 server | ✅ 通常會進到 server_name a.b.com |
❌ 取決於 SNI,可能進入 default server |
為何 TLS 憑證驗證會失敗?
SNI 是什麼?
-
TLS 層在握手階段會送出
Server Name(來自curl的--resolve或 URL)。 -
用來讓伺服器知道要回哪一張憑證。
在兩種情況下比較:
✅ curl https://a.b.com:
-
DNS → 168.23.1.1
-
SNI:
a.b.com -
Host header:
a.b.com -
Nginx 匹配成功,憑證也是給
a.b.com,一切正常
❌ curl https://168.23.1.1 -H 'Host: a.b.com':
-
SNI:
168.23.1.1(預設值,非 a.b.com) -
Host header:
a.b.com(只有 HTTP 層有用) -
若 Nginx 用
server_name a.b.com並綁定憑證,那會 因為 SNI 不符無法選中正確的憑證 → TLS 握手失敗
Nginx 對這兩種請求的反應
server {
    listen 443 ssl;
    server_name a.b.com;

    ssl_certificate     /etc/nginx/certs/a.b.com.crt;
    ssl_certificate_key /etc/nginx/certs/a.b.com.key;

    location / {
        return 200 "hello a.b.com\n";
    }
}

server {
    listen 443 ssl default_server;
    server_name _;

    ssl_certificate     /etc/nginx/certs/default.crt;
    ssl_certificate_key /etc/nginx/certs/default.key;

    location / {
        return 200 "default server\n";
    }
}
測試結果:
| 測試指令 | 伺服器 block 命中 | 回傳內容 | 是否 SSL 通過 |
|---|---|---|---|
curl https://a.b.com |
server_name a.b.com |
hello a.b.com | ✅ 是 |
curl https://168.23.1.1 -H 'Host: a.b.com' |
server_name _(default) |
default server | ⚠️ 通常憑證不符(或需 -k) |
✅ 解法:讓 IP 請求也能通過 SSL
方法一:用自簽或專門支援 IP 的憑證
但大多數公開 CA(如 Let's Encrypt)不發給 IP 憑證。
方法二:用 curl 忽略 TLS 驗證
curl -k https://168.23.1.1 -H 'Host: a.b.com'
方法三:讓 curl 傳送正確的 SNI(推薦)
curl --resolve a.b.com:443:168.23.1.1 https://a.b.com
-
這會讓 curl:
-
SNI 傳
a.b.com -
Host header 是
a.b.com -
實際連到 IP
168.23.1.1
-
-
✅ 完整模擬瀏覽器行為
✅ 總結
| 比較項目 | curl https://a.b.com |
curl https://168.23.1.1 -H 'Host: a.b.com' |
|---|---|---|
| DNS 解析 | ✅ 有 | ❌ 無 |
| TLS SNI | a.b.com |
168.23.1.1 |
| Host Header | a.b.com |
a.b.com |
| SSL 憑證驗證 | ✅ 通常成功 | ❌ 會失敗(除非用 -k) |
| 建議用法 | ✅ 正常連線方式 | ⚠️ 用於測試或模擬 |
如果你需要模擬真實請求又繞過 DNS,可使用:
curl --resolve a.b.com:443:168.23.1.1 https://a.b.com
這是最穩定且最貼近瀏覽器 SNI 行為的方式。
【PowerDNS】
Lua records
https://doc.powerdns.com/authoritative/lua-records/index.html
-- 返回请求方 IP
who:toString()

-- 根据请求方 IP 不同返回不同地址
view({
  {{'10.10.0.0/16'}, {'10.10.1.1'}}
  {{'0.0.0.0/0'}, {'192.0.2.1'}}
})

-- 返回存活的 IP
-- 异步检测 - 如果都不存活则都返回
ifportup(443, {'192.0.2.1', '192.0.2.2'})
-- 使用 URL 检测存活 - stringmatch 为可选的内容匹配条件
ifurlup("example.com/status", { {"192.0.2.20", "203.0.113.4"}, {"203.0.113.2"} },{stringmatch='ok'})

-- 基于请求方的 HASH(bestwho) 进行返回
pickwhashed({{10,'192.168.0.1'},{100,'192.168.0.2'}})
-- 随机返回 - 有带权重版
pickrandom({{'192.168.0.1'},{'192.168.0.2'}})
pickwrandom({{10,'192.168.0.1'},{100,'192.168.0.2'}})
pdnsutil
下面是 pdnsutil(PowerDNS 的指令工具,用於 DNS 區域與 DNSSEC 管理)的一份常用語法與操作範例教學。你可以把它當作 cheat-sheet 或操作對照表。
(若你的 PowerDNS 版本略有不同或後續改版,部分語法可能略有出入,建議搭配 man pdnsutil 或官方文檔確認) (doc.powerdns.com)
基本語法結構與通用選項
pdnsutil [OPTIONS] COMMAND [ARGUMENTS...]
常見的選項:
| 選項 | 說明 |
|---|---|
-h, --help |
顯示協助訊息 |
-v, --verbose |
輸出較詳細訊息 |
--force |
強制執行(覆寫、跳過某些檢查等) |
--config-name <NAME> |
指定虛擬設定名稱 |
--config-dir <DIR> |
指定 pdns.conf 所在目錄(預設 /etc/powerdns) |
常見區域 (zone) 管理指令
以下指令幾乎涵蓋新增、查看、編輯、刪除、檢查等需求。
| 功能 | 指令範例 | 說明 / 備註 |
|---|---|---|
| 建立區域 | pdnsutil create-zone example.com |
建立一個空的 zone example.com,內部會自動加入一条 NS 記錄 (blog.powerdns.com) |
| 刪除區域 | pdnsutil delete-zone example.com |
將該 zone 從後端資料庫中移除 |
| 顯示區域內容 | pdnsutil show-zone example.com |
列出 zone 的所有 resource record 和 meta 資訊 (blog.powerdns.com) |
| 列出區域 | pdnsutil list-zone example.com |
列出該區域的所有資料記錄 (blog.powerdns.com) |
| 列出所有區域 | pdnsutil list-all-zones |
顯示所有已註冊的 zone 名稱 (Debian Manpages) |
| 檢查單個區域 | pdnsutil check-zone example.com |
檢查該 zone 是否有錯誤(語法、衝突等) (cPanel Support) |
| 檢查所有區域 | pdnsutil check-all-zones |
對所有 zones 執行檢查 (CloudWizard.nl) |
| 編輯區域(交互式) | pdnsutil edit-zone example.com |
進入文字編輯介面,可以手動修改 zone 的所有記錄(系統會做基本檢查) (blog.powerdns.com) |
| 增加記錄 | pdnsutil add-record example.com sub A 3600 1.2.3.4 |
在 example.com 區域新增一條 A 紀錄: sub.example.com TTL 3600 指向 1.2.3.4 (blog.powerdns.com) |
| 更新(替換)整組記錄 | pdnsutil replace-rrset example.com sub A 3600 5.6.7.8 |
將 sub 的 A 類型記錄整組替換為新的值(如果有多條) (blog.powerdns.com) |
| 刪除一組記錄 | pdnsutil delete-rrset example.com sub A |
刪除 sub 的所有 A 類型記錄(整個 RRset) (HackMD) |
| 增加序號 | pdnsutil increase-serial example.com |
手動把 SOA 的 Serial 加一(通常在變更後需告知 slave) (CloudWizard.nl) |
| 設定 zone 類型 | pdnsutil set-kind example.com MASTER |
設定該 zone 為主(zone master)、從(zone slave)或其他類型 (CloudWizard.nl) |
| 設定 meta (zone metadata) | pdnsutil set-meta example.com ALLOW-AXFR-FROM AUTO-NS |
為該 zone 加上 metadata,例如允許哪些 IP 做 AXFR 等 (blog.powerdns.com) |
DNSSEC / 金鑰 (key) 管理指令
如果你要為 zone 啟用 DNSSEC、管理金鑰或做 key rollover 等,這些指令就會派上用場。 (doc.powerdns.com)
| 功能 | 指令範例 | 說明 / 備註 |
|---|---|---|
| 啟用 DNSSEC(簽名 zone) | pdnsutil secure-zone example.com |
為該 zone 建立金鑰並簽名(預設配置) (doc.powerdns.com) |
| 列出該 zone 的金鑰 | pdnsutil list-keys example.com |
顯示該 zone 所有的 KSK / ZSK 金鑰資訊 (SIDN - Het bedrijf achter .nl) |
| 新增金鑰 | pdnsutil add-zone-key example.com ZSK active 2048 rsasha256 |
為例:在 zone example.com 新增一組 ZSK 金鑰,256 RSA, 2048 位元長度。可調整參數。 (Debian Manpages) |
| 啟用金鑰 | pdnsutil activate-zone-key example.com 12345 |
啟用某一個金鑰(以其 key-id 為識別) (Debian Manpages) |
| 停用金鑰 | pdnsutil deactivate-zone-key example.com 12345 |
停用該金鑰(使其不再用於簽名) (Debian Manpages) |
| 匯出公鑰與 DS 記錄 | pdnsutil export-zone-ds example.com |
匯出該 zone 所有 KSK 的 DS 記錄(可提交給上層域名註冊商) (SIDN - Het bedrijf achter .nl) |
| 匯出金鑰 | pdnsutil export-zone-key example.com 12345 |
匯出該 zone 指定金鑰(含私鑰)到檔案或標準輸出 (SIDN - Het bedrijf achter .nl) |
| 移除金鑰 | pdnsutil remove-zone-key example.com 12345 |
將指定金鑰從 zone 中移除(不再保留) (SIDN - Het bedrijf achter .nl) |
| 停用 DNSSEC(取消簽名) | pdnsutil disable-dnssec example.com |
將 zone 還原為不使用 DNSSEC 狀態 (SIDN - Het bedrijf achter .nl) |
| 修正 (rectify) zone 資料庫 | pdnsutil rectify-zone example.com |
重建 zone 在資料庫中的 internal 欄位(如 auth / ordername) (SIDN - Het bedrijf achter .nl) |
| 修正所有 zone | pdnsutil rectify-all-zones |
對所有已存在的 zone 執行 rectify 操作 (SIDN - Het bedrijf achter .nl) |
一些操作流程範例
以下是比較常見的操作流程,依步驟示範怎麼做:
範例:建立一個新的 zone 並設定記錄 + 啟用 DNSSEC
假設 domain 為 example.com:
pdnsutil create-zone example.com
pdnsutil set-kind example.com MASTER
pdnsutil add-record example.com @ NS ns1.example.com.
pdnsutil add-record example.com @ NS ns2.example.com.
pdnsutil add-record example.com ns1 A 1.2.3.4
pdnsutil add-record example.com ns2 A 5.6.7.8
pdnsutil replace-rrset example.com . SOA 'ns1.example.com. hostmaster.example.com. 1 10800 3600 604800 3600'
pdnsutil secure-zone example.com
pdnsutil increase-serial example.com
pdns_control notify example.com
這樣做完後,你可以用 pdnsutil show-zone example.com 檢查結果。 (CloudWizard.nl)
範例:修改已有記錄
假設要把 www.example.com 的 A 紀錄從 1.2.3.4 換成 5.5.5.5:
pdnsutil replace-rrset example.com www A 3600 5.5.5.5
pdnsutil increase-serial example.com
pdns_control notify example.com
或若要直接刪除 www 的 A 紀錄:
pdnsutil delete-rrset example.com www A
pdnsutil increase-serial example.com
pdns_control notify example.com
最後別忘了通知 slave 或其他 server 更新:pdns_control notify example.com。
注意事項與建議
-
後端限制
某些後端 (特別是 BIND 後端) 可能不支援修改操作(只能透過 zone transfer)或不支援pdnsutil操作。要確認你使用的後端是否允許這些操作。 (Reddit) -
版本差異
不同 PowerDNS 版本對於 DNSSEC 的預設邏輯、支援的演算法、金鑰長度限制等可能不同。建議查看你系統上man pdnsutil或官方版本對照表。 (Debian Manpages) -
序號 (Serial) 管理
在變更 zone 後,務必更新 SOA 的 serial(可用increase-serial或手動編輯 SOA)並通知 slave。否則 slave 可能不會接收到變更。 -
測試 / 錯誤檢查
使用check-zone/check-all-zones來檢查語法或邏輯錯誤,以免上線後 DNS 無法解析。 (cPanel Support) -
備份與金鑰匯出
在做 DNSSEC 金鑰 rollover 或改動前,建議匯出金鑰備份(export-zone-key)及對 DS 記錄操作要小心,避免中斷解析鏈。
🧩 一、PowerDNS 查詢流程(簡化版)
當你執行:
dig app-wekan.momoshop.com.tw
時,PDNS 的查詢處理順序如下:
-
找 zone(domains 表)
-
從
domains.name開始,找最匹配的 zone(例如momoshop.com.tw)。
-
-
在 records 表中找符合的 name
-
順序為:
-
精確比對
name='app-wekan.momoshop.com.tw' -
如果找不到,則依序比對:
-
*.momoshop.com.tw -
*.com.tw -
*.tw
-
-
-
每一層可能都會回傳多筆記錄。
-
-
根據 type 過濾
-
只會選出符合查詢類型(例如 A)或可解譯的 LUA record。
-
-
若有 LUA 記錄,執行 Lua 腳本
-
若多筆 LUA record,PDNS 會依「資料庫記錄順序(id 由小到大)」逐筆執行;
-
直到第一筆成功產生合法的回應為止。
-
-
若多筆普通記錄(A, CNAME)
-
會全部回傳;
-
若 TTL 不同,取最小 TTL 為最終 TTL。
-
-
若無任何匹配
-
回覆
NXDOMAIN或SERVFAIL(視 zone 與設定而定)。
-
🧠 二、LUA Record 的詳細執行順序
當 PDNS 找到多筆 type='LUA' 的記錄時:
| 順序 | 行為 |
|---|---|
| 1️⃣ | 按照 id 由小到大排序 |
| 2️⃣ | 依序執行每筆 LUA 程式 |
| 3️⃣ | 第一個「有成功回傳記錄」的 LUA 結果會被採用 |
| 4️⃣ | 若 LUA 執行失敗(語法錯誤或回傳空值) → 嘗試下一筆 |
| 5️⃣ | 全部失敗 → 回 SERVFAIL |
✅ 範例:
假設你有:
id | name               | type | content
---+--------------------+------+------------------------------------------
 1 | *.momoshop.com.tw  | LUA  | return getdns("10.2.1.11", qname, qtype)
 2 | *.momoshop.com.tw  | LUA  | return getdns("8.8.8.8", qname, qtype)
查詢 app.momoshop.com.tw 時:
-
PDNS 會先執行第 1 筆(id=1),
如果 10.2.1.11 無法回應或錯誤 → 自動執行第 2 筆(id=2)。 -
若第 1 筆成功,第二筆不會被執行。
👉 因此你可以用多筆 LUA record 來實作「多層 fallback」。
⚙️ 三、普通記錄(非 LUA)的多筆處理邏輯
若同一個 name 有多筆非 LUA 記錄(例如多個 A 記錄):
| 記錄 | TTL | IP |
|---|---|---|
| app.momoshop.com.tw | 60 | 10.2.1.11 |
| app.momoshop.com.tw | 120 | 10.2.1.12 |
PDNS 會:
-
同時回傳兩筆;
-
最終 TTL = min(60, 120) = 60。
回覆結果:
app.momoshop.com.tw. 60 IN A 10.2.1.11
app.momoshop.com.tw. 60 IN A 10.2.1.12
🔍 四、查詢過程中,實際的比對順序(Wildcard / LUA 混合時)
PowerDNS 在有通配符與 LUA 混用的情況下,查詢順序如下:
| 優先順序 | 比對型態 | 是否執行 LUA |
|---|---|---|
| 1️⃣ | 精確比對(如 app.momoshop.com.tw) |
是(若 type=LUA) |
| 2️⃣ | wildcard 比對(如 *.momoshop.com.tw) |
是(若 type=LUA) |
| 3️⃣ | 更高層 wildcard(如 *.com.tw) |
是(若 type=LUA) |
| 4️⃣ | zone SOA / NS | 否 |
| 5️⃣ | 沒有符合 → NXDOMAIN 或 SERVFAIL |
🧩 五、如何查看 PowerDNS 真實回應順序
你可以用:
pdnsutil list-zone momoshop.com.tw
觀察記錄順序。
PowerDNS 的執行順序就是按照這個清單的排列(id遞增)。
若你要控制順序,可以直接修改 id 或刪除後重新新增。
🧪 六、測試方式建議
建立多筆 LUA fallback:
INSERT INTO records (domain_id, name, type, content, ttl)
VALUES
  (3, '*.momoshop.com.tw', 'LUA', 'return getdns("10.2.1.11", qname, qtype)', 60),
  (3, '*.momoshop.com.tw', 'LUA', 'return getdns("8.8.8.8", qname, qtype)', 60);
測試:
journalctl -u pdns -f &
dig @127.0.0.1 -p 5501 app.momoshop.com.tw
你會看到:
Executing LUA record id=1: getdns(10.2.1.11)
Failed: timeout
Executing LUA record id=2: getdns(8.8.8.8)
Success → returning result
🔚 結論摘要
| 類型 | 行為 | 回應方式 |
|---|---|---|
| 多筆 A 記錄 | 全部回傳 | TTL 取最小 |
| 多筆 LUA 記錄 | 依 ID 順序執行 | 第一筆成功即返回 |
| 通配符 vs 精確匹配 | 精確優先於通配符 | |
| LUA 與非 LUA 混用 | LUA 先執行 | 若 LUA 無結果再回傳靜態記錄 |
是否要我幫你畫一張「PowerDNS 回應決策順序」的流程圖(含 fallback 流程)?
會清楚標出「多筆 LUA record 執行順序 → fallback 判斷 → 最終回應」。
【PowerDNS】Lua Records
這是一份 PowerDNS 官方文件的完整中文翻譯。
它說明了 LUA Record(Lua 動態記錄) 的用途、語法、應用範例、進階用法與安全注意事項。
我保留了原文段落結構與技術名詞,方便你比對。
🧩 PowerDNS — Lua Records 中文說明文件
一、概述
為了提供動態行為(例如全球負載平衡 Global Server Load Balancing),
PowerDNS Authoritative Server 自 4.2 版起 支援 動態 DNS 記錄(LUA Records)。
這些記錄中包含了小段設定程式(Lua 程式碼),
可根據「查詢者 IP」、「EDNS Client Subnet」、「伺服器可用性」等因素,
動態決定要回應哪個 IP 或 CNAME。
功能範圍從簡單到複雜,
可實現多池(multi-pool)地理與權重負載平衡(Geo & Weighted Load Balancing)。
雖然使用者不必了解內部原理,
但 PowerDNS 的動態記錄本質上是 嵌入在 DNS 內的小型 Lua 腳本。
💡 注意:
這是 PowerDNS 專屬功能,目前尚未成為 IETF 或其他標準機構的標準。
PowerDNS 官方承諾會致力於互通性,並希望最終能成為被廣泛支持的標準。
要啟用此功能,可在設定檔中加入:
enable-lua-records=yes
或對單一 zone 設定 metadata:
ENABLE-LUA-RECORDS=1
若要使用地理位置功能,請確認 launch 設定中包含:
launch=gpgsql,geoip
⚠️ 警告:
使用 AXFR 傳輸包含長 Lua 記錄的 zone 時,請確保每筆記錄內容(TXT 型態傳輸)
不超過 255 bytes。超過時會被分割成多段,導致次伺服器解析錯誤。
二、範例說明
1️⃣ ifportup()
www IN LUA A "ifportup(443, {'192.0.2.1', '192.0.2.2'})"
這會讓 www 這個名稱隨機回應 192.0.2.1 或 192.0.2.2,
前提是這些 IP 的 TCP 443 port 是開放的。
若其中一個 IP 不再回應 443,則僅回傳另一個。
若全部都不通,則全部地址會被回傳。
多組 IP 可分優先層級,例如:
www IN LUA A "ifportup(443, {{'192.0.2.1', '192.0.2.2'}, {'192.0.3.1'}})"
這表示:
-
若第一組中的任一 IP 可用 → 回第一組;
-
否則 → 試第二組。
因為 DNS 查詢要求極快回應,PowerDNS 不會即時檢查連線狀態,
而是由背景程序定期檢測這些 IP 是否可用。
2️⃣ pickclosest()
www IN LUA A "pickclosest({'192.0.2.1','192.0.2.2','198.51.100.1'})"
這會根據查詢者的地理位置(GeoIP),
選擇最靠近使用者的 IP 回覆。
也可以與 ifportup() 結合:
www IN LUA A ("ifportup(443, {'192.0.2.1', '192.0.2.2', '198.51.100.1'}, {selector='pickclosest'})")
這會在可用的 IP 中挑出距離使用者最近的一個。
3️⃣ 複雜 Lua 程式碼範例
www IN LUA A ";if country('US') then return {'192.0.2.1','192.0.2.2','198.51.100.1'} else return '192.0.2.2' end"
可同時回傳單一字串或多筆字串(array)。
4️⃣ 使用 qname 的例子
*.example.net 10 IN LUA TXT "; return 'Got a TXT query for ' .. qname:toString() .. '; First label is: ' .. qname:getRawLabels()[1]"
注意:
qtype無法從 Lua 內直接取得(它是固定的)。
可使用預設變數(Preset Variables)取得其他查詢相關資訊。
三、在 SQL 後端使用 Lua Records
LUA Records 可與一般的 gmysql / gpgsql 通用 SQL 後端一起使用。
由於內容同時包含單引號與雙引號,
在 INSERT 或 UPDATE 時需特別轉義。
範例如下:
-- 建立 zone
INSERT INTO domains (id, name, type) VALUES (1, 'example.com', 'NATIVE');

-- 啟用 Lua 記錄功能
INSERT INTO domainmetadata (domain_id, kind, content)
VALUES (1, 'ENABLE-LUA-RECORDS', 1);

-- 建立 pickclosest() 記錄
INSERT INTO records (domain_id, name, type, content, ttl)
VALUES (
  1,
  'www.example.com',
  'LUA',
  'A "pickclosest({''192.0.2.1'',''192.0.2.2'',''198.51.100.1''})"',
  600
);
這三筆 SQL:
-
建立
example.comzone, -
啟用 Lua Records,
-
新增一筆
www.example.com的動態 A 記錄。
四、LUA Record 格式
💡 名稱由來:
“Lua” 在葡萄牙文中意為「月亮」,不是縮寫。
但 DNS 慣例記錄類型一律大寫,因此用LUA。
一筆 LUA Record 結構如下:
LUA <query_type> <Lua 程式>
例如:
www IN LUA A "pickclosest({'1.1.1.1','8.8.8.8'})"
-
可設定 TTL,PowerDNS 會照常套用;
-
可被 DNSSEC 簽章(需在同一伺服器即時簽署)。
五、更強大的範例
west IN LUA A ("ifurlup('https://www.lua.org/', {{'192.0.2.1', '192.0.2.2'}, {'198.51.100.1'}}, {stringmatch='Programming in Lua'})")
這會:
-
嘗試對
www.lua.org發出 HTTPS; -
若回應內容包含
Programming in Lua,則視為可用; -
第一組 IP 可用 → 回第一組;否則 → 回第二組。
與地理導向結合:
www IN LUA CNAME (";if(continent('EU')) then return 'west.powerdns.org' else return 'usa.powerdns.org' end")
對應的 usa 名稱配置如下:
usa IN LUA A ("ifurlup('https://www.lua.org/', {{'198.51.100.1'}, {'192.0.2.1', '192.0.2.2'}}, {stringmatch='Programming in Lua'})")
歐洲以外的訪客會優先使用 198.51.100.1,
若失效則回到 192.0.2.1 / 192.0.2.2。
六、進階主題
(1) 語法模式
若記錄內容未以 ; 開頭,PDNS 會自動加上 return。
若要撰寫完整 Lua 腳本,請以分號 ; 開頭。
(2) 可引用其他記錄的設定
可用 include() 引用共用設定:
config IN LUA LUA ("settings={stringmatch='Programming in Lua'} EUips={'192.0.2.1','192.0.2.2'} USAips={'198.51.100.1'}")

usa IN LUA A (";include('config') return ifurlup('https://www.lua.org/', {USAips, EUips}, settings)")
west IN LUA A (";include('config') return ifurlup('https://www.lua.org/', {EUips, USAips}, settings)")
七、安全與同步機制
-
LUA Record 是查詢時即時生成;
-
可透過 AXFR 同步至其他 PDNS 伺服器;
-
但無法直接查詢(防止外部洩露負載邏輯)。
⚠️ 警告:
絕對不要從不信任的來源匯入含 LUA Record 的 zone!
惡意 Lua 可能導致伺服器崩潰甚至被接管。即使是可信來源也請使用 TSIG 保護 AXFR 傳輸。
若有 DNSSEC 簽章需求,
LUA Record 必須由主伺服器即時簽署(無法預先簽署 zone)。
八、共享 Lua 狀態模式(shared mode)
預設情況下,PDNS 每次查詢都會建立新的 Lua 執行環境。
這樣每筆 LUA Record 彼此獨立,不會污染變數。
但建立 Lua state 很耗時。
可啟用共用模式:
enable-lua-records=shared
-
每個執行緒建立一個 Lua 狀態並重複使用;
-
約可提升 QPS 10 倍;
-
各執行緒 Lua 環境獨立(UDP 為多實例,TCP 共用一個)。
九、Reference(函式與物件類別)
PowerDNS 提供的 Lua 內建 API 包含:
預設變數(Preset Variables)
-
qname,qtype,remoteip,ednssubnet等
可用函式
-
getdns(),ifportup(),pickclosest(),country(),continent() -
ifurlup(),include(),pdnslog(), 等
物件類別
-
DNSName,ComboAddress,DNSResourceRecord,DNSHeader,QType -
Netmask,ComboAddressSet,DNSRecord, 及輔助函式群組
(這些內容在官方文件的「LUA Reference」章節中詳細列出)
🔚 總結
| 功能 | 說明 |
|---|---|
| LUA Record | PowerDNS 內建的動態 DNS 回覆機制 |
| 語言 | Lua |
| 用途 | 智能選址、健康檢查、地理導向、服務偵測 |
| 啟用方式 | enable-lua-records=yes 或 ENABLE-LUA-RECORDS=1 |
| 安全性 | 僅限信任 zone;建議使用 TSIG |
| 效能優化 | enable-lua-records=shared 可大幅提高 QPS |
是否要我幫你把這篇翻譯版整理成 可直接放進公司內部 Wiki 的 Markdown 版(含語法高亮與範例區塊)?
我可以自動加上標題層級、代碼框、注意區塊與翻譯對照欄位。
【PowerDns】dnsdist
傳遞來源ip
https://www.dnsdist.org/advanced/passing-source-address.html
addLocal("0.0.0.0:53")

-- Recursor 作為唯一後端
-- useClientSubnet=true 傳送ECS 來源端資訊
newServer({ name="rec", address="127.0.0.1:5301", pool="recursor", useClientSubnet=true })

--設定ipv4顯示的位數
setECSSourcePrefixV4(32)
setECSSourcePrefixV6(128)

-- 不加任何分流規則,全部都送 recursor
addAction(AllRule(), PoolAction("recursor"))