Jenkins
- 【Jenkins】相關連結
- 【Jenkins】常用plug-in
- 【Jenkins】Jenkinsfile
- 【GitLab】push 觸發pipline
- 【Jenkins】docker-compose
- 【Jenkins】如何執行排程作業
- 【Jenkins】執行git專案上的pipline
- 【Jenkins】 on macOS 速查表
【Jenkins】相關連結
Jenkins入门 pipeline (官方文檔)
https://www.jenkins.io/zh/doc/book/pipeline/syntax/
https://www.jenkins.io/doc/book/pipeline/
【udemy】持續集成(Continuous Integration with Jenkins)---從初學到精通
Jenkins.pdf
【Docker Hub】Jenkins 官說明
Jenkins - Official Image | Docker Hub
Jenkins+Github觸發器
Jenkins : GitHub Plugin (jenkins-ci.org)
PMD Jenkins plugin:
https://wiki.jenkins-ci.org/display/JENKINS/PMD+Plugin
Findbugs Jenkins Plugin:
https://wiki.jenkins-ci.org/display/JENKINS/FindBugs+Plugin
Postman+Newman+Git+Jenkins介面自動化測試 | IT人 (iter01.com)
Jenkins pipeline
[Day 27] Jenkins (1) - iT 邦幫忙::一起幫忙解決難題,拯救 IT 人的一天 (ithome.com.tw)
在 Jenkins 容器中執行 docker 指令
Jenkins 容器中執行 docker 指令:叡揚部落格 (gss.com.tw)
docker run -d --name test-jenkins \
--user root -p 8080:8080 \
-p 50000:50000 \
-v /var/run/docker.sock:/var/run/docker.sock \
jenkins/jenkins
docker exec -it --user root test-jenkins /bin/bashapt-get update && apt-get -y install apt-transport-https ca-certificates \
curl gnupg2 software-properties-common && \
curl -fsSL https://download.docker.com/linux/$(. /etc/os-release; echo "$ID")/gpg > /tmp/dkey; \
apt-key add /tmp/dkey && \
add-apt-repository "deb [arch=amd64] https://download.docker.com/linux/$(. /etc/os-release; echo "$ID") $(lsb_release -cs) stable" && \
apt-get update && apt-get -y install docker-ce【Jenkins】常用plug-in


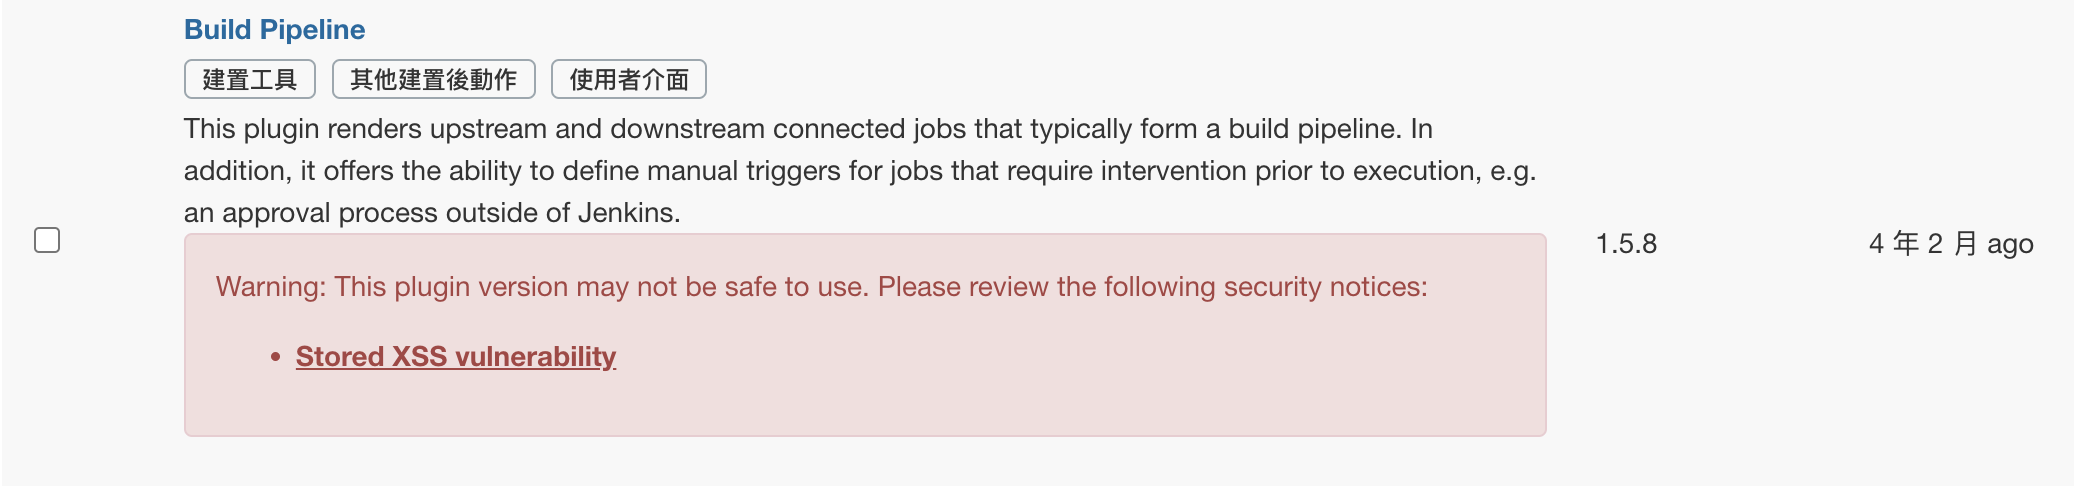

權限控管
https://plugins.jenkins.io/matrix-auth/
【Jenkins】Jenkinsfile
pipeline {
    agent any
    stages{
        stage('Init'){
            steps {
                echo "Testing......"
            }
        }
 	stage('Build'){
            steps {
                echo "Building......"
            }
        }
 	stage('Deploy'){
            steps {
                echo "Code Deployed."
            }
        }
    }
}
pipeline {
agent any
tools{
maven 'local maven'
}
parameters{
string(name: 'tomcat_dev', defaultValue: '1.1.1.1', description: 'Staging Server')
string(name: 'tomcat_prod', defaultValue: '2.2.2.2', description: 'Production Server')
}
triggers {
pollSCM('* * * * *')
}
stages{
stage('Build'){
steps {
sh 'mvn clean package'
}
post {
success {
echo '开始存档...'
archiveArtifacts artifacts: '**/target/*.war'
}
}
}
stage ('Deployments'){
parallel{
stage ('Deploy to Staging'){
steps {
sh "scp -i /Users/gaoyan/Documents/SunnyDemo/dev/tomcat-demo.pem.txt **/target/*.war ec2-user@${params.tomcat_dev}:/var/lib/tomcat8/webapps"
}
}
stage ("Deploy to Production"){
steps {
sh "scp -i /Users/gaoyan/Documents/SunnyDemo/dev/tomcat-demo.pem.txt **/target/*.war ec2-user@${params.tomcat_prod}:/var/lib/tomcat8/webapps"
}
}
}
}
}
}- [Day 25] Pipeline 專案 (上) - iT 邦幫忙::一起幫忙解決難題,拯救 IT 人的一天 (ithome.com.tw)
- [Day 26] Pipeline 專案 (中) - iT 邦幫忙::一起幫忙解決難題,拯救 IT 人的一天 (ithome.com.tw)
- [Day 27] Pipeline 專案 (下) - iT 邦幫忙::一起幫忙解決難題,拯救 IT 人的一天 (ithome.com.tw)
問題1:**\target\*.war: No such file or directory
解決辦法:
Jenkins無法根據正則匹配找到war文件,我們需要在Jenkinsfile中指定到war文件的完整路徑,例如/var/jenkins_home/workspace/package_pipelpine/webapp/target/*.war(更改成你機器上的實際路徑)。而不是**\target\*.war
如果出現面下錯誤提示:
[Deploy to Production] Host key verification failed.
[Deploy to Production] lost connection
解決思路如下:
請改用如下命令
1.
scp -o StrictHostKeyChecking=no -i /Users/gaoyan/Documents/SunnyDemo/dev/tomcat-demo.pem.txt webapp/target/webapp.war ec2-user@52.15.183.253:/var/lib/tomcat8/webapps
加了-o StrictHostKeyChecking=no參數, 這樣主機密鑰就會在連接時自動加入到known_hosts中去
2.
命令行也用加了-o參數的命令手動登錄試試
ssh -o StrictHostKeyChecking=no ec2-user@13.58.179.83 -i tomcat-demo.pem.txt
這樣主機密鑰就會在連接時自動加入到known_hosts中去
3.保證用jenkins執行的時候 tomcat-demo.pem.txt這個文件其他用戶對他有操作權,但是注意執行上面第二個命令時,會提示其他人不能對這個文件有訪問權,所以用sudo chmod 700 tomcat-demo.pem.txt, 執行完這個命令以後,再把權限改成 644, sudo chmod 644 tomcat-demo.pem.txt, 然後去jenkins執行第一條命令
4.還不成功刪除known_hosts試試, cd~/.ssh
rm known_hosts
如果出現:
Permissions 0644 for 'jenkinskey.pem' are too open.
It is required that your private key files are NOT accessible by others.
This private key will be ignored.
Load key "jenkinskey.pem": bad permissions
解決辦法:
chmod 400 pem_filename.pem
【GitLab】push 觸發pipline
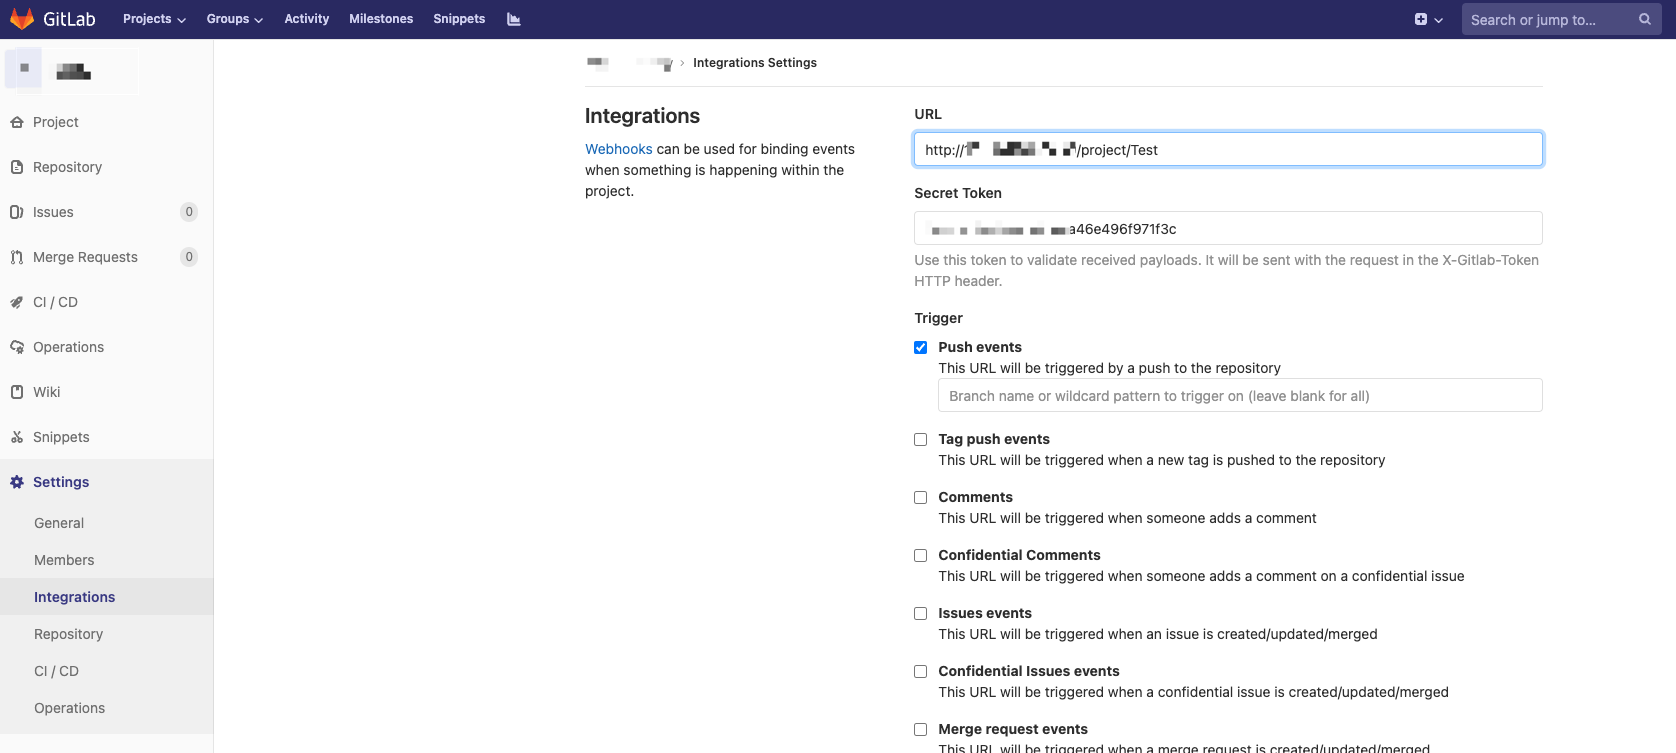
Gitlab 專案的 settings ->integrations
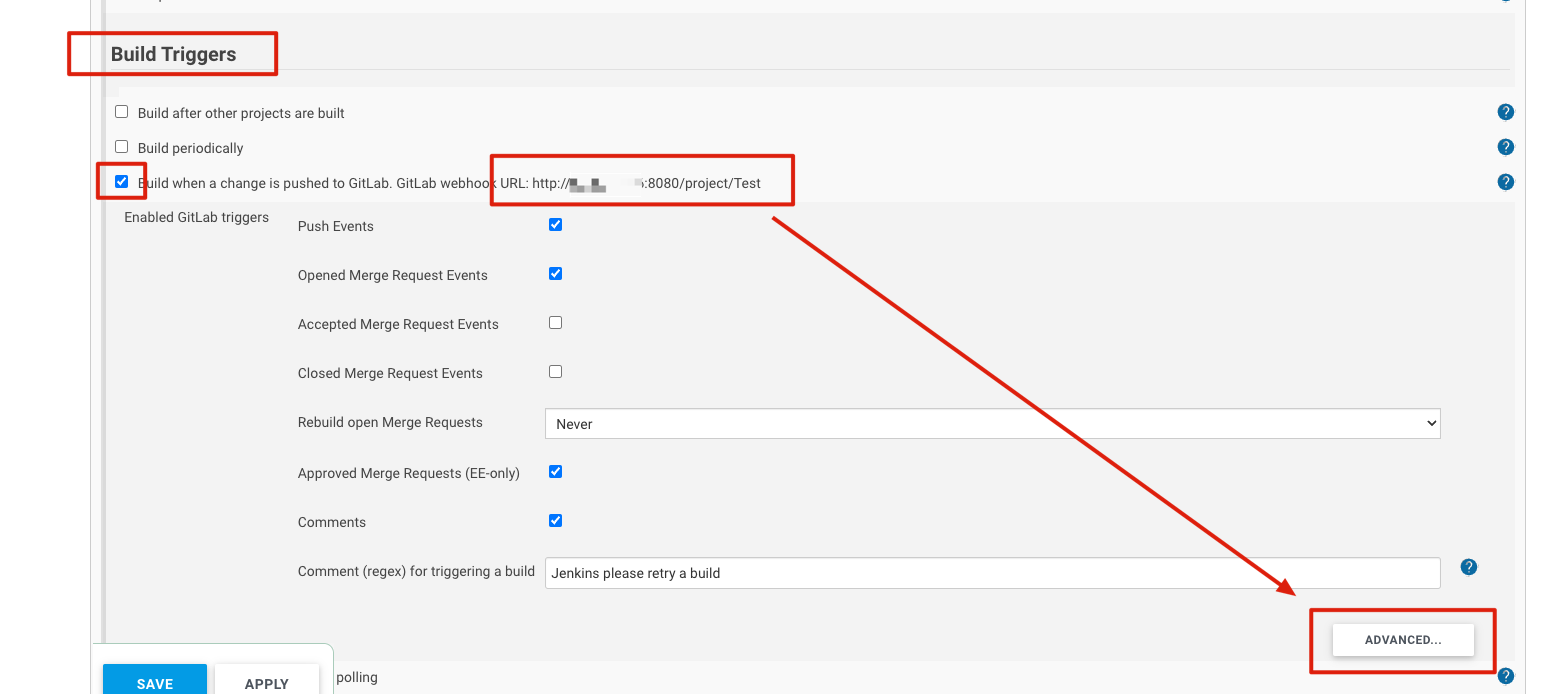
設定 【url】【tocken】(見下方jenkins 設定)
點選下方【 Test】【Push events】測試
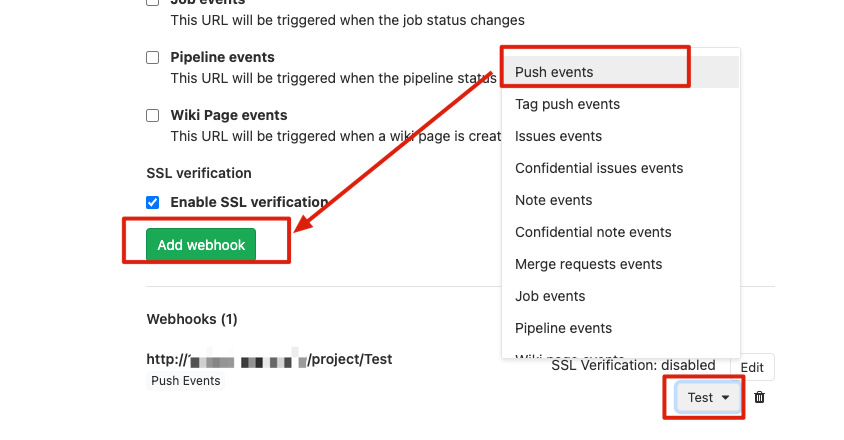
成功上方會出現藍色200字樣

Jenkins (Url, token)

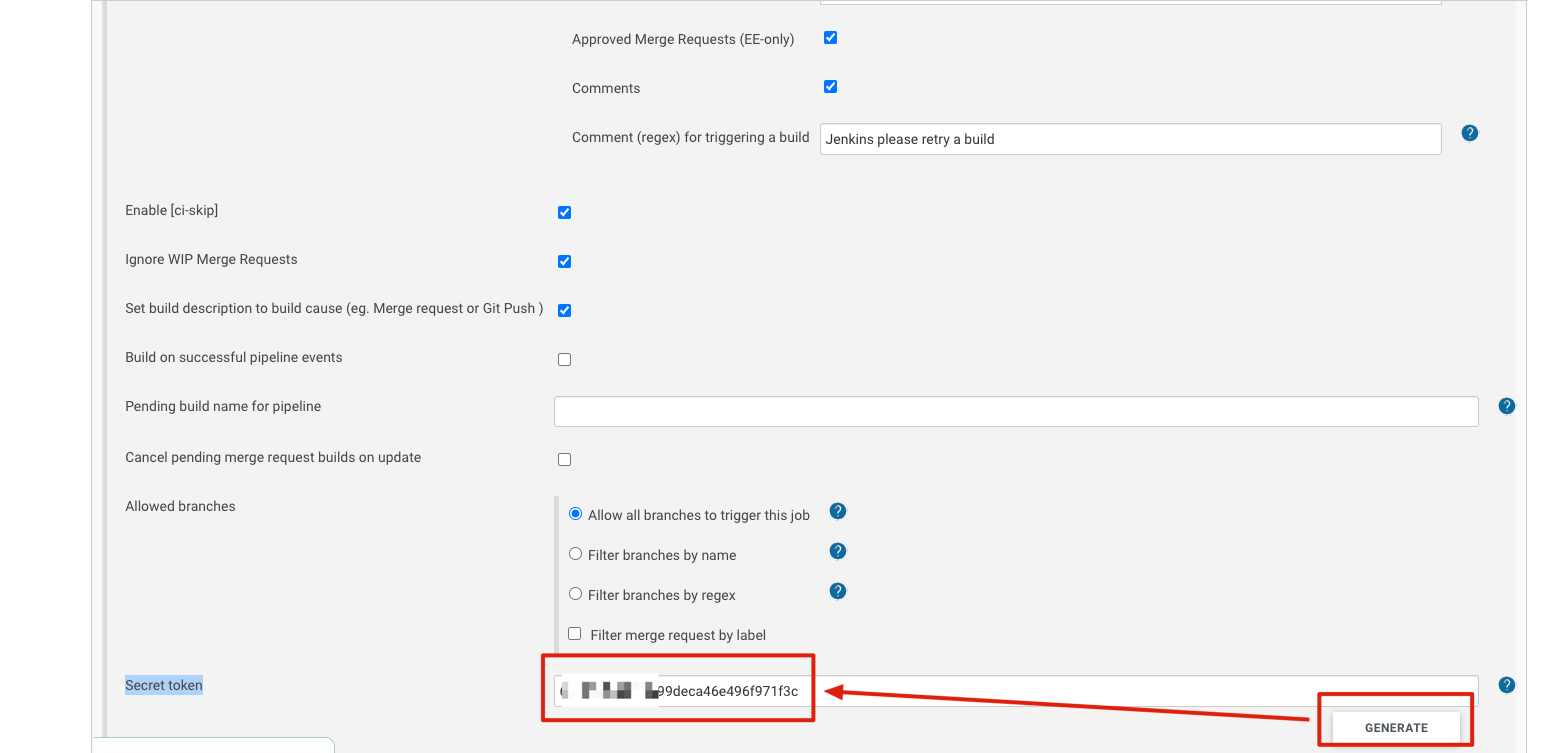
【Jenkins】docker-compose
version: '3.1'

services:

  jenkins:
    deploy:
      resources:
        limits:
          cpus: '0.50'
          # memory: 500M
    image: jenkins/jenkins:2.462.3-lts-jdk11
    # image: jenkins/jenkins:lts-jdk11
    # restart: always
    container_name: com_jenkins
    environment:
      - TZ=Asia/Taipei #設定時區
    volumes:
      - ./data/jenkins:/var/jenkins_home
      # - /var/run/docker.sock:/var/run/docker.sock
    ports:
      - 8096:8080
      - 8097:50000
    networks:
      - jenkins
networks:
  jenkins:

# /var/jenkins_home/secrets/initialAdminPassword
【Jenkins】如何執行排程作業
-
Jenkins 作業可以手動執行,可以由某個Web 鉤子觸發,也可以定時運行;
-
定時執行Jenkins 作業,是經由「宣告式指令產生器」 中的「triggers: Triggers」 指令,「cron: Build periodically」完成的;
-
這裡的
cron與*nix 中cron有略微差異,包括了H及@midnight等語法,其中H指hash,可避免在某個時刻過多的作業(作業競爭),@midnight這樣的寫法也可以避免作業競爭; -
TZ=TZ=Asia/Taipei這種寫法可以給Jenkinscron加入時區; -
將聲明式指令產生器產生的程式碼片段:
pipeline {
    agent any
	environment {
        TZ = "Asia/Taipei"
    }
    triggers {
        cron '* * * * *'
    }
    stages {
      stage('demo') {
        steps {
        // do....
        }
      }
    }
}
【Jenkins】執行git專案上的pipline
參考:https://ithelp.ithome.com.tw/m/articles/10287403
- Definition:
Pipeline script from SCM - SCM:
Git - Repository URL:
https://github.com/ben4932042/jenkins-ithome.git - Branch Specifier (blank for 'any'):
main - Script Path:
jobs/ithome-day3-sample-job/Jenkinsfile=> pipline 檔案
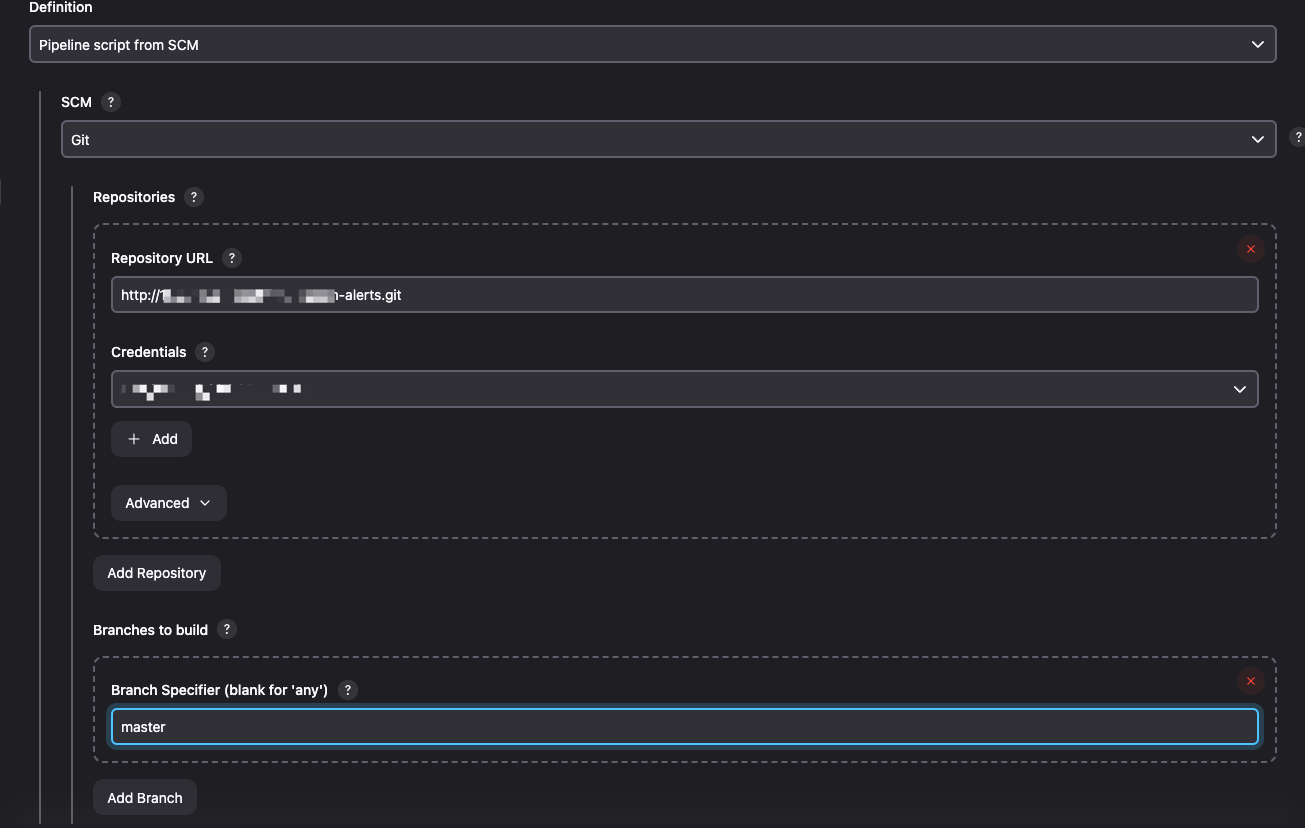
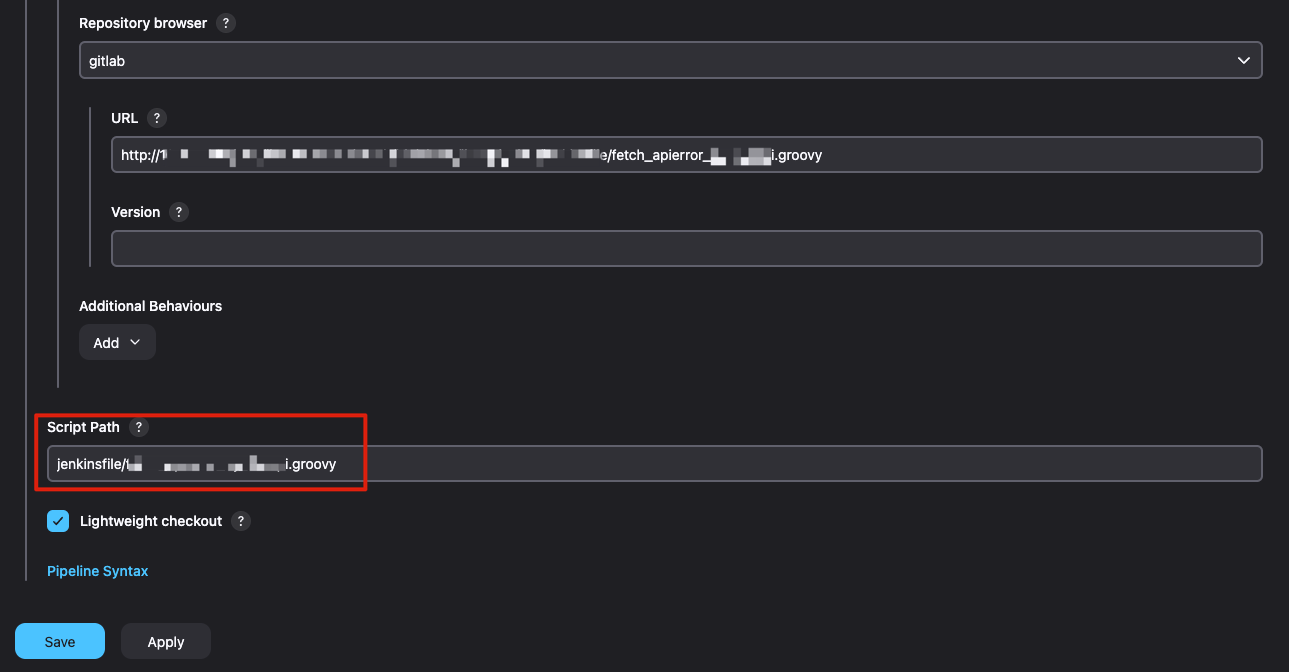
【Jenkins】 on macOS 速查表
1. 安裝流程
# 更新 Homebrew 自身與套件清單
brew update

# (可選)升級已安裝的套件
brew upgrade

# 安裝 Jenkins LTS(穩定版)
brew install jenkins-lts
2. 啟動 / 停止 / 重啟 Jenkins
# 啟動 Jenkins 服務(開機自動啟動)
brew services start jenkins-lts

# 停止 Jenkins 服務
brew services stop jenkins-lts

# 重啟 Jenkins 服務
brew services restart jenkins-lts

# 手動啟動(非守護行程模式,終端機關掉就結束)
jenkins-lts
3. Jenkins 預設資訊
-
預設 Port:
8080
👉 瀏覽器打開 http://localhost:8080 -
初始管理員密碼(第一次登入需要):
cat ~/.jenkins/secrets/initialAdminPassword
4. 常見檢查
# 檢查 Jenkins 是否有在跑
curl http://localhost:8080

# 查看 Jenkins log
tail -f /usr/local/var/log/jenkins.log
5. 升級 Jenkins
# 更新 Homebrew 清單
brew update

# 升級 Jenkins
brew upgrade jenkins-lts

# 重啟服務讓新版生效
brew services restart jenkins-lts
6. 移除 Jenkins
brew services stop jenkins-lts
brew uninstall jenkins-lts
📌 建議:
-
第一次安裝後,記得把初始密碼存起來,避免找不到。
-
長期使用:定期跑
brew update && brew upgrade,保持 Jenkins 最新。
要不要我再幫你整理一份 對照表格(指令 → 功能),方便你 copy 貼到筆記?