Nginx
- 【錯誤處理】【Nginx】client intended to send too large body
- 【Lua】【型別】 字串- 數字
- 【Lua】【型別】 函數function
- 【Lua】【型別】 nil - 布林
- 【Lua】【流程控制】for
- 【Lua】【流程控制】if
- 【Lua】【流程控制】while
- 【Lua】【優化】請求返回後繼續執行
- 【Lua】安裝 luarocks
- 【Lua】註解
- 【Lua】load
- 【Lua】ngx_lua_module
- 【Lua】Nginx 變量
- 【Lua】ngx.say 與 ngx.print 差異
- 【Lua】SSL相關指令執行順序
- 【Lua】table
- 【Lua】vscode 外掛
- 【Nginx】config 詳解
- 【Nginx】location 匹配規則
- 【OpenResty】相關資源
- 【Openresty】Lua 的變數範圍
- 【Openresty】Nginx Lua的 執行階段
- Nginx 反向代理
- TWCA 憑證放入 Nginx
- 【Lua】錯誤處理
- 【 Lua】動態參數
- 【Lua】使用map 做全域變數
- 【Lua】Learn Lua in 15 Minutes
【錯誤處理】【Nginx】client intended to send too large body
查了一下資料發現造成的原因為 web server 接收 request body 的大小設定
- apache:
LimitRequestBody預設為 0(unlimit) - nginx:
client_max_body_size預設為 1m
根據以下步驟更改一下 nginx 設定,就沒問題了
http {
    ...

    # set request body size unlimit
    client_max_body_size 0;
    ...
}
nginx -s reload【Lua】【型別】 字串- 數字
- nil
- boolean
- number
- string
- function
- userdata
- thread
- table
Number( 數字)
字串轉數字
tonumber("1.0")數字轉字串
tostring(1.0)自動轉型
-- Lua會自動轉型,如果一個字串與數字相加,會嘗試將字串轉換為數字
"1.0" + 2 -- => 3.0

-- 如果一個數字和字串使用串接,會嘗試將數字轉換成字串:
"1.0"..2 -- => 1.02
-- 數字轉字串
1.0 .. ""
-- 字串轉數字
1.0 + 0 string (字串)
使用單引號或雙引號包起來:
-- 單行
s1 = 'string'
s2 = "string"

-- 多行
s3 = [[
multiple
string
]]
字串長度
-- #
print(#"abc") -- => 3

-- string.len()
rint(string.len("abc")) -- => 3

-- 文字會有些不同
-- note: with UTF-8
print(string.len("我")) -- equal print(#"我") => 3

local utf8 = require "utf8"
print(utf8.len("你好,世界!")) -- => 6
文字串接
-- 使用兩個點 .
print("Hello, " .. "World")  -- Hello, World

-- 多文字串接建議使用table.concat

local strs = {"Hello"," ","World"}
print(table.concat(strs,""))  -- Hello, World
-- format
local string = require "string"
print(string.format("%s !! %s","Hello","World")) -- > Hello !! World
file的資料型態--userdata
do
  local f <close> = io.open("text.txt",'w')
  print(type(f)) -- Output: userdata
end
【Lua】【型別】 函數function
函數宣告
函數可以使用function來做宣告,並以end結束
function hello()
  print("Hello, World")
end

-- 等同以下
hello = function()
  print("Hello, World")
end
function genFun()
return function()
print("Hello, World")
end
end
function callFun(f)
f()
end
local _f = genFun() -- # get a function
callFun(_f) -- print("Hello, World")函數傳遞
function plus(a, b)
    print(a,b, a + b)
    return a+b ,a ,b
end

local anser, A, B = plus(1,2)
print(A.."+"..B.."="..anser)

-- 1	2	3
-- 1+2=3
回傳值規則
若返回值個數大於接收變量的個數,多餘的返回值會被忽略掉; 若返回值個數小 於參數個數,從左向右,沒有被返回值初始化的變量會被初始化為 nil。
function init() --init 函数 返回两个值 1 和 "lua"
return 1, "lua"
end
x = init()
print(x)
x, y, z = init()
print(x, y, z)

--output
1
1 lua nil当一个函数有一个以上返回值,且函数调用不是一个列表表达式的最后一个元素,那么函数 调用只会产生一个返回值, 也就是第一个返回值。
local function init() -- init 函数 返回两个值 1 和 "lua"
return 1, "lua"
end
local x, y, z = init(), 2 -- init 函数的位置不在最后,此时只返回 1
print(x, y, z) -->output 1 2 nil
local a, b, c = 2, init() -- init 函数的位置在最后,此时返回 1 和 "lua"
print(a, b, c) -->output 2 1
local function init() -- init 函数 返回两个值 1 和 "lua"
return 1, "lua"
end
local x, y, z = init(), 2 -- init 函数的位置不在最后,此时只返回 1
print(x, y, z) -->output 1 2 nil
local a, b, c = 2, init() -- init 函数的位置在最后,此时返回 1 和 "lua"
print(a, b, c) -->output 2 1 不定長參數
function hello(...)
  local members = {...}
  print("有多少成員: ", #members)
  for _,m in pairs(members) do
    print("Hello, "..m)
  end
end

-- hello("Bob", "Lua", "Luna", "Selene")
-- 有多少成員: 	4
-- Hello, Bob
-- Hello, Lua
-- Hello, Luna
-- Hello, Selene
function mylog(...)
	local arr = {...}
	table.insert(arr,1,"\n=====[mylog_begin]=====")
	table.insert(arr,"=====[mylog_end]=====\n")
	local print_str = table.concat(arr,"\n")
	-- for key,value in pairs(arr) do
	-- 	-- ngx.say(key..":"..value)
	-- 	ngx.say(value)
	-- end
	ngx.log(ngx.ERR,print_str)
end


mylog("開始",1,2,3,"結束")
-- =====[mylog_begin]=====
-- 開始
-- 1
-- 2
-- 3
-- 結束
-- =====[mylog_end]=====
立即呼叫函式表達式(IIFE) 與 匿名函式
(function ()
  print("Hello, World")
end)()
多值返回
function get(dict, key, default)
  return (dict[key] or default), dict[key] ~= nil
end

_d = {}
_v, found = get(_d, "key", "value")
print(_v) -- => Output: value
print(found) -- => Output: false
function Person(args)
local person = args
person.name = args.name or "Bob"
person.age = args.age or 20
person.address = args.address or ""
return person
end
p1 = Person {
"位置參數1",
age = 13,
address = "secret",
"位置參數2",
}
print("Name: ", p1.name)
print("Age: ", p1.age)
print("Address: ", p1.address)
print("-------------")
print("位置參數:", p1[1], p1[2])Name: Bob
Age: 13
Address: secret
位置參數: 位置參數1 位置參數2常用的內建函數
基本
- ipairs
- pairs
- require
- tonumber
- tostring
- type
輸入/輸出
估計本系列不怎麼會提到,先放這XD。
- io.close
- io.input
- io.lines
- io.open
- io.output
- io.popen
- io.read
- io.stderr
- io.stdin
- io.stdout
- io.tmpfile
- io.type
- io.write
- file:close
- file:flush
- file:lines
- file:read
- file:seek
- file:write
數學
- math.abs
- math.ceil
- math.exp
- math.floor
- math.huge (無限大)
- math.log
- math.max
- math.maxinteger
- math.min
- math.mininteger
- math.pi (PI 常數)
- math.random
- math.randomseed
- math.tointeger
- math.type
作業系統
- os.clock
- os.date
- os.difftime
- os.execute
- os.exit
- os.getenv
- os.time
Lua 5.1前一個和
os.getenv很像的函數setfenv其實也蠻常用的,後來被移除,改用其他方式。
當前還有很多是使用Lua 5.1,這雖然是需要知道的事情,不過其實其與作業系統無關。
字串
- string.byte
- string.char
- string.find
- string.format
- string.len
- string.reverse
- string.sub
- utf8.char
- utf8.codes
- utf8.len
【Lua】【型別】 nil - 布林
nil
nil是Lua裡的一個特殊值,代表什麼也沒有。其型別也是nil
type(nil) -- => nil布林
布林值只有true和false
只要不是nil或是false都為真, 包含0、空表、空字串 。
if 0 then
  print("0 is true")
end

if {} then
  print("{} is true")
end

if "" then
  print [["" is true]]
end
~= 不等於
weeks = {"週一","週二","週三","週四","週五","週六","週日", "Opps"}

if #weeks ~= 7 then
  error("Weeks length must is 7.")
end
【Lua】【流程控制】for
-- for i = {起始值}, {結束值}, {step] do
for i = 1, 10, 2 do
  print(i)
end


-- 1
-- 3
-- 5
-- 7
-- 9
迭代
array = {"one", "two", "three"}

for i, v in ipairs(array) do
  print(i, v)
end

-- 1	one
-- 2	two
-- 3	three
array = {"one", "two", "three"}

for i in ipairs(array) do
  print(i, array[i])
end

-- 1	one
-- 2	two
-- 3	three
tb = {
["key1"] = "one",
["key2"] = "two",
["key3"] = "three",
}
for k, v in pairs(tb) do
print(k, v)
end
-- key3 three
-- key1 one
-- key2 two【Lua】【流程控制】if
if true then
  print("if block")
elseif true then
  print("elseif block")
else
  print("else")
end
if not true then
print("not true")
else
print("else")
endelseif 中間沒有空白要注意
if true then
  print("if block")
else if true then
  print("elseif block")
else
  print("else")
end
end

-- 其實等於

if true then
    print("if block")
else
    if true then
        print("elseif block")
    else
        print("else")
    end
end
【Lua】【流程控制】while
destination = 5  -- 終點位置
current_pos = 0  -- 目前位置

print([[馬拉松賽跑
============]])

print("終點位於:"..destination)
print("目前在:"..current_pos)

while current_pos < destination do
  current_pos = current_pos + 1
  print("往前跑1㎞,目前位於"..current_pos)
end

print("抵達終點,目前位於"..current_pos)
馬拉松賽跑
============
終點位於:5
目前在:0
往前跑1㎞,目前位於1
往前跑1㎞,目前位於2
往前跑1㎞,目前位於3
往前跑1㎞,目前位於4
往前跑1㎞,目前位於5
抵達終點,目前位於5
【Lua】【優化】請求返回後繼續執行
ngx.eof 關閉連線,data 返還user,後續代碼繼續進行
local response, user_stat = logic_func.get_response(request)
ngx.say(response)
ngx.eof()
if user_stat then
local ret = db_redis.update_user_data(user_stat)
end
【Lua】安裝 luarocks
https://github.com/luarocks/luarocks/wiki/Download
https://github.com/luarocks/luarocks/wiki/Installation-instructions-for-Unix
apt-get update
apt install build-essential libreadline-dev unzip wget zlib1g-dev -y

#安裝 luarocks
wget https://luarocks.org/releases/luarocks-3.8.0.tar.gz && tar zxpf luarocks-3.8.0.tar.gz && cd luarocks-3.8.0
./configure
make && make install

#安裝 lua-resty-http
luarocks install lua-resty-http
#安裝 lua-ffi-zlib
luarocks install lua-ffi-zlib
install lua-zlib
cd /usr/local
wget https://github.com/brimworks/lua-zlib/archive/master.zip
unzip lua-zlib-master.zip
cd /usr/local/lua-zlib-master
cmake -DLUA_INCLUDE_DIR=/usr/local/openresty/luajit/include/luajit-2.1 -DLUA_LIBRARIES=/usr/local/openresty/luajit/lib -DUSE_LUAJIT=ON -DUSE_LUA=OFFmake
cp zlib.so /usr/local/openresty/lualib/zlib.so【Lua】註解
單行註解
-- 這是註解多行註解
-- 使用 --[[ 內文 ]]-- 包起來

--[[
 function log_header_body()
        -- 取出列表編號
        local t = cjson.decode(ngx.req.get_body_data())
        local body =  cjson.encode(t)
        ngx.log(ngx.ERR, body)
        local headers = cjson.encode(ngx.req.get_headers())
        ngx.log(ngx.ERR, headers)

end
]]--
特數多行註解
可在--[ ${這中間插入任意數量=}[ ..... ] ${這中間插入任意數量=}]--
--[===[
Some Comments
==============
特別插入--]]  但實際註釋還未結束
--]===] print("這段不是註釋") -- end comment
【Lua】load
與 javascipt eval 相同-動態產生並執行程式碼
-- load不回直接執行,其實其返回一個包裝函式:

f = load[[g2 = 2]]
print(type(f)) -- => function

print(g2) -- => Output: nil
f()
print(g2) -- => Output: 2
【Lua】ngx_lua_module
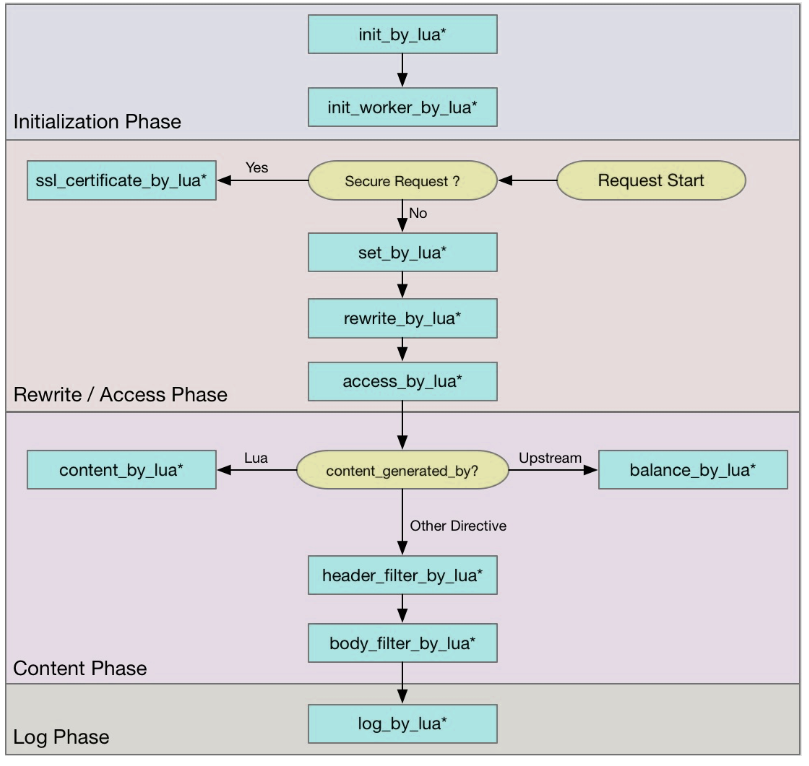
| 指令 | 說明 |
| set_by_lua* | 流程分支處理判斷變量初始化 |
| rewrite_by_lua* | 轉發、重定向、緩存等功能 |
| access_by_lua* | IP 准入、身份驗證、接口權限、解密 |
| content_by_lua* | 內容生成 |
| header_filter_by_lua* | 響應頭部過濾處理,可以添加響應頭 |
| body_filter_by_lua* | 響應體過濾處理,例如轉換響應體 |
| log_by_lua* | 異步完成日誌記錄,日誌可以記錄在本地,還可以同步到其他機器 |
儘管僅使用單個階段的指令content_by_lua*就可以完成以上職責,但是把邏輯劃分在不同階段,更加容易維護。
https://blog.gmem.cc/openresty-study-note
https://github.com/openresty/lua-nginx-module
【Lua】Nginx 變量
要在OpenResty中引用Nginx變量,可以使用 ngx . var . VARIABLE,要將變量從字符串轉換為數字,可以使用 tonumber函數。
-- 黑名单
local black_ips = {["127.0.0.1"]=true}

-- 当前客户端IP
local ip = ngx.var.remote_addr
if true == black_ips[ip] then
    -- 返回相应的HTTP状态码
    ngx.exit(ngx.HTTP_FORBIDDEN)
end
經常用到的Ng變量如下表:
| 變量 | 說明 | ||
| arg_name | 請求中的name參數 | ||
| args | 請求中的參數 | ||
| binary_remote_addr | 遠程地址的二進製表示 | ||
| body_bytes_sent | 已發送的消息體字節數 | ||
| content_length | HTTP請求信息裡的"Content-Length" | ||
| content_type | 請求信息裡的"Content-Type" | ||
| document_root | 針對當前請求的根路徑設置值 | ||
| document_uri | 與$uri相同; 比如/test2/test.php | ||
| host | 請求信息中的"Host",如果請求中沒有Host行,則等於設置的服務器名 | ||
| hostname | 機器名使用gethostname系統調用的值 | ||
| http_cookie | Cookie信息 | ||
| http_referer | 引用地址 | ||
| http_user_agent | 客戶端代理信息 | ||
| http_via | 最後一個訪問服務器的Ip地址。 | ||
| http_x_forwarded_for | 相當於網絡訪問路徑 | ||
| is_args | 如果請求行帶有參數,返回“?”,否則返回空字符串 | ||
| limit_rate |
對連接速率的限制。此變量支持寫入:
|
||
| nginx_version | 當前運行的nginx版本號 | ||
| pid | Worker進程的PID | ||
| query_string | 與$args相同 | ||
| realpath_root | 按root指令或alias指令算出的當前請求的絕對路徑。其中的符號鏈接都會解析成真是文件路徑 | ||
| remote_addr | 客戶端IP地址 | ||
| remote_port | 客戶端端口號 | ||
| remote_user | 客戶端用戶名,認證用 | ||
| request | 用戶請求 | ||
| request_body | 這個變量(0.7.58+)包含請求的主要信息。在使用proxy_pass或fastcgi_pass指令的location中比較有意義 | ||
| request_body_file | 客戶端請求主體信息的臨時文件名 | ||
| request_completion | 如果請求成功,設為"OK";如果請求未完成或者不是一系列請求中最後一部分則設為空 | ||
| request_filename | 當前請求的文件路徑名,比如/opt/nginx/www/test.php | ||
| request_method | 請求的方法,比如"GET"、"POST"等 | ||
| request_uri | 請求的URI,帶參數 | ||
| scheme | 所用的協議,比如http或者是https | ||
| server_addr | 服務器地址,如果沒有用listen指明服務器地址,使用這個變量將發起一次系統調用以取得地址(造成資源浪費) | ||
| server_name | 請求到達的服務器名 | ||
| server_port | 請求到達的服務器端口號 | ||
| server_protocol | 請求的協議版本,"HTTP/1.0"或"HTTP/1.1" | ||
| uri | 請求的URI,可能和最初的值有不同,比如經過重定向之類的 |
【Lua】ngx.say 與 ngx.print 差異
差異在 ngx.say 會加入一個換行符號
【Lua】SSL相關指令執行順序

【Lua】table
模擬陣列用法
注意 lua 索引 從 1 開始
-- 宣告 table
lang = {
  "C",
  "C#",
  "C++",
  "Java",
  "Swift",
  "Python",
  "Haskell",
}

-- 使用 ipairs 迭代 lang
for i in ipairs(lang) do
    print(i, #lang[i], lang[i])
end

-- 以下寫法相同
for i,v in ipairs(lang) do
    print(i, #v, v)
end


-- 1	1	C
-- 2	2	C#
-- 3	3	C++
-- 4	4	Java
-- 5	5	Swift
-- 6	6	Python
-- 7	7	Haskell
新增資料 => table.insert
lang = {
  "C",
  "C#",
  "C++",
  "Java",
  "Swift",
  "Python",
  "Haskell",
}

-- 使用table.insert
table.insert(lang, "lua")
-- 使用索引
lang[9] = "Javascript"

-- 1	1	C
-- 2	2	C#
-- 3	3	C++
-- 4	4	Java
-- 5	5	Swift
-- 6	6	Python
-- 7	7	Haskell
-- 8	3	lua
-- 9	10	Javascript
刪除資料 => 設為 nil
lang = {
  "C",
  "C#",
  "C++",
  "Java",
  "Swift",
  "Python",
  "Haskell",
}

-- 刪除總是山最後一筆,不然會有意外錯誤
lang[8] = nil

for i,v in ipairs(lang) do
    print(i, #v, v)
end
-- 1	1	C
-- 2	2	C#
-- 3	3	C++
-- 4	4	Java
-- 5	5	Swift
-- 6	6	Python
-- 7	7	Haskell
類map(key,vlaue)宣告
key 不要文字,數字混和宣告
person = {
  ["name"] = "Bob",
  ["age"] = 25,
}

-- key不為數字-以上相同
person = {
  name = "Bob",
  age = 25,
}

-- 陣列用法
arr = {
  [1] = 1,
  [2] = 2,
  [3] = 3,
  [4] = 4,
}
Key 值範圍
key可以是除了nil和NaN(Not a Number)以外的任何型別。
obj = {} -- 建立一個空表
obj[1] = 1 -- 整數是合法的key值
obj[1.0] = 2 -- 浮點數是合法的key值
obj["string"] = 1 -- 字串是合法的key值
obj[math.huge] = 1 -- inf是合法的key值

--[[
要注意的是 obj[1] 和 obj[1.0]相同
其obj[1]和obj[1.0]最終值為2
--]]

----------------

print(obj[nil]) --> nil
obj[nil] = 1 --> Error: nil不是合法的key值,儘管取值不會出錯

print(obj[0/0]) --> nil
print(0/0) --> -nan
obj[0/0] = 1 --> Error: NaN不是合法的key值
【Lua】vscode 外掛
https://marketplace.visualstudio.com/items?itemName=sumneko.lua

【Nginx】config 詳解
基本配置區塊
#config 區塊 基本配置
...                   # 全域性區塊

event{                # events 區塊
        ...
}
http{                 # http 區塊
    server{           # server 區塊
        location{     # location 區塊
            ...
        }
    }
}
server 區塊的配置
server{
      listen  80;
      listen [::]80;
      server_name  example.com  example2.com;
    location /{
        root /usr/share/nginx/html;
    	index index.html index.htm;
    }
}

#listen 80; 代表監聽所有 ipv4 的位址
#listen [::]80; 代表監聽所有 ipv6 的位址
#server_name 是你的 Domain 名稱。 可以使用空白listen 多個domain
#location 中則是指定對不同路徑要怎麼處理
# 如果沒有下deault_server; 設定,第一個server 區塊會變成預設所以有位被匹配到的設定
# 避免除錯上的困難,可設定一個預設區塊,在未匹配到server 時,顯示403錯誤
server {
listen 80 default_server;
server_name _;
set $cache_status -;
set $parameter -;
set $response_body_size 0;
location / {
default_type 'text/html';
echo "default server" ;
return 403; # 403 forbidden
}
}
【反向代理】reverse proxy
server {

    listen 80;
    server_name www.example.com;

    location \ {
           proxy_pass http://192.168.1.1:8080;

           proxy_set_header Host 				$host;
           proxy_set_header X-Real-IP			$remote_addr;
           proxy_set_header X-Forwarded-For		$proxy_add_x_forwarded_for;
           proxy_set_header X-Forwarded-Proto	$scheme;
        }
}
【快取】實作圖片快取機制
server {

    listen 80;
    server_name www.example.com;

    location ~* \.(jpg|jpeg|png|css|js)$ {
            expires 365d;  # 快取時間
            proxy_pass http://loaclhost:8080;
        }
}
【virtural host】實作 virtural host
# .web1
server {
    listen      80;
    server_name web1.example.com ;
    root /usr/loacl/nginx/web1;
    index index.html;
}

# .web2
server {
    listen      80;
    server_name web2.example.com ;
    root /usr/loacl/nginx/web2;
    index index.html;
}
【負載平衡】 load balance
#Nginx 提供了以下三種 load balancing 方法:

#round-robin:預設值,會將請留輪流平均分配到每台伺服器上
#lest-connected:會將請求分配到目前連接數最少的伺服器上
#ip-hash:利用 hash-function 來決定使用者要被分配到的伺服器,此方法可以達到同一個使用者 (IP address) 每次連結的伺服器都是相同的
#如果要從默認值 round-robin 方法改成 lest-connected 或 ip-hash 的方法,只需要在第一行加上lest_conn; 或 ip_hash; 即可
upstream myapp {
    ip_hash;
    server srv1.example.com;
    server srv2.example.com;
    server srv3.example.com;
}
server {
  listen 80;
  location / {
    proxy_pass   http://myapp;
  }
}
# weight 默認值為 1,
# 以下的配置代表如果有 5 次新的請求,則會有 3 次被分配到 srv1 和分配各 1 次到 srv2 srv3 上
upstream myapp1 {
server srv1.example.com weight=3;
server srv2.example.com;
server srv3.example.com;
server bak.example.com; #backup 代表,所有伺服器都掛掉之後,此伺服器才會生效
}
server {
listen 80;
location / {
proxy_pass http://myapp1;
}
}限制來源
location / {
    deny  192.168.1.1;
    allow 192.168.1.0/24;
    allow 10.1.1.0/16;
    allow 2001:0db8::/32;
    deny  all;
}
nginx.conf 詳細配置
#定义Nginx运行的用户和用户组
user www www;


#nginx進程數,建議設置為等於CPU總核心數。
worker_processes 8;


#全局錯誤日誌定義類型,[ debug | info | notice | warn | error | crit ]
error_log /var/log/nginx/error.log info;


#進程文件
pid /var/run/nginx.pid;


#一個nginx進程打開的最多文件描述符數目,理論值應該是最多打開文件數(系統的值ulimit -n)與nginx進程數相除,但是nginx分配請求並不均勻,所以建議與ulimit -n的值保持一致。
worker_rlimit_nofile 65535;


#工作模式與連接數上限
events
{
#參考事件模型,use [ kqueue | rtsig | epoll | /dev/poll | select | poll ]; epoll模型是Linux 2.6以上版本內核中的高性能網絡I/O模型,如果跑在FreeBSD上面,就用kqueue模型。
use epoll;
#單個進程最大連接數(最大連接數=連接數*進程數)
worker_connections 65535;
}

#設定http服務器
http
{
include mime.types; #文件擴展名與文件類型映射表
default_type application/octet-stream; #默認文件類型
#charset utf-8; #默認編碼
server_names_hash_bucket_size 128; #服務器名字的hash表大小
large_client_header_buffers 4 64k; #設定請求緩
autoindex on; #開啟目錄列表訪問,合適下載服務器,默認關閉。

#此指令設置 Nginx 使用的 DNS 解析器的配置。在這個例子中,使用了兩個 DNS 解析器的 IP 地址:8.8.8.8 和 168.95.1.1。
#ipv6=off 表示禁用 IPv6 解析。valid=300s 表示 DNS 解析的結果將在 300 秒(5 分鐘)內被緩存。
resolver 8.8.8.8 168.95.1.1 ipv6=off valid=300s;

#此指令設置 DNS 解析的超時時間。如果在指定的時間內無法解析域名,Nginx 將中斷解析並返回錯誤。
resolver_timeout 3s;

client_body_buffer_size 256K; 	#此指令指定客戶端請求主體的緩衝區大小,這是用於存儲客戶端發送的請求主體數據的內存區域。
client_body_timeout 3s; 		#此指令設置接收客戶端請求主體的超時時間。如果在指定的時間內沒有接收到完整的請求主體,Nginx 將結束該連接。
client_header_buffer_size 64k;	#此指令指定用於存儲客戶端請求標頭的緩衝區大小。(?上傳文件大小限制?)
client_header_timeout 3s;		#此指令設置接收客戶端請求標頭的超時時間。如果在指定的時間內沒有接收到完整的請求標頭,Nginx 將結束該連接。
client_max_body_size 1m;		#此指令設置允許客戶端發送的最大請求主體大小。如果客戶端嘗試發送超過此大小的請求主體,Nginx 將返回 413 Request Entity Too Large 錯誤。
large_client_header_buffers 8 64k; #此指令設置用於存儲大型客戶端請求標頭的緩衝區大小。如果客戶端請求的標頭超過指定的大小,Nginx 將使用這些緩衝區來處理它。
keepalive_timeout 5s;			#此指令設置持久連接的超時時間。如果在指定的時間內沒有新的請求到達,Nginx 將關閉持久連接。
open_file_cache max=5000 inactive=20s; #此指令啟用了文件打開時的緩存機制,以加快文件的讀取速度。max 參數指定緩存的最大數量,inactive 參數指定文件在緩存中保持不活躍的時間。
open_file_cache_valid 30s;		#此指令設置緩存中的文件信息的有效期限。在此期限內,Nginx 將重用緩存的文件信息而不需要再次訪問磁盤。
open_file_cache_min_uses 8;		#此指令設置文件緩存機制中的最小使用次數。只有當某個文件被訪問的次數超過此設定值時,才會將該文件的信息緩存起來。
open_file_cache_errors on;		#此指令設置是否緩存文件打開期間的錯誤。當設置為 "on" 時,如果在打開文件時發生錯誤,Nginx 會將該錯誤信息緩存起來,以避免重複出現相同的錯誤。
send_timeout 10;				#此指令設置向客戶端發送數據的超時時間。如果在指定的時間內沒有將數據發送給客戶端,Nginx 將結束該連接。

#開啟高效文件傳輸模式,sendfile指令指定nginx是否調用sendfile函數來輸出文件,對於普通應用設為on,用於高效地將文件內容發送給客戶端,而無需將文件數據從磁盤讀入到用戶空間。
#如果用來進行下載等應用磁盤IO重負載應用,可設置為off,以平衡磁盤與網絡I/O處理速度,降低系統的負載。注意:如果圖片顯示不正常把這個改成off。
sendfile on;

sendfile_max_chunk 512k;		#此指令設置單次 sendfile 操作的最大數據塊大小。如果需要發送的文件數據大於此值,Nginx 將分段進行 sendfile 操作。
server_tokens off;				#此指令關閉 Nginx 的版本號顯示。在生產環境中,關閉版本號的顯示可以增加安全性,防止攻擊者利用已知漏洞進行攻擊。
tcp_nodelay on;					#此指令啟用 TCP 即時發送功能。它禁用了 Nagle 算法,從而降低了數據傳輸的延遲,但可能會增加網絡流量。
tcp_nopush  on;					#此指令啟用 TCP 壓縮機制。當服務器將數據發送給客戶端時,它將盡可能地將多個小的數據包合並為一個較大的數據包發送,從而減少了網絡傳輸的開銷。
types_hash_max_size 2048;		#此指令設置 Nginx 在處理 MIME 類型時使用的哈希表的大小。增大此值可以提高性能

#FastCGI相關參數是為了改善網站的性能:減少資源佔用,提高訪問速度。下面參數看字面意思都能理解。
fastcgi_connect_timeout 300;
fastcgi_send_timeout 300;
fastcgi_read_timeout 300;
fastcgi_buffer_size 64k;
fastcgi_buffers 4 64k;
fastcgi_busy_buffers_size 128k;
fastcgi_temp_file_write_size 128k;


#gzip模塊設置
gzip on; #開啟gzip壓縮輸出
gzip_min_length 1k; #最小壓縮文件大小
gzip_buffers 4 16k; #壓縮緩衝區
gzip_http_version 1.0; #壓縮版本(默認1.1,前端如果是squid2.5請使用1.0)
gzip_comp_level 2; #壓縮等級
gzip_types text/plain application/x-javascript text/css application/xml;
#壓縮類型,默認就已經包含text/html,所以下面就不用再寫了,寫上去也不會有問題,但是會有一個warn。
gzip_vary on;
#limit_zone crawler $binary_remote_addr 10m; #開啟限制IP連接數的時候需要使用


upstream blog.ha97.com {
#upstream的負載均衡,weight是權重,可以根據機器配置定義權重。weigth參數表示權值,權值越高被分配到的機率越大。
server 192.168.80.121:80 weight=3;
server 192.168.80.122:80 weight=2;
server 192.168.80.123:80 weight=3;
}


#虛擬主機的配置
server
{
#監聽端口
listen 80;
#域名可以有多個,用空格隔開
server_name www.ha97.com ha97.com;
index index.html index.htm index.php;
root /data/www/ha97;
location ~ .*\.(php|php5)?$
{
fastcgi_pass 127.0.0.1:9000;
fastcgi_index index.php;
include fastcgi.conf;
}
#圖片緩存時間設置
location ~ .*\.(gif|jpg|jpeg|png|bmp|swf)$
{
expires 10d;
}
#JS和CSS緩存時間設置
location ~ .*\.(js|css)?$
{
expires 1h;
}
#日誌格式設定
log_format access '$remote_addr – $remote_user [$time_local] “$request” '
'$status $body_bytes_sent “$http_referer” '
'”$http_user_agent” $http_x_forwarded_for';
#定義本虛擬主機的訪問日誌
access_log /var/log/nginx/ha97access.log access;


#對“/” 啟用反向代理
location / {
proxy_pass http://127.0.0.1:88;
proxy_redirect off;
proxy_set_header X-Real-IP $remote_addr;
#後端的Web服務器可以通過X-Forwarded-For獲取用戶真實IP
proxy_set_header X-Forwarded-For $proxy_add_x_forwarded_for;
#以下是一些反向代理的配置,可選。
proxy_set_header Host $host;
client_max_body_size 10m; #允許客戶端請求的最大單文件字節數
client_body_buffer_size 128k; #緩衝區代理緩衝用戶端請求的最大字節數,
proxy_connect_timeout 90; #nginx跟後端服務器連接超時時間(代理連接超時)
proxy_send_timeout 90; #後端服務器數據回傳時間(代理髮送超時)
proxy_read_timeout 90; #連接成功後,後端服務器響應時間(代理接收超時)
proxy_buffer_size 4k; #設置代理服務器(nginx)保存用戶頭信息的緩衝區大小
proxy_buffers 4 32k; #proxy_buffers緩衝區,網頁平均在32k以下的設置
proxy_busy_buffers_size 64k; #高負荷下緩衝大小(proxy_buffers*2)
proxy_temp_file_write_size 64k;
#設定緩存文件夾大小,大於這個值,將從upstream服務器傳
}


#設定查看Nginx狀態的地址
location /NginxStatus {
stub_status on;
access_log on;
auth_basic “NginxStatus”;
auth_basic_user_file conf/htpasswd;
#htpasswd文件的內容可以用apache提供的htpasswd工具來產生。
}


#本地动静分离反向代理配置
#所有jsp的页面均交由tomcat或resin处理
location ~ .(jsp|jspx|do)?$ {
proxy_set_header Host $host;
proxy_set_header X-Real-IP $remote_addr;
proxy_set_header X-Forwarded-For $proxy_add_x_forwarded_for;
proxy_pass http://127.0.0.1:8080;
}
#所有静态文件由nginx直接读取不经过tomcat或resin
location ~ .*.(htm|html|gif|jpg|jpeg|png|bmp|swf|ioc|rar|zip|txt|flv|mid|doc|ppt|pdf|xls|mp3|wma)$
{ expires 15d; }
location ~ .*.(js|css)?$
{ expires 1h; }
}
}
【Nginx】location 匹配規則
一般匹配
location [=|~|~*|^~] /uri/ { ... }
| 模式 | 含义 |
|---|---|
| location = /uri | = 表示精确匹配,只有完全匹配上才能生效 |
| location ^~ /uri | ^~ 开头对URL路径进行前缀匹配,并且在正则之前。 |
| location ~ pattern | 开头表示区分大小写的正则匹配 |
| location ~* pattern | 开头表示不区分大小写的正则匹配 |
| location /uri | 不带任何修饰符,也表示前缀匹配,但是在正则匹配之后 |
| location / | 通用匹配,任何未匹配到其它location的请求都会匹配到,相当于switch中的default |
實際使用規則至少有三個匹配定義
# 直接匹配网站根,通过域名访问网站首页比较频繁,使用这个会加速处理,官网如是说。 # 这里是直接转发给后端应用服务器了,也可以是一个静态首页
# 第一个必选规则
location = / {
    proxy_pass http://tomcat:8080/index
}
# 第二个必选规则是处理静态文件请求,这是 nginx 作为 http 服务器的强项
# 有两种配置模式,目录匹配或后缀匹配,任选其一或搭配使用
location ^~ /static/ {
    root /webroot/static/;
}
location ~* \.(gif|jpg|jpeg|png|css|js|ico)$ {
    root /webroot/res/;
}
# 第三个规则就是通用规则,用来转发动态请求到后端应用服务器
# 非静态文件请求就默认是动态请求,自己根据实际把握
# 毕竟目前的一些框架的流行,带.php、.jsp后缀的情况很少了 location / {
    proxy_pass http://tomcat:8080/
}
依據檔案類型設置過期時間
location ~* \.(js|css|jpg|jpeg|gif|png|swf)$ {
    if (-f $request_filename) {
expires 1h;
break; }
}
禁止訪問某目錄
location ~* \.(txt|doc)${
    root /data/www/wwwroot/linuxtone/test;
    deny all;
}
內部命名位置
命名位置的用途
@開頭: 這個符號用來表示這是一個內部使用的命名位置,不會與普通 URL 路徑混淆。- 命名自由: 你可以給命名位置起任何名稱,只要以
@開頭並且不與其他位置塊或指令名稱衝突。
如何使用命名位置
命名位置常用於內部重定向,當某些條件滿足時會跳轉到這些位置。通常用在 try_files、error_page 等指令中。
命名位置的典型應用
- 靜態資源: 先查找靜態文件,如果找不到則交給動態處理程序處理。
- 錯誤處理: 如果遇到特定錯誤碼,重定向到特定的錯誤處理位置。
- 代理後備: 如果特定條件下需要將請求代理到其他服務器。
使用 try_files 與命名位置
server {
    listen 80;
    server_name example.com;

    # 主位置塊
    location / {
        # 嘗試匹配靜態文件,如果找不到則重定向到 @backend
        try_files $uri $uri/ @backend;
    }

    # 定義 @backend 內部重定向位置
    location @backend {
        # 添加自定義標頭
        add_header X-Cache-Status "MISS" always;
        # 設定代理地址
        proxy_pass http://backend_server;
    }
}
在這個例子中:
try_files $uri $uri/ @backend;指示 Nginx 先嘗試匹配$uri和$uri/,如果都不匹配,則跳轉到@backend。- 在
@backend位置塊中,添加一個自定義標頭並將請求代理到http://backend_server。
使用 error_page 與命名位置
假設你希望在遇到 404 錯誤時顯示自定義的錯誤頁面,並且如果特定條件下(例如 URL 中包含 /api/),將請求代理到其他服務器。可以這樣配置:
server {
    listen 80;
    server_name example.com;

    # 主位置塊
    location / {
        # 通常的處理邏輯
        try_files $uri $uri/ =404;
    }

    # 錯誤頁面處理
    error_page 404 /404.html;
    location = /404.html {
        # 內部重定向到 @notfound 位置
        try_files @notfound;
    }

    # 定義 @notfound 內部重定向位置
    location @notfound {
        # 檢查 URL 中是否包含 /api/
        if ($request_uri ~* /api/) {
            # 如果是,代理到 API 服務器
            proxy_pass http://api_server;
        }

        # 否則返回自定義的 404 頁面
        root /usr/share/nginx/html;
        internal; # 表示這個位置只能內部訪問
    }
}
【OpenResty】相關資源
跟我学OpenResty(Nginx+Lua)开发目录贴
https://jinnianshilongnian.iteye.com/category/333854
Docker下的OpenResty三部曲
- https://blog.csdn.net/boling_cavalry/article/details/79290944
- https://blog.csdn.net/boling_cavalry/article/details/79292356
- https://blog.csdn.net/boling_cavalry/article/details/79311164
- 使用 OpenResty Docker 镜像快速搭建 Web 服务器 - 简书 (jianshu.com)
- agentzh 的 Nginx 教程
- OpenResty 最佳实践
- 30天 Lua重拾筆記
- Nginx Lua的执行阶段
- Lua 錯誤處理 pcall & xpcall
- lua 線上測試
- https://github.com/openresty/lua-nginx-module
-
第三方 lib
https://github.com/ledgetech/lua-resty-http/tree/master/lib/resty
https://github.com/hamishforbes/lua-ffi-zlib/blob/master/lib/ffi-zlib.lua
【Openresty】Lua 的變數範圍
只有在 init_by_lua* 和 init_worker_by_lua* 階段才能定義真正的 全域變數
【Openresty】Nginx Lua的 執行階段
nginx 執行步驟
1、post-read
读取请求内容阶段,nginx读取并解析完请求头之后就立即开始运行;例如模块 ngx_realip 就在 post-read 阶段注册了处理程序,它的功能是迫使 Nginx 认为当前请求的来源地址是指定的某一个请求头的值。

2、server-rewrite
server请求地址重写阶段;当ngx_rewrite模块的set配置指令直接书写在server配置块中时,基本上都是运行在server-rewrite 阶段

3、find-config
配置查找阶段,这个阶段并不支持Nginx模块注册处理程序,而是由Nginx核心来完成当前请求与location配置块之间的配对工作。


4、rewrite
location请求地址重写阶段,当ngx_rewrite指令用于location中,就是再这个阶段运行的;另外ngx_set_misc(设置md5、encode_base64等)模块的指令,还有ngx_lua模块的set_by_lua指令和rewrite_by_lua指令也在此阶段。

5、post-rewrite
请求地址重写提交阶段,当nginx完成rewrite阶段所要求的内部跳转动作,如果rewrite阶段有这个要求的话;

6、preaccess
访问权限检查准备阶段,ngx_limit_req和ngx_limit_zone在这个阶段运行,ngx_limit_req可以控制请求的访问频率,ngx_limit_zone可以控制访问的并发度;

7、access
访问权限检查阶段,标准模块ngx_access、第三方模块ngx_auth_request以及第三方模块ngx_lua的access_by_lua指令就运行在这个阶段。配置指令多是执行访问控制相关的任务,如检查用户的访问权限,检查用户的来源IP是否合法;

8、post-access
访问权限检查提交阶段;主要用于配合access阶段实现标准ngx_http_core模块提供的配置指令satisfy的功能。satisfy all(与关系),satisfy any(或关系)

9、try-files
配置项try_files处理阶段;专门用于实现标准配置指令try_files的功能,如果前 N-1 个参数所对应的文件系统对象都不存在,try-files 阶段就会立即发起“内部跳转”到最后一个参数(即第 N 个参数)所指定的URI.

10、content
内容产生阶段,是所有请求处理阶段中最为重要的阶段,因为这个阶段的指令通常是用来生成HTTP响应内容并输出 HTTP 响应的使命;

11、log
日志模块处理阶段;记录日志
#lua 模組使用 nginx 區塊
init_by_lua http
set_by_lua server, server if, location, location if
rewrite_by_lua http, server, location, location if
access_by_lua http, server, location, location if
content_by_lua location, location if
header_filter_by_lua http, server, location, location if
body_filter_by_lua http, server, location, location if
log_by_lua http, server, location, location if
timer#config 區塊 基本配置
... # 全域性區塊
event{ # events 區塊
...
}
http{ # http 區塊
init_by_lua_block{
}
init_by_lua_file /usr/local/nginx/conf/lua/init.lua
#常見的功能是執行定時任務 or health_check
#此階段一般用來進行權限檢查和黑白名單配置
init_worker_by_lua_block{
}
#配置環境:**http,server,location,location if
access_by_lua_block{}
#配置環境**http,server,location,location if#
#常用於header進行添加、刪除等操作
header_filter_by_lua_block{}
server{ # server 區塊
location /aaa { # location 區塊
set $b '';
# 設定變量
set_by_lua_block $a {
local t = 'test'
ngx.var.b = 'test_b'
return t
}
return 200 $a,$b; # test,test_b
}
location /bbb {
set $b '1';
#rewrite_by_lua_block始終都在rewrite階段的後面執行
rewrite_by_lua_block { ngx.var.b = '2'}
set $b '3';
echo $b; #2
}
}
location /ccc{
#**配置環境:**location,location if
#content_by_lua_block指令不可以和其他內容處理階段的模塊如echo、return、proxy_pass等放在一起
content_by_lua_block{}
}
location /ddd{
#content_by_lua_file可以直接获取URL中参数file_name的值
content_by_lua_file conf/lua/$arg_file_name;
}
location /eee{
#将响应体全部转换为大写
#**配置環境:**http,server,location,location if
body_filter_by_lua_block { ngx.arg[1] = string.upper(ngx. arg[1]) }
}
}
}https://blog.51cto.com/xikder/2331649
Nginx 反向代理
server {
    listen       80;
    listen  [::]:80;
    server_name  www.srou.com;

    access_log  /var/log/nginx/host.access.log  main;

    location / {
        root   /usr/share/nginx/html;
        # proxy_pass http://10.2.99.14:8081;
        index  index.html index.htm;
    }

    location /dev/ {
        proxy_pass http://10.2.99.14:8081;
    }


    #error_page  404              /404.html;

    # redirect server error pages to the static page /50x.html
    #
    error_page   500 502 503 504  /50x.html;
    location = /50x.html {
        root   /usr/share/nginx/html;
    }

    # proxy the PHP scripts to Apache listening on 127.0.0.1:80
    #
    #location ~ \.php$ {
    #    proxy_pass   http://127.0.0.1;
    #}

    # pass the PHP scripts to FastCGI server listening on 127.0.0.1:9000
    #
    #location ~ \.php$ {
    #    root           html;
    #    fastcgi_pass   127.0.0.1:9000;
    #    fastcgi_index  index.php;
    #    fastcgi_param  SCRIPT_FILENAME  /scripts$fastcgi_script_name;
    #    include        fastcgi_params;
    #}

    # deny access to .htaccess files, if Apache's document root
    # concurs with nginx's one
    #
    #location ~ /\.ht {
    #    deny  all;
    #}
}

server {
    listen       80;
    listen  [::]:80;
    server_name  wsf.srou.com;

    location / {
        # root   /usr/share/nginx/html;
        proxy_pass http://10.2.99.14:8081;
        index  index.html index.htm;
    }

    location /uat/ {
        proxy_pass http://10.2.99.14:8082;
    }

}

server {
    listen       80;
    listen  [::]:80;
    server_name  wsm.srou.com;

    location / {
        # root   /usr/share/nginx/html;
        proxy_pass http://10.2.99.14:8082;
        index  index.html index.htm;
    }
}
使用 IP 來替代域名的配置方法
-
查找域名對應的 IP 地址:確保你知道
a.aaa.com對應的 IP 地址。 -
修改 Nginx 配置:將原本指向域名的
proxy_pass修改為指向 IP 地址。
具體操作步驟:
假設 aaa.aaa.com 對應的 IP 地址是 192.168.1.1,這樣配置:
location / {
    proxy_pass https://192.168.1.1;
    proxy_ssl_name a.aaa.com;  # 設置 SSL 握手時使用的域名
    proxy_ssl_server_name on;    # 開啟 SNI 支持
}
配置解釋:
-
proxy_pass使用 IP 地址:直接使用 IP 地址(如https://192.168.1.1)來替代域名,這樣就不需要 DNS 解析。 -
proxy_ssl_name指令:即使使用了 IP 地址,你仍然需要指示 Nginx 在 SSL 握手過程中使用哪個主機名。這是因為 SSL/TLS 握手過程通常依賴於域名,特別是在有 SNI(Server Name Indication)需求的情況下。 -
proxy_ssl_server_name on指令:這個指令開啟 SNI 支持,以便在 SSL 握手時能夠發送正確的域名信息給後端服務器。
不使用 DNS 的注意事項
-
如果你不使用 DNS 而選擇 IP 地址,一旦服務器 IP 發生變化,你需要手動更新 Nginx 配置中的 IP 地址。
-
使用 IP 地址的配置需要確保 IP 對應的服務器上有正確的 SSL 憑證,並且該憑證包含了你在
proxy_ssl_name指令中指定的域名。
這種方法有效避免了 Nginx 對 DNS 解析的依賴,但需要確保 IP 地址和 SSL 配置的正確性。
TWCA 憑證放入 Nginx
憑證安裝
TWCA發回來憑證內容若要裝在nginx 上處理方式
解開cert.zip後會有下列檔案
主機憑證:root.cer
網域憑證:server.cer
中繼憑證1:uca_1.cer
中繼憑證2:uca_2.cer
檔案內容由上而下的順序uca_2在上面,再來是uca_1,透過下列指令産生檔案
cp uca_2.cer uca.crt ; cat uca_1.cer >> uca.cer
這個個設定可以適用於apache,apache的設定如下:
SSLEngine On
SSLCertificateFile /etc/ssl/server.cer
SSLCertificateKeyFile /etc/ssl/server.key
SSLCertificateChainFile /etc/ssl/uca.cer
若你要放在nginx上的處理方式有稍梢不同
nginx 上的設檔如下:
ssl on;
ssl_certificate /etc/ssl/server.pem;
ssl_certificate_key /etc/ssl/server.key;
ssl_session_timeout 5m;
ssl_protocols SSLv3 TLSv1 TLSv1.1 TLSv1.2;
ssl_ciphers "HIGH:!aNULL:!MD5 or HIGH:!aNULL:!MD5:!3DES";
ssl_prefer_server_ciphers on;
server{
    listen       80;
    listen       443 ssl;
    server_name  demo.server.com.tw;


    ssl_certificate /etc/nginx/ssl/server.pem;
    ssl_certificate_key /etc/nginx/ssl/server.key;
    ssl_session_timeout 5m;
    ssl_protocols SSLv3 TLSv1 TLSv1.1 TLSv1.2;
    ssl_ciphers "HIGH:!aNULL:!MD5 or HIGH:!aNULL:!MD5:!3DES";
    ssl_prefer_server_ciphers on;
    #access_log  /var/log/nginx/host.access.log  main;

    location / {
        # root   /usr/share/nginx/html;
        # index  index.html index.htm;
        proxy_http_version 1.1;

    	# 以下是reverse proxy 才需要
		proxy_set_header Upgrade $http_upgrade;
		proxy_set_header Connection "upgrade";
		proxy_set_header X-Forwarded-For   $proxy_add_x_forwarded_for;
		proxy_set_header Host $host;
		proxy_read_timeout 60s;
        proxy_pass   http://192.168.1.1:20599/;


    }

    error_page   500 502 503 504  /50x.html;
    location = /50x.html {
        root   /usr/share/nginx/html;
    }

}
其中/etc/ssl/server.pem和原來的産生的規則有些不同,他的順序是 server.cer + uca_2.cer + uca_1.cer
産生方法如下
cp server.cer server.pem;cat uca_2.cer >> server.pem ; cat uca_1.cer >> server.pem
憑證需要密碼解決方案
今天設定客戶的域名遇到 SSL_CTX_use_PrivateKey_file、EVP_DecryptFinal_ex:bad decrypt error 的錯誤訊息 指出是私鑰的問題。
May 07 16:43:18 terrylin nginx[5307]: nginx: [emerg] SSL_CTX_use_PrivateKey_file("/etc/nginx/ssl/terryl.in/2020/server.key") failed (SSL: error:06065064:digital envelope routines:EVP_DecryptFinal_ex:bad decrypt error:0May 07 16:43:18 terrylin nginx[5307]: nginx: configuration file /etc/nginx/nginx.conf test failed
May 07 16:43:18 terrylin systemd[1]: nginx.service: Control process exited, code=exited status=1
May 07 16:43:18 terrylin systemd[1]: nginx.service: Failed with result 'exit-code'.
May 07 16:43:18 terrylin systemd[1]: Failed to start A high performance web server and a reverse proxy server.
-- Subject: Unit nginx.service has failed
打開私鑰檔案,發現在以往的長的不一樣,開頭多了一些編碼資訊。
-----BEGIN RSA PRIVATE KEY-----
Proc-Type: 4,ENCRYPTED
DEK-Info: DES-EDE3-CBC,D5F9600F17CDAB82
這是被密碼保護的私鑰。所以解決方法有兩種方式,一是補上設定在 nginx 的設定檔中。舉例,我們建立一個文字檔,命名為 ssl_password.txt 並將密碼存放在這個檔案。
在 Nginx 的設定中補上這一行。
ssl_password_file /etc/nginx/ssl/terryl.in/2020/ssl_password.txt;重啟 Nginx,就可以了。
另外一種方法則是把有密碼保護的私鑰檔案轉成不需要密碼的私鑰。利用 OpenSSL 的指令如下:
openssl rsa -in server.key -out new_server.key會提示需要您輸入密碼。
Enter pass phrase for server.key:密碼正確輸入的話,則會匯出 new_server.key,這是不需要密碼保護的私鑰檔案。當然 Nginx 的設定就照之前的設定就可以了。
【Lua】錯誤處理
local status, err = pcall(function()
    -- 可能会出现错误的代码
    local result = some_function()
    ngx.print("Result: ", result)
end)

if not status then
    -- 出现错误时的处理
    ngx.log(ngx.ERR, "Error occurred: ", err)
    ngx.status = 500
    ngx.print("An error occurred. Please try again later.")
end
【 Lua】動態參數
function mylog(...)
	local arr = {...}
  	-- table.inset(table,index,value)
	table.insert(arr,1,"start")
	table.insert(arr,"end")
	for key,value in pairs(arr) do
		ngx.say(key..":"..value)
		-- ngx.say(value)
	end
end

mylog("A","B","C","D")
-- 1:start
-- 2:A
-- 3:B
-- 4:C
-- 5:D
-- 6:end
【Lua】使用map 做全域變數
http {
    map $server_name $redis_server {
        default 10.10.10.1;
        example.com 10.10.10.2;  # 每個 server_name 可以有自己的 redis 伺服器
        example.org 10.10.10.3;
        # 添加更多的 server_name 和對應的 redis 伺服器
    }

    server {
    	listen 80 backlog=16384;
        server_name  example.com;
        charset UTF-8;

    	# $redis_server 10.10.10.2
        set $REDIS_SERVER $redis_server;
        lua_need_request_body on;
        add_header X-Content-Length $response_body_size always;

        # 其他設定...
    }

     server {
    	listen 80 backlog=16384;
        server_name  example.org;
        charset UTF-8;

    	# $redis_server 10.10.10.3
        set $REDIS_SERVER $redis_server;
        lua_need_request_body on;
        add_header X-Content-Length $response_body_size always;

        # 其他設定...
    }

    server {
    	listen 80 backlog=16384;
        server_name  test.com;
        charset UTF-8;

    	# $redis_server 走預設 10.10.10.1
        set $REDIS_SERVER $redis_server;
        lua_need_request_body on;
        add_header X-Content-Length $response_body_size always;

        # 其他設定...
    }
    # 其他 server 區塊...
}
a
【Lua】Learn Lua in 15 Minutes
Learn Lua in 15 Minutes
-- Two dashes start a one-line comment.

--[[
     Adding two ['s and ]'s makes it a
     multi-line comment.
--]]

----------------------------------------------------
-- 1. Variables and flow control.
----------------------------------------------------

num = 42  -- All numbers are doubles.
-- Don't freak out, 64-bit doubles have 52 bits for
-- storing exact int values; machine precision is
-- not a problem for ints that need < 52 bits.

s = 'walternate'  -- Immutable strings like Python.
t = "double-quotes are also fine"
u = [[ Double brackets
       start and end
       multi-line strings.]]
t = nil  -- Undefines t; Lua has garbage collection.

-- Blocks are denoted with keywords like do/end:
while num < 50 do
  num = num + 1  -- No ++ or += type operators.
end

-- If clauses:
if num > 40 then
  print('over 40')
elseif s ~= 'walternate' then  -- ~= is not equals.
  -- Equality check is == like Python; ok for strs.
  io.write('not over 40\n')  -- Defaults to stdout.
else
  -- Variables are global by default.
  thisIsGlobal = 5  -- Camel case is common.

  -- How to make a variable local:
  local line = io.read()  -- Reads next stdin line.

  -- String concatenation uses the .. operator:
  print('Winter is coming, ' .. line)
end

-- Undefined variables return nil.
-- This is not an error:
foo = anUnknownVariable  -- Now foo = nil.

aBoolValue = false

-- Only nil and false are falsy; 0 and '' are true!
if not aBoolValue then print('twas false') end

-- 'or' and 'and' are short-circuited.
-- This is similar to the a?b:c operator in C/js:
ans = aBoolValue and 'yes' or 'no'  --> 'no'

karlSum = 0
for i = 1, 100 do  -- The range includes both ends.
  karlSum = karlSum + i
end

-- Use "100, 1, -1" as the range to count down:
fredSum = 0
for j = 100, 1, -1 do fredSum = fredSum + j end

-- In general, the range is begin, end[, step].

-- Another loop construct:
repeat
  print('the way of the future')
  num = num - 1
until num == 0


----------------------------------------------------
-- 2. Functions.
----------------------------------------------------

function fib(n)
  if n < 2 then return 1 end
  return fib(n - 2) + fib(n - 1)
end

-- Closures and anonymous functions are ok:
function adder(x)
  -- The returned function is created when adder is
  -- called, and remembers the value of x:
  return function (y) return x + y end
end
a1 = adder(9)
a2 = adder(36)
print(a1(16))  --> 25
print(a2(64))  --> 100

-- Returns, func calls, and assignments all work
-- with lists that may be mismatched in length.
-- Unmatched receivers are nil;
-- unmatched senders are discarded.

x, y, z = 1, 2, 3, 4
-- Now x = 1, y = 2, z = 3, and 4 is thrown away.

function bar(a, b, c)
  print(a, b, c)
  return 4, 8, 15, 16, 23, 42
end

x, y = bar('zaphod')  --> prints "zaphod  nil nil"
-- Now x = 4, y = 8, values 15..42 are discarded.

-- Functions are first-class, may be local/global.
-- These are the same:
function f(x) return x * x end
f = function (x) return x * x end

-- And so are these:
local function g(x) return math.sin(x) end
local g; g  = function (x) return math.sin(x) end
-- the 'local g' decl makes g-self-references ok.

-- Trig funcs work in radians, by the way.

-- Calls with one string param don't need parens:
print 'hello'  -- Works fine.


----------------------------------------------------
-- 3. Tables.
----------------------------------------------------

-- Tables = Lua's only compound data structure;
--          they are associative arrays.
-- Similar to php arrays or js objects, they are
-- hash-lookup dicts that can also be used as lists.

-- Using tables as dictionaries / maps:

-- Dict literals have string keys by default:
t = {key1 = 'value1', key2 = false}

-- String keys can use js-like dot notation:
print(t.key1)  -- Prints 'value1'.
t.newKey = {}  -- Adds a new key/value pair.
t.key2 = nil   -- Removes key2 from the table.

-- Literal notation for any (non-nil) value as key:
u = {['@!#'] = 'qbert', [{}] = 1729, [6.28] = 'tau'}
print(u[6.28])  -- prints "tau"

-- Key matching is basically by value for numbers
-- and strings, but by identity for tables.
a = u['@!#']  -- Now a = 'qbert'.
b = u[{}]     -- We might expect 1729, but it's nil:
-- b = nil since the lookup fails. It fails
-- because the key we used is not the same object
-- as the one used to store the original value. So
-- strings & numbers are more portable keys.

-- A one-table-param function call needs no parens:
function h(x) print(x.key1) end
h{key1 = 'Sonmi~451'}  -- Prints 'Sonmi~451'.

for key, val in pairs(u) do  -- Table iteration.
  print(key, val)
end

-- _G is a special table of all globals.
print(_G['_G'] == _G)  -- Prints 'true'.

-- Using tables as lists / arrays:

-- List literals implicitly set up int keys:
v = {'value1', 'value2', 1.21, 'gigawatts'}
for i = 1, #v do  -- #v is the size of v for lists.
  print(v[i])  -- Indices start at 1 !! SO CRAZY!
end
-- A 'list' is not a real type. v is just a table
-- with consecutive integer keys, treated as a list.

----------------------------------------------------
-- 3.1 Metatables and metamethods.
----------------------------------------------------

-- A table can have a metatable that gives the table
-- operator-overloadish behavior. Later we'll see
-- how metatables support js-prototypey behavior.

f1 = {a = 1, b = 2}  -- Represents the fraction a/b.
f2 = {a = 2, b = 3}

-- This would fail:
-- s = f1 + f2

metafraction = {}
function metafraction.__add(f1, f2)
  sum = {}
  sum.b = f1.b * f2.b
  sum.a = f1.a * f2.b + f2.a * f1.b
  return sum
end

setmetatable(f1, metafraction)
setmetatable(f2, metafraction)

s = f1 + f2  -- call __add(f1, f2) on f1's metatable

-- f1, f2 have no key for their metatable, unlike
-- prototypes in js, so you must retrieve it as in
-- getmetatable(f1). The metatable is a normal table
-- with keys that Lua knows about, like __add.

-- But the next line fails since s has no metatable:
-- t = s + s
-- Class-like patterns given below would fix this.

-- An __index on a metatable overloads dot lookups:
defaultFavs = {animal = 'gru', food = 'donuts'}
myFavs = {food = 'pizza'}
setmetatable(myFavs, {__index = defaultFavs})
eatenBy = myFavs.animal  -- works! thanks, metatable

-- Direct table lookups that fail will retry using
-- the metatable's __index value, and this recurses.

-- An __index value can also be a function(tbl, key)
-- for more customized lookups.

-- Values of __index,add, .. are called metamethods.
-- Full list. Here a is a table with the metamethod.

-- __add(a, b)                     for a + b
-- __sub(a, b)                     for a - b
-- __mul(a, b)                     for a * b
-- __div(a, b)                     for a / b
-- __mod(a, b)                     for a % b
-- __pow(a, b)                     for a ^ b
-- __unm(a)                        for -a
-- __concat(a, b)                  for a .. b
-- __len(a)                        for #a
-- __eq(a, b)                      for a == b
-- __lt(a, b)                      for a < b
-- __le(a, b)                      for a <= b
-- __index(a, b)  <fn or a table>  for a.b
-- __newindex(a, b, c)             for a.b = c
-- __call(a, ...)                  for a(...)

----------------------------------------------------
-- 3.2 Class-like tables and inheritance.
----------------------------------------------------

-- Classes aren't built in; there are different ways
-- to make them using tables and metatables.

-- Explanation for this example is below it.

Dog = {}                                   -- 1.

function Dog:new()                         -- 2.
  newObj = {sound = 'woof'}                -- 3.
  self.__index = self                      -- 4.
  return setmetatable(newObj, self)        -- 5.
end

function Dog:makeSound()                   -- 6.
  print('I say ' .. self.sound)
end

mrDog = Dog:new()                          -- 7.
mrDog:makeSound()  -- 'I say woof'         -- 8.

-- 1. Dog acts like a class; it's really a table.
-- 2. function tablename:fn(...) is the same as
--    function tablename.fn(self, ...)
--    The : just adds a first arg called self.
--    Read 7 & 8 below for how self gets its value.
-- 3. newObj will be an instance of class Dog.
-- 4. self = the class being instantiated. Often
--    self = Dog, but inheritance can change it.
--    newObj gets self's functions when we set both
--    newObj's metatable and self's __index to self.
-- 5. Reminder: setmetatable returns its first arg.
-- 6. The : works as in 2, but this time we expect
--    self to be an instance instead of a class.
-- 7. Same as Dog.new(Dog), so self = Dog in new().
-- 8. Same as mrDog.makeSound(mrDog); self = mrDog.

----------------------------------------------------

-- Inheritance example:

LoudDog = Dog:new()                           -- 1.

function LoudDog:makeSound()
  s = self.sound .. ' '                       -- 2.
  print(s .. s .. s)
end

seymour = LoudDog:new()                       -- 3.
seymour:makeSound()  -- 'woof woof woof'      -- 4.

-- 1. LoudDog gets Dog's methods and variables.
-- 2. self has a 'sound' key from new(), see 3.
-- 3. Same as LoudDog.new(LoudDog), and converted to
--    Dog.new(LoudDog) as LoudDog has no 'new' key,
--    but does have __index = Dog on its metatable.
--    Result: seymour's metatable is LoudDog, and
--    LoudDog.__index = LoudDog. So seymour.key will
--    = seymour.key, LoudDog.key, Dog.key, whichever
--    table is the first with the given key.
-- 4. The 'makeSound' key is found in LoudDog; this
--    is the same as LoudDog.makeSound(seymour).

-- If needed, a subclass's new() is like the base's:
function LoudDog:new()
  newObj = {}
  -- set up newObj
  self.__index = self
  return setmetatable(newObj, self)
end

----------------------------------------------------
-- 4. Modules.
----------------------------------------------------


--[[ I'm commenting out this section so the rest of
--   this script remains runnable.
-- Suppose the file mod.lua looks like this:
local M = {}

local function sayMyName()
  print('Hrunkner')
end

function M.sayHello()
  print('Why hello there')
  sayMyName()
end

return M

-- Another file can use mod.lua's functionality:
local mod = require('mod')  -- Run the file mod.lua.

-- require is the standard way to include modules.
-- require acts like:     (if not cached; see below)
local mod = (function ()
  <contents of mod.lua>
end)()
-- It's like mod.lua is a function body, so that
-- locals inside mod.lua are invisible outside it.

-- This works because mod here = M in mod.lua:
mod.sayHello()  -- Says hello to Hrunkner.

-- This is wrong; sayMyName only exists in mod.lua:
mod.sayMyName()  -- error

-- require's return values are cached so a file is
-- run at most once, even when require'd many times.

-- Suppose mod2.lua contains "print('Hi!')".
local a = require('mod2')  -- Prints Hi!
local b = require('mod2')  -- Doesn't print; a=b.

-- dofile is like require without caching:
dofile('mod2.lua')  --> Hi!
dofile('mod2.lua')  --> Hi! (runs it again)

-- loadfile loads a lua file but doesn't run it yet.
f = loadfile('mod2.lua')  -- Call f() to run it.

-- loadstring is loadfile for strings.
g = loadstring('print(343)')  -- Returns a function.
g()  -- Prints out 343; nothing printed before now.

--]]

----------------------------------------------------
-- 5. References.
----------------------------------------------------

--[[

I was excited to learn Lua so I could make games
with the Löve 2D game engine. That's the why.

I started with BlackBulletIV's Lua for programmers.
Next I read the official Programming in Lua book.
That's the how.

It might be helpful to check out the Lua short
reference on lua-users.org.

The main topics not covered are standard libraries:
 * string library
 * table library
 * math library
 * io library
 * os library

By the way, this entire file is valid Lua; save it
as learn.lua and run it with "lua learn.lua" !

This was first written for tylerneylon.com. It's
also available as a github gist. Tutorials for other
languages, in the same style as this one, are here:

https://learnxinyminutes.com/

Have fun with Lua!

--]]

Tyler Neylon
336.2013