# VSCode
# 【extension】 自訂extenstion 位置
### vscode extenstions 儲存位置
#### C:\\Users\\使用者名稱\\.vscode
#### 想要自定位置-在捷徑上新增 --extensions-dir 設定extenstion 位置
[ 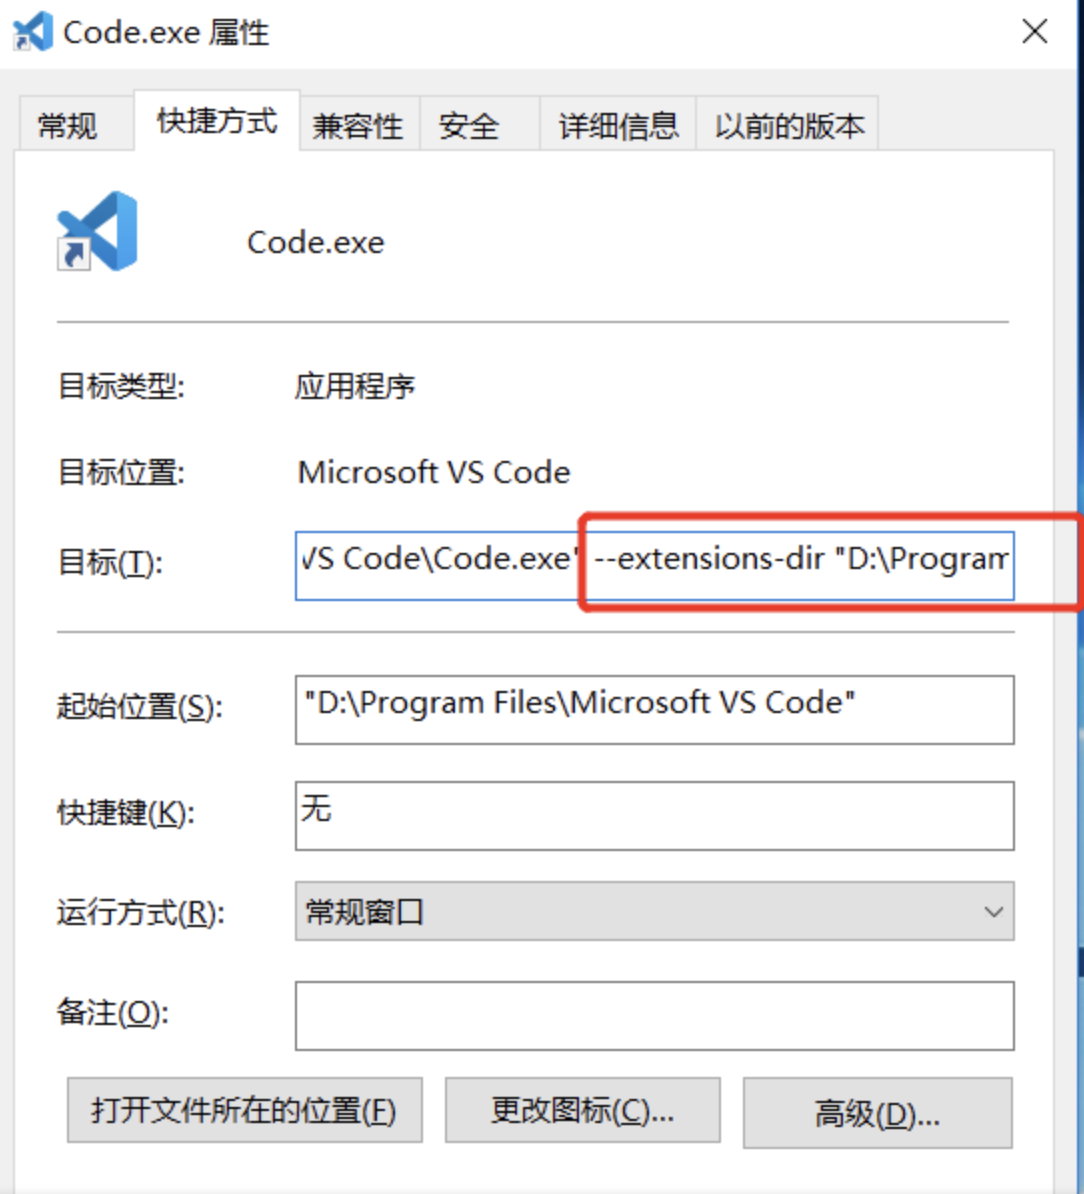](https://bookstack.treemanou.com/uploads/images/gallery/2023-02/Rsd0UzUWOuQOhaU9-image-1675391800393.png)
# 【extension】安裝
#### 搜尋安裝
[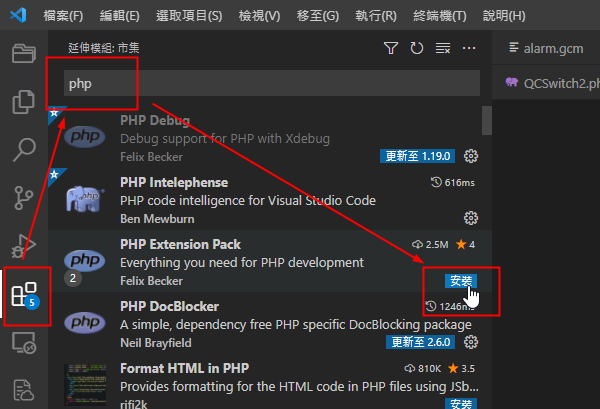](http://bookstack.treemanou.com/uploads/images/gallery/2021-10/XzUOAzvBB5ouDr7d-image-1633423731590.png)
#### VSIX安裝(檔案安裝)
網路連線有問題,無法自動安裝的時候可以手動下載
[](http://bookstack.treemanou.com/uploads/images/gallery/2021-10/pIoIS9bIbG6InC4V-image-1633424029080.png)
從VSIX檔案安裝
[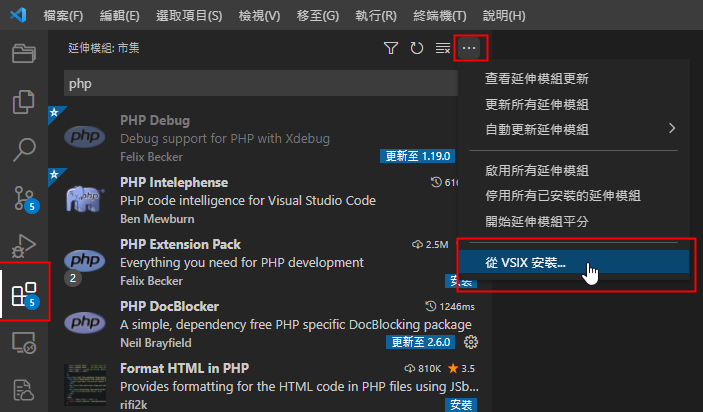](http://bookstack.treemanou.com/uploads/images/gallery/2021-10/3KTggDjjfc0QBOii-image-1633423824775.png)
#### **批次安裝**
**\# 羅列需要安裝的套件**
\-->寫在 extensions.txt
**\# extensions.txt**
```
d-biehl.robotcode
eamodio.gitlens
github.copilot
github.copilot-chat
mhutchie.git-graph
ms-python.debugpy
ms-python.python
ms-python.vscode-pylance
```
**\# 若要將現有套件可用語法匯出(用來統一最新已安裝套件盤點)**
```shell
code --list-extensions > extensions.txt
```
\# Extensions ID --> 可從界面上的小齒輪複製
[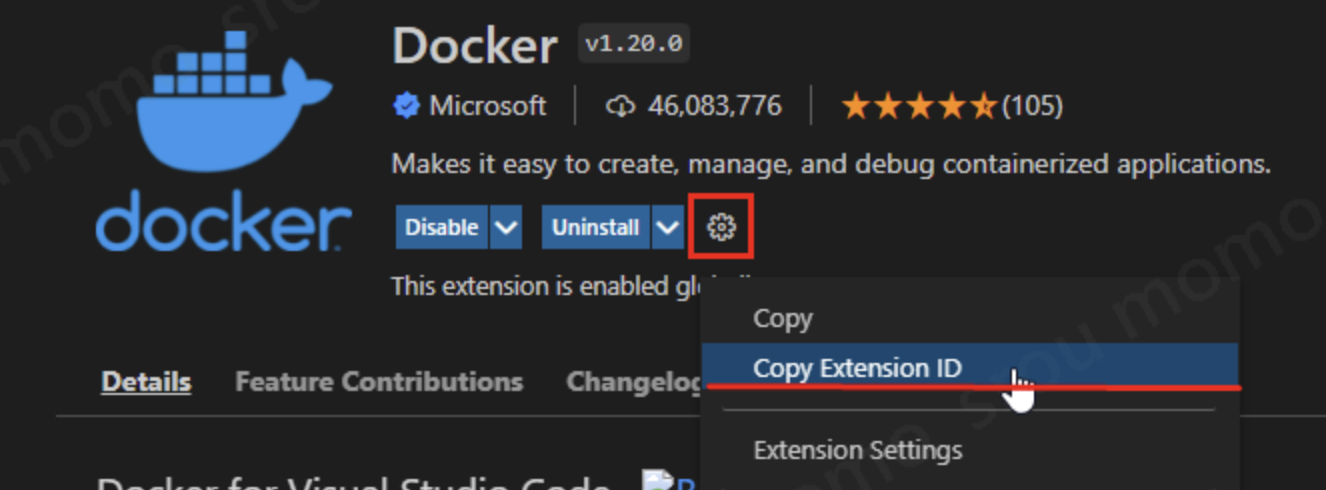](https://bookstack.treemanou.com/uploads/images/gallery/2025-06/uf576vlo4QrPYiFk-image-1750820507718.png)
#### **Windows安裝**
**\# VSCode Extensions 套件安裝執行檔**
\--> extensions.txt 放在同一層目錄
\-->點兩下執行安裝
**\# install\_vs\_extensions.bat**
```shell
@echo off
for /F %%i in (extensions.txt) do (
echo Installing %%i ...
code --install-extension %%i
)
echo All extensions installed.
pause
```
#### **Linux安裝**
**\# install\_vs\_extensions.sh**
\--> extensions.txt 放在同一層目錄
\--> bash install\_vs\_extensions.sh
```shell
#!/bin/bash
# 從 extensions.txt 逐行讀取 VS Code 擴充套件並安裝
while IFS= read -r extension; do
echo "Installing $extension ..."
code --install-extension "$extension"
done < extensions.txt
echo "All extensions installed."
```
如果出現code 指令無法辨認,須先將[vscode 加入環境變數](https://bookstack.treemanou.com/books/treeman/page/vscode-class-path)
# 【extension】推薦
#### 專案管理
[](http://bookstack.treemanou.com/uploads/images/gallery/2021-10/vHhPk1p1vVRuO9n9-image-1633423633855.png)
#### 同步原端資料
[https://github.com/Natizyskunk/vscode-sftp](https://github.com/Natizyskunk/vscode-sftp)
[](http://bookstack.treemanou.com/uploads/images/gallery/2021-10/mJVq6yuSe8d5XJ7l-image-1633423190973.png)
#### React 開發相關
[](https://bookstack.treemanou.com/uploads/images/gallery/2023-03/QD59uCdy4VFNv1PW-image-1679882791034.png)
# 【extension】Code Runner
### 【錯誤處理】列印中文會顯亂碼
【解決】將輸出至終端機打勾
[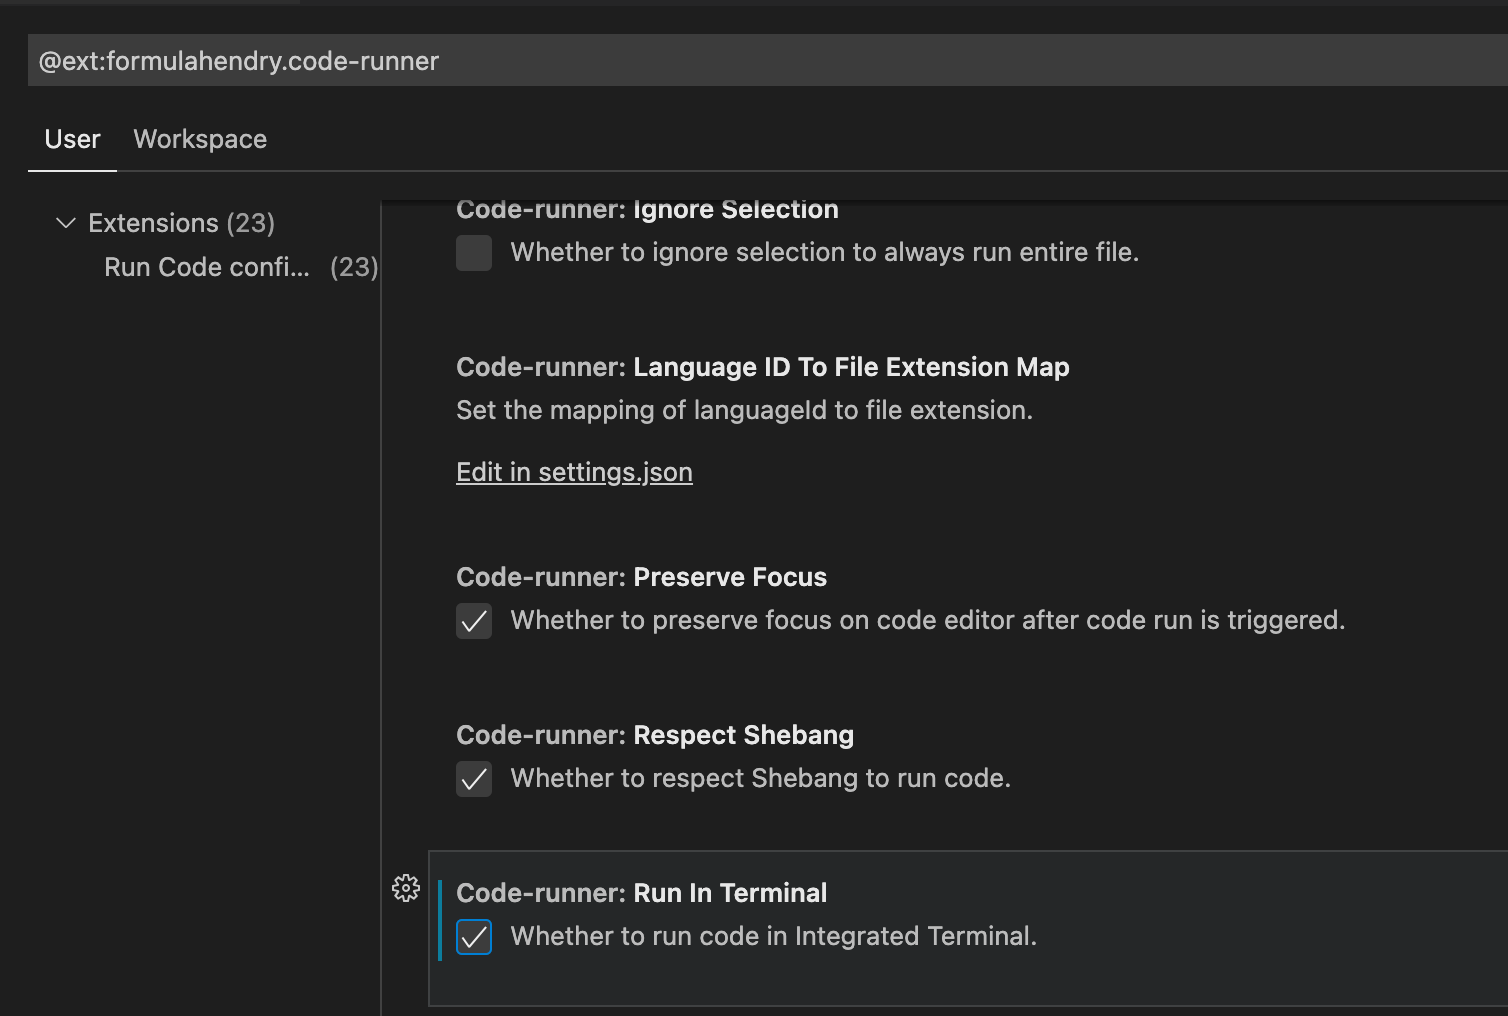](https://bookstack.treemanou.com/uploads/images/gallery/2022-07/wCWbjfVUsqWgGmKz-image-1657252347905.png)
# 【extension】ProjectManager
[](https://bookstack.treemanou.com/uploads/images/gallery/2021-12/ttfwvNFWPFprId3R-image-1638770347187.png)
```JSON
// "name": 顯示名稱,
// "rootPath": 本機資料夾("\" 要寫成 "\\"),
// "tag": tag分類,
// 是否顯示
[
{
"name": "go_demo",
"rootPath": "D:\\go_workspace\\go_demo",
"tags":["go","test"],
"enabled": true
},{
"name": "go_demo2",
"rootPath": "D:\\go_workspace\\go_demo2",
"tags":["go","test"],
"enabled": true
}
]
```
使用 tag / list 排序
[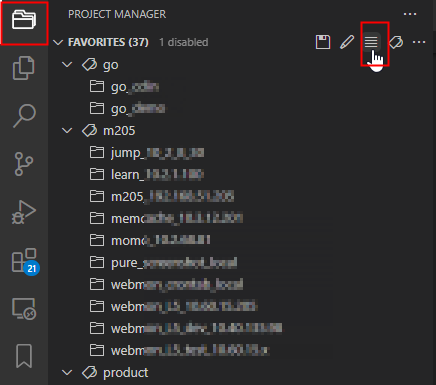](https://bookstack.treemanou.com/uploads/images/gallery/2021-12/UJdkcx9a2dLjmQmr-image-1638774516996.png)
[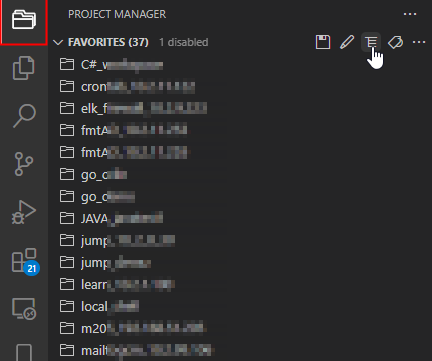](https://bookstack.treemanou.com/uploads/images/gallery/2021-12/F3GGbtR6k9eBMgkI-image-1638774582569.png)
# 【extension】sftp
### 產生Config
vscode 按下 Ctrl + Shift + P
輸入 SFTP:Config
---
[](https://bookstack.treemanou.com/uploads/images/gallery/2021-12/tNIi6QkOATYpcsHp-image-1638770235855.png)
### Config 相關
---
單一來源
```JSON
[
{
"name": "demo_10.1.1.1",
"context": "D:\\php_workspace\\demo",
"host": "10.1.1.1",
"username": "user1",
"password": "12345678",
"remotePath": "/root"
}
]
```
多個來源
```JSON
[
{
"name": "demo_10.1.1.1",
"context": "D:\\php_workspace\\demo\web1",
"host": "10.1.1.1",
"username": "user1",
"password": "12345678",
"remotePath": "/root"
},
{
"name": "demo_10.1.1.2",
"context": "D:\\php_workspace\\demo\web2",
"host": "10.1.1.2",
"username": "user1",
"password": "12345678",
"remotePath": "/root"
},
]
```
使用跳板機(帳號密碼)
```JSON
[
{
"name": "jump_demo",
"remotePath": "/root",
"context": "D:\\php_workspace\\jump_demo",
"host": "10.1.1.1", // 跳板機ip
"username": "user1", // 跳板機 帳號
"password": "12345678", // 跳板機 密碼
"hop": {
"host": "192.168.1.1", // 目的地ip
"port": 22,
"username": "target_user", // 目的地 帳號
"password": "66778899" // 目的地 密碼
},
// 排除檔案
"ignore": [
".vscode",
".git",
".DS_Store",
"**/logs/**",
"**/sessions/**"
],
// 儲存後自動上傳
"uploadOnSave": false
}
]
```
使用跳板機(憑證)
```JSON
[
{
"name": "jump_demo",
"remotePath": "/root",
"context": "D:\\php_workspace\\jump_demo",
"host": "10.1.1.1", // 跳板機ip
"username": "user1",
"password": "12345678",
"hop": {
"host": "192.168.1.1", // 目的地ip
"port": 22,
"username": "target_user",
"privateKeyPath": "/home/user1/.ssh/id_rsa" //使用憑證(跳板機位置)
},
// 排除檔案
"ignore": [
".vscode",
".git",
".DS_Store",
"**/logs/**",
"**/sessions/**"
],
// 儲存後自動上傳
"uploadOnSave": false
}
]
```
第一次設定完,可以按下【Ctrl + Shift + P 】(Mac: Cmd + Shift + P)
鍵入 >SFTP:Sync Remote -> Local
先將遠端資料同步至本機
[](https://bookstack.treemanou.com/uploads/images/gallery/2022-07/zOtmW2iuNdnjImut-image-1657186191829.png)
---
### 瀏覽遠端檔案/選取Server檔案至本地編輯
選取左側icon
[](https://bookstack.treemanou.com/uploads/images/gallery/2022-07/TfAGHB74KNUTyp4L-image-1657186997112.png)
,展開目錄找到要編輯檔案,【Edit in Local】
[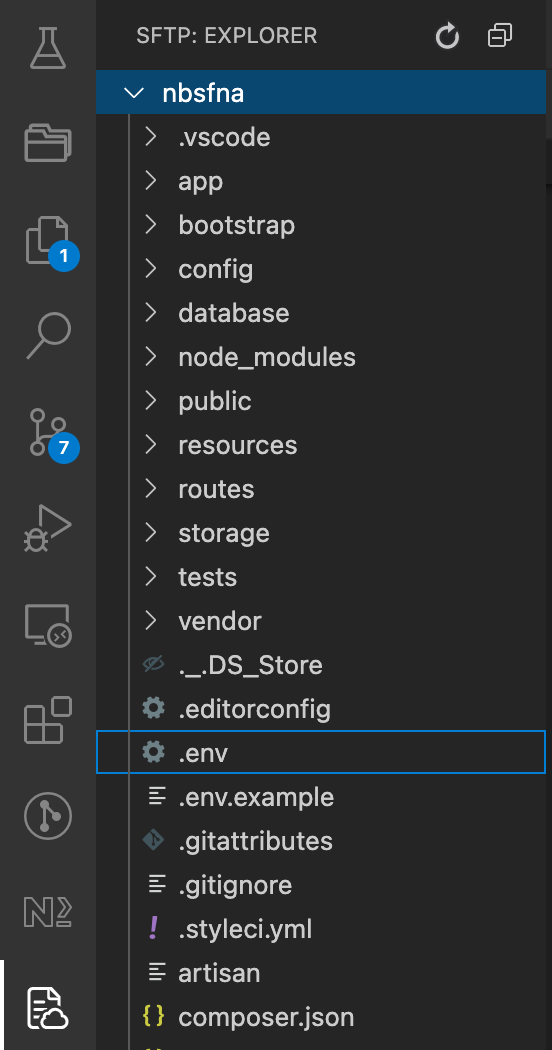](https://bookstack.treemanou.com/uploads/images/gallery/2022-07/dYCIqlAbr2GaUdNP-image-1657186787174.png)
[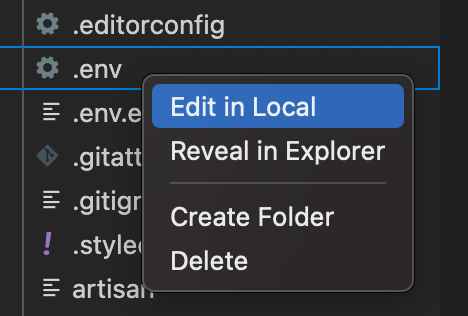](https://bookstack.treemanou.com/uploads/images/gallery/2022-07/Cvf7ePo36wLHdG1l-image-1657186848499.png)
---
### 檔案比較
在本地編輯的時候,可以按右鍵【Diff with Remote】與server 檔案比較
[](https://bookstack.treemanou.com/uploads/images/gallery/2022-07/gQD3mLHQYxZVPA3B-image-1657186402680.png)
---
###
###
---
### 上傳,下載檔案
可以按右鍵,【Upload/ Download】上傳本地檔案至Server 或是 下載Server 檔案
[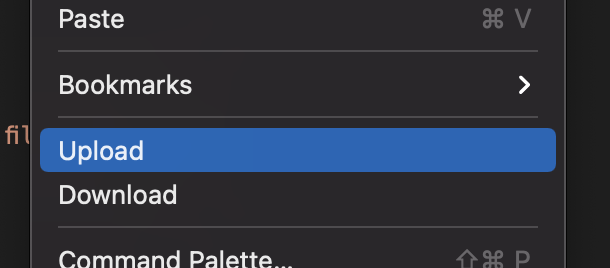](https://bookstack.treemanou.com/uploads/images/gallery/2022-07/1YDtrGQUAJ1ZCsE6-image-1657186492797.png)
---
# 【extention】RemoteSSH
# Running the contributed command: ‘\_workbench.downloadResource‘ failed解决
1 問題描述
此前,本人參考網上教程在VS Code中配置了“Remote SSH”插件(比如 但是今天使用遇到了問題Error: Running the contributed command: '\_workbench.downloadResource' failed
2 解決方案
刪除Remote Server上的~/.vscode-serverrm -rf ~/.vscode-server
在本地的VS Code中再次嘗試連接,毫無意外,這次依然是失敗的。但是這一步會在遠程服務器中生成~/.vscode-server/bin/xxx/vscode-server.tar.gz
上面的xxx的文件夾稱為Commit Id,現在利用Commit ID下載遠程連接需要的文件。
然後使用這個鏈接:https://update.code.visualstudio.com/commit:xxx/server-linux-x64/stable下載所需文件,注意鏈接中的$COMMIT\_ID這幾個字符(注意$不要忘記)需要換成自己的,比如我的是2d23c42a936db1c7b3b06f918cde29561cc47cd6,
下載完畢後,將下載的文件upload到Remote Server的~/.vscode-server/bin/xxx
tar -xvf stable --strip-components 1
然後使用chmod +x node server.sh
再次使用VS Code嘗試鏈接,這一步會鏈接成功
原文链接:https://blog.csdn.net/ibless/article/details/118610776
# 【tip】修改設定檔(settings.json)
圖形化介面
[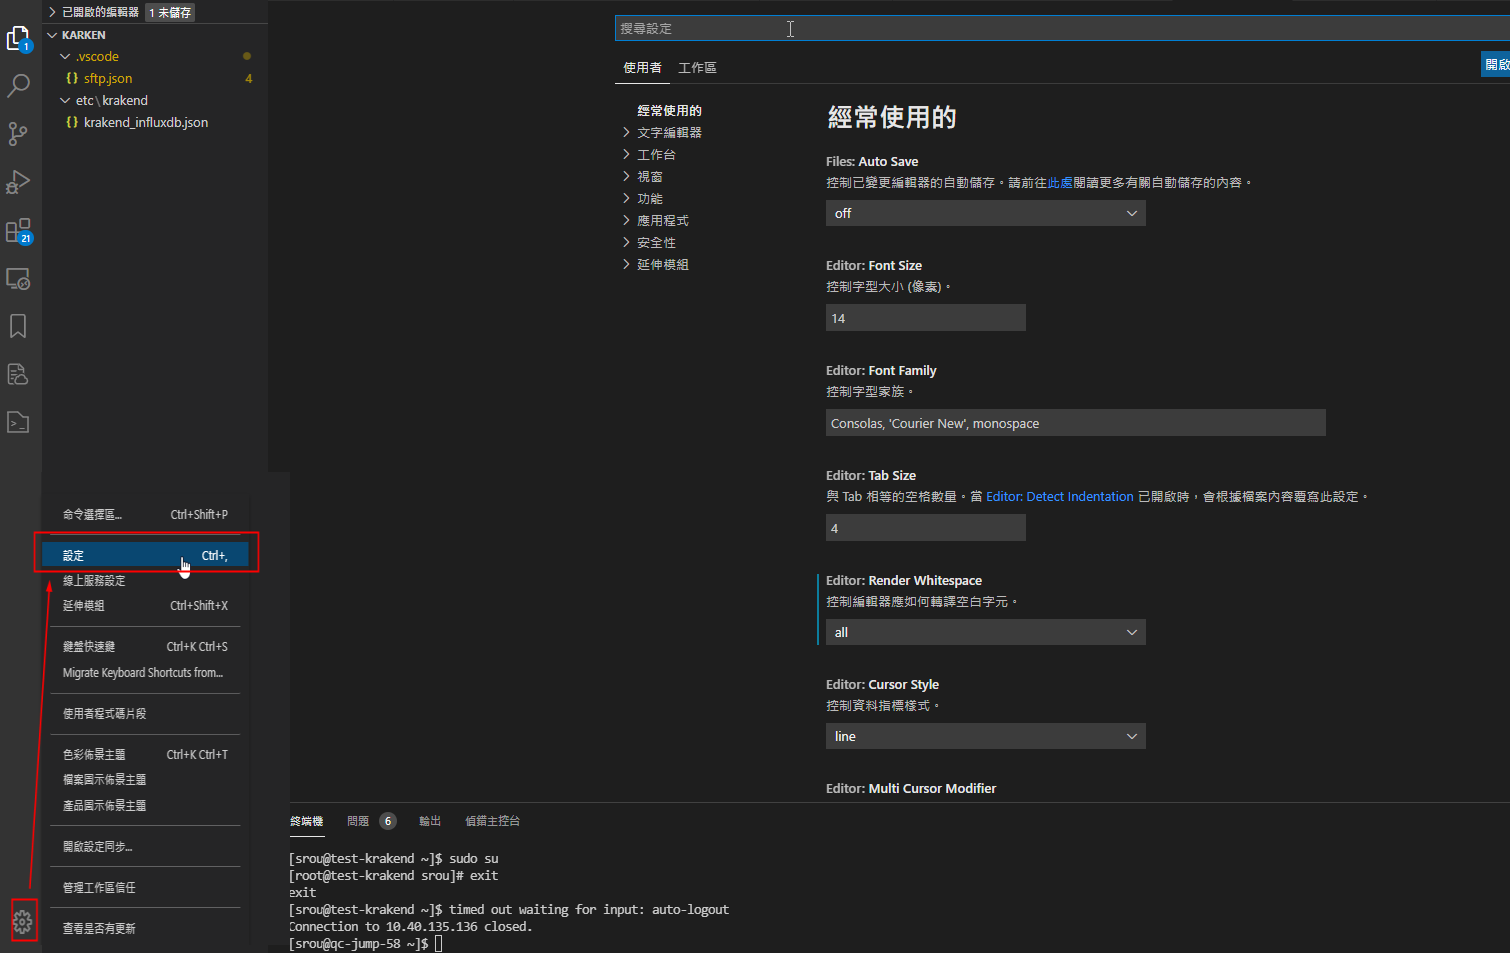](https://bookstack.treemanou.com/uploads/images/gallery/2021-12/eY6yD9zm4EaE6Etw-image-1638780167411.png)
修改 setting.json
[](https://bookstack.treemanou.com/uploads/images/gallery/2021-12/wqT15iKBaRVx01oo-image-1638780258387.png)
[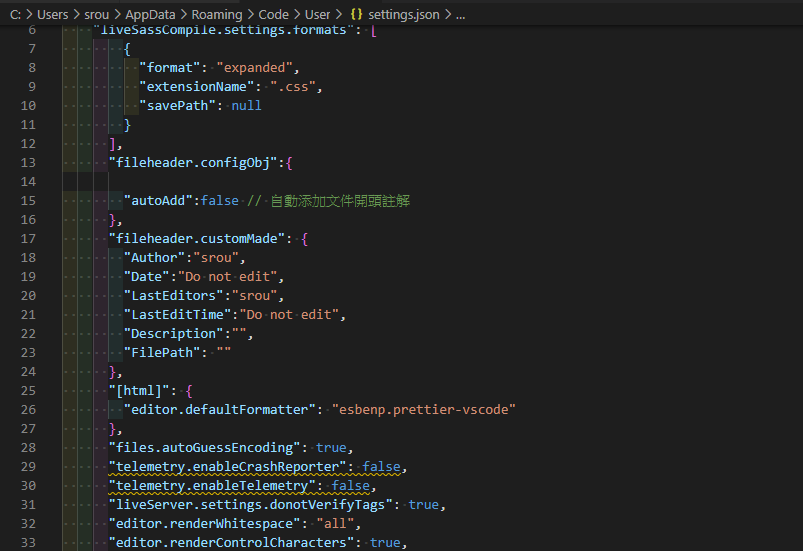](https://bookstack.treemanou.com/uploads/images/gallery/2021-12/tqsPhkFcvdvFWOXV-image-1638780282253.png)
# 【tip】常用settings
修改 settings.json
```JSON
{
"workbench.editor.wrapTabs": true, // tab數量超過一行是否摺疊顯示(false 會出現scroll bar)
"workbench.editor.enablePreview": false, // 點選檔案是否使用同一個tab(不另開)
"editor.defaultFormatter": null, // 預設排版引擎
"[html]": { // html 使用排版引擎
"editor.defaultFormatter": "esbenp.prettier-vscode"
},
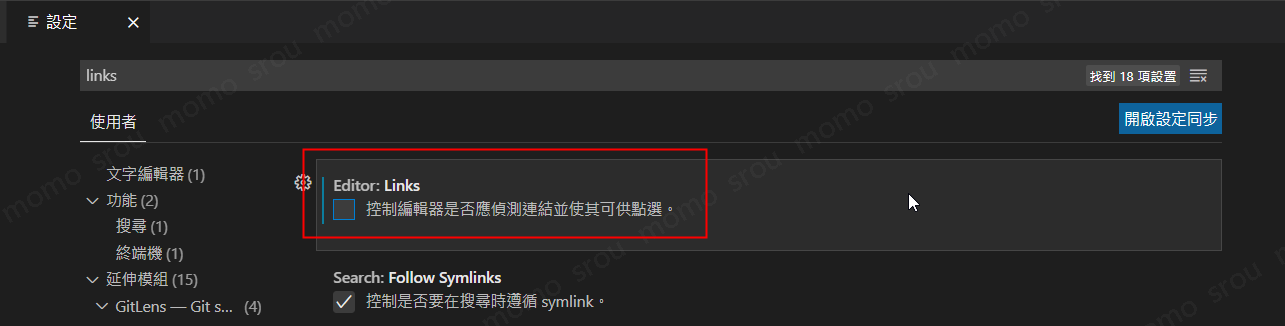
"editor.links": false, // 關閉超連結(避免誤點超連結,選用)
}
```
---
editor.links
[](https://bookstack.treemanou.com/uploads/images/gallery/2022-10/yrQRQqTCjs2EZa1z-image-1665730176972.png)
# 【tip】format 程式碼排版
快速鍵
```
在Windows Shift + Alt + F
在Mac Shift + Option + F
在Ubuntu Ctrl + Shift + I
```
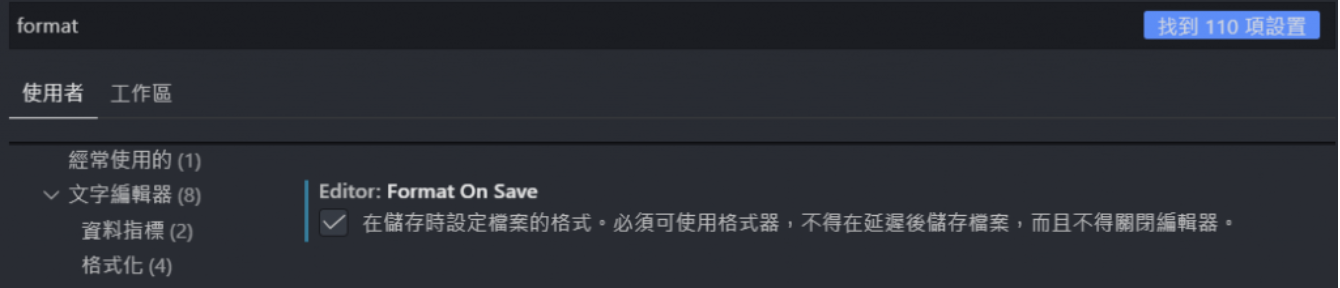
存檔自動格式化(設定 Ctrl + ,)
[](https://bookstack.treemanou.com/uploads/images/gallery/2021-12/gdvaklh9cxxBEdaa-image-1638779536748.png)
如何修改預設排版外掛
[修改 setting.json](https://bookstack.treemanou.com/books/treeman/page/tipsettingjson) (複製後請將註解刪除,避免json格式錯誤)
```JSON
{
// 預設formatter引擎
"editor.defaultFormatter": null,
// javascript 排版使用引擎
"[javascriptreact]": {
"editor.defaultFormatter": "esbenp.prettier-vscode"
},
}
```
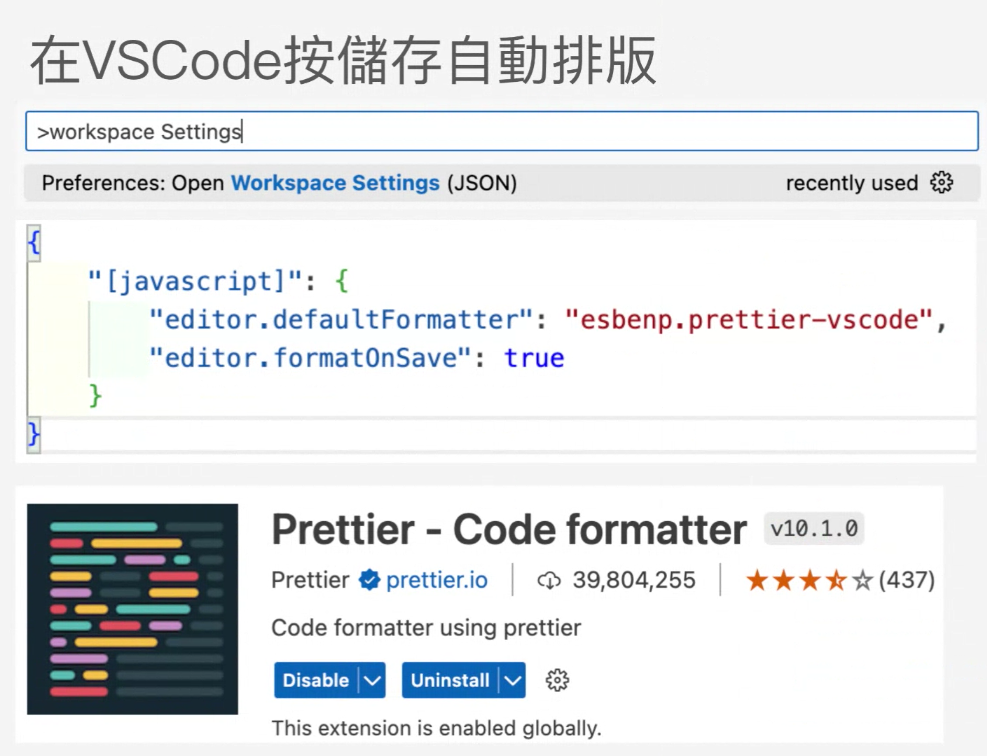
# 【extention】Preettier
[](https://bookstack.treemanou.com/uploads/images/gallery/2024-01/ZctIc0knYhj8ynPd-image-1704336769236.png)
# 【 VScode】 加入class path
了解,你的意思是想讓 `code` 指令(用來從終端機開啟 VS Code)**在 Zsh 中可以使用**。這通常是因為 `code` 沒有被加入 PATH。以下是解法:
---
### ✅ macOS 上讓 `code` 指令可用(官方方式)
1. 打開 VS Code
2. 用快捷鍵 `Cmd + Shift + P` 打開 **Command Palette**
3. 輸入並選擇:
```
Shell Command: Install 'code' command in PATH
```
4. 關閉終端機重新開啟,輸入:
```bash
code --version
```
若能顯示版本就成功了!
---
### ✅ 手動加入 `code` 到 PATH(若上面方式無效)
VS Code 的 `code` 通常在這裡:
```bash
/Applications/Visual\ Studio\ Code.app/Contents/Resources/app/bin
```
你可以將這段加入 `~/.zshrc`:
```zsh
export PATH="$PATH:/Applications/Visual Studio Code.app/Contents/Resources/app/bin"
```
然後執行:
```bash
source ~/.zshrc
```
接著執行 `code` 應該就會有反應了。