【GitLab】相關
- 【GitLab】gitlab-runner 執行環境種類
- 【GitLab】升級相關
- 【GitLab】runner 使用 k8s 流程說明
- 【GitLab】CI/CD Settings 說明
- 【GitLab】使用ssh clone 專案
【GitLab】gitlab-runner 執行環境種類
下面整理成表格給你(主流可用的 executor):
| Executor | 運作方式 | 優點 | 缺點 | 適用情境 | 設定/註冊要點 |
|---|---|---|---|---|---|
| shell | 直接在 Runner 主機的 shell 執行(bash / PowerShell) | 最快、零容器開銷;可直接用主機已安裝工具 | 隔離最弱、容易「弄髒」主機;多專案易衝突 | 單機/內網、快速 smoke test、固定工具鏈 | gitlab-runner register --executor shell;確保 gitlab-runner 使用者權限(如加入 docker 群組)與 builds_dir 可寫 |
| docker | 每個 job 以容器執行;image: 可指定環境 |
環境可重現、隔離佳、跨專案穩定 | 需管理映像;使用 Docker 需選擇掛 docker.sock 或 DinD |
大多數 CI/CD 場景(前後端 build、容器化) | --executor docker --docker-image <base>;若 job 需 docker build:① 掛 /var/run/docker.sock,或 ② DinD:privileged=true + services: docker:dind |
| kubernetes | 每個 job 建一個 Pod 來跑 | 彈性擴縮、資源/隔離/配額完善 | 需 K8s 叢集與維運成本 | 中大型團隊、尖峰負載、雲原生 | --executor kubernetes;於 config.toml 設 namespace、serviceAccount、pull secrets 等 |
| ssh | Runner 透過 SSH 登入遠端主機執行 | 可用現成遠端環境、無需在目標機器裝 Runner | 隔離弱、擴展性差、權限管控要嚴格 | 特定機器/設備、臨時需求 | --executor ssh;於 config.toml 填 host/user/key、路徑與環境 |
| custom | 以自訂腳本(prepare/run/cleanup)對接任意執行環境 | 彈性最高、可接非官方平台 | 需自寫與維護整套腳本,診斷較複雜 | 特殊平台、內部排程器 | --executor custom;提供自訂 hook 腳本並測好錯誤處理 |
【GitLab】升級相關
升級路徑
https://gitlab-com.gitlab.io/support/toolbox/upgrade-path/
【GitLab】runner 使用 k8s 流程說明
一、前置條件
-
已有可用的 Kubernetes 叢集(kubectl/helm 可連通)
-
GitLab 可連到 Runner(你的 GitLab URL 例:
http://10.2.11.139) -
在 GitLab 介面建立 Runner(Project/Group/Instance → CI/CD → Runners → New runner),取得 Authentication Token(
glrt-...)
二、建立命名空間
kubectl create namespace gitlab-runner     # 放 Runner 本體
kubectl create namespace ci-jobs           # job 跑的位置(也可與上面同一 ns)
三、用 Helm 裝 Runner(K8s executor)
-
加入 chart
helm repo add gitlab https://charts.gitlab.io
helm repo update
-
建一份
values.yaml
gitlabUrl: "http://10.2.11.139/"
# 新流程建議用 runnerToken(glrt-...)
runnerToken: "glrt-xxxxxxxxxxxxxxxxxxxxxxxxxxxx"

rbac:
  create: true

serviceAccount:
  create: true
  name: gitlab-runner

runners:
  executor: kubernetes
  # job 要跑在哪個 ns;不填則跟 Runner 同 ns
  namespace: ci-jobs
  # 預設 job 容器用什麼 image(可被 .gitlab-ci.yml 的 image 覆蓋)
  image: alpine:3.20
  pollTimeout: 180

  # 是否允許特權容器(多數情況不需要,建議先關)
  privileged: false

  # 幫 job Pod 加上標籤(可選)
  podLabels:
    app: gitlab-ci-job

  # 預設資源限制(可選)
  resources:
    limits:
      cpu: "1"
      memory: "1Gi"
    requests:
      cpu: "200m"
      memory: "256Mi"

  # Cache(可選:接 S3/MinIO;此段示意,若未啟用請刪除)
  cache:
    type: s3
    path: "gitlab-runner"
    s3ServerAddress: "minio.minio.svc.cluster.local:9000"
    s3BucketName: "gitlab-ci-cache"
    s3AccessKey: "minio-access"
    s3SecretKey: "minio-secret"
    s3Secure: false
新流程下:tags / run-untagged / locked 等屬性建議在 GitLab UI 的 Runner 設定頁調整,不再用 CLI 參數寫入。
-
安裝
helm upgrade --install gitlab-runner gitlab/gitlab-runner \
  -n gitlab-runner -f values.yaml
-
驗證
kubectl -n gitlab-runner get pods
# 應看到 gitlab-runner 的 Pod(或 deployment/rs)
四、最小 .gitlab-ci.yml(驗證 K8s executor 正常)
stages: [ping]

hello:
  stage: ping
  image: alpine:3.20
  script:
    - echo "Runner: $CI_RUNNER_DESCRIPTION"
    - echo "Executor: Kubernetes OK"
    - cat /etc/os-release
跑起來時的 log 開頭應出現:Preparing the "kubernetes" executor
K8s 裡 ci-jobs 命名空間會看到對應的 Pod(生命周期:Running → Succeeded)。
五、在 K8s executor 內建 Docker 映像(推薦用 Kaniko)
K8s executor 不建議 DinD。常見做法是用 Kaniko(rootless,無需 Docker daemon)。
-
在 GitLab 專案 CI Variables 設定:
-
CI_REGISTRY(你的 registry 位址) -
CI_REGISTRY_IMAGE(目標 repo) -
CI_REGISTRY_USER/CI_REGISTRY_PASSWORD(登入憑證)
-
Kaniko Job 範例
stages: [build]

docker-build:
  stage: build
  image:
    name: gcr.io/kaniko-project/executor:latest
    entrypoint: [""]
  variables:
    # registry 登入(若用 GitLab Container Registry,可改為 CI 提供的 token)
    DOCKER_CONFIG: /kaniko/.docker
  script:
    - >
      mkdir -p /kaniko/.docker &&
      cat > /kaniko/.docker/config.json <<EOF
      {
        "auths": {
          "${CI_REGISTRY}": {
            "auth": "$(printf "%s:%s" "$CI_REGISTRY_USER" "$CI_REGISTRY_PASSWORD" | base64 -w0)"
          }
        }
      }
      EOF
    - echo -e 'FROM alpine:3.20\nCMD ["echo","kaniko build OK"]' > Dockerfile
    - >
      /kaniko/executor
      --context "${CI_PROJECT_DIR}"
      --dockerfile "${CI_PROJECT_DIR}/Dockerfile"
      --destination "${CI_REGISTRY_IMAGE}:$CI_COMMIT_SHA"
      --destination "${CI_REGISTRY_IMAGE}:latest"
這個 job 會在 K8s 中跑 Kaniko,把映像打好推到 Registry,不需要 Docker daemon、也不需要 privileged。
六、(可選)Sidecar 服務示例(K8s 會幫你生多容器 Pod)
stages: [test]

pg-test:
  stage: test
  image: postgres:16-alpine
  services:
    - name: postgres:16-alpine
      alias: db
  variables:
    POSTGRES_PASSWORD: secret
  script:
    - psql -h db -U postgres -c "SELECT version();"
在 K8s executor 下,
services:會轉成 同一個 Pod 的 sidecar 容器,網路互通用alias連線。
七、常見疑難排解
-
Pipeline 卡 Pending
-
確認 Runner 在 GitLab UI 顯示 Online、tags 是否匹配(或允許 untagged)。
-
-
Pod 起不來 / CrashLoopBackOff
-
kubectl -n ci-jobs describe pod <pod>看 event / 拉不到 image / 權限問題。
-
-
需要特權容器
-
在
values.yaml的runners.privileged: true(謹慎評估安全)。
-
-
Cache/S3 連線
-
先用最小流程跑通,再逐一加上 cache 設定;MinIO/GCS/S3 憑證與位址要正確。
-
八、如果不用 Helm(純手工方式,了解即可)
-
部署一個
gitlab/gitlab-runner的 Deployment -
用 ConfigMap/Secret 提供
config.toml(executor = "kubernetes"、[runners.kubernetes]參數) -
綁一個 ServiceAccount + RBAC(允許建立/刪除 Pod)
但維運上 Helm chart 會簡單很多(升級/回滾/佈署差異)。
需要我幫你把 values.yaml 客製到你的環境(例如 MinIO 位址、特定節點選擇器、Pod 安全性設定、預設資源)嗎?我可以直接產一份可用的版本給你。
【GitLab】CI/CD Settings 說明
✅ General pipelines
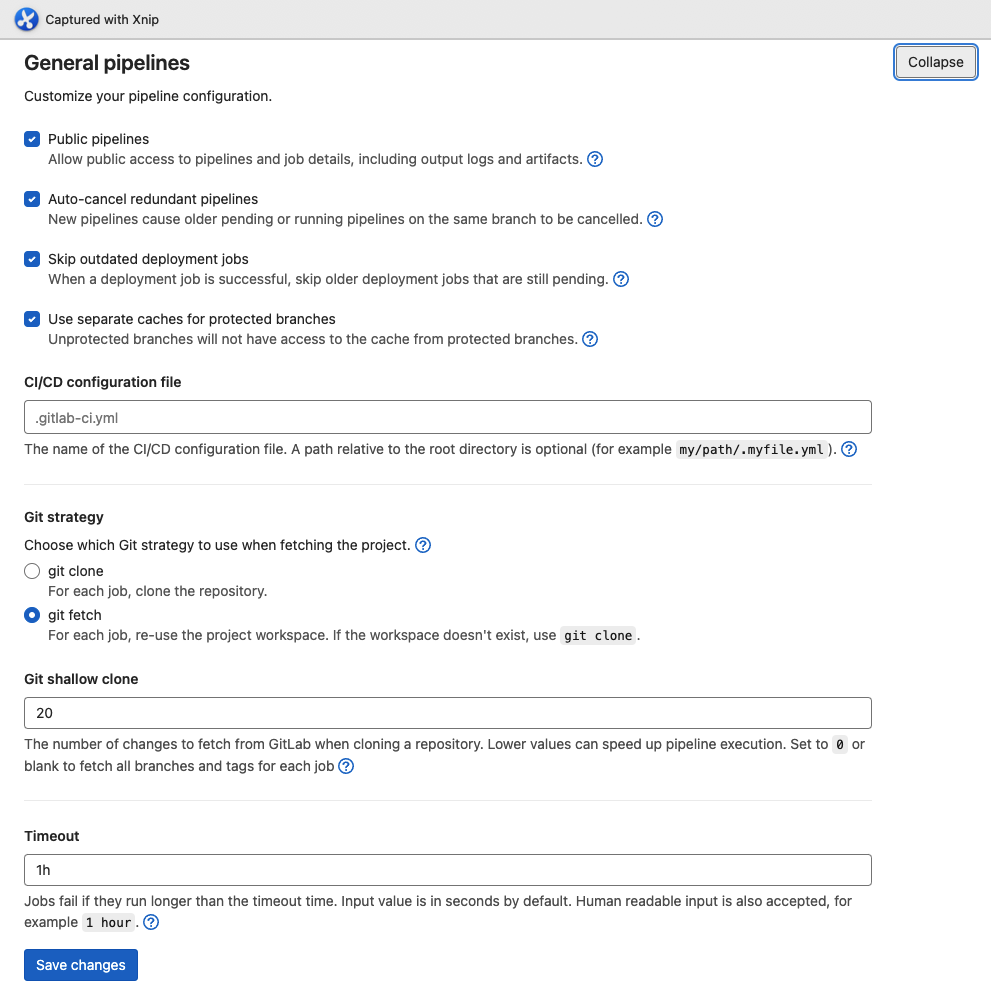
1. Public pipelines
-
功能:允許任何人(即使沒有專案權限)查看 Pipeline 與 Job 詳細資訊,包括 log 和 artifacts。
-
影響:
-
開啟:方便外部協作或開源專案 debug。
-
關閉:僅有有權限的使用者能查看。
-
2. Auto-cancel redundant pipelines
-
功能:在同一分支上,如果新的 Pipeline 啟動,會自動取消舊的 Pending / Running pipeline。
-
好處:減少資源浪費(例如多次 push 只保留最後一次)。
-
注意:取消的 pipeline 會標記為 canceled。
3. Skip outdated deployment jobs
-
功能:部署任務還沒執行時,如果有新的 pipeline 部署成功,舊的部署 job 就會跳過(不執行)。
-
應用情境:避免舊版本覆蓋新版本的部署。
4. Use separate caches for protected branches
-
功能:對受保護分支(protected branch)使用獨立的 CI cache。
-
好處:防止非受保護分支的 cache 汙染主分支的 cache(例如 main / master)。
-
影響:可能增加存儲空間使用。
5. CI/CD configuration file
-
功能:指定
.gitlab-ci.yml檔案位置。 -
預設:
.gitlab-ci.yml在專案根目錄。 -
用途:
-
如果 CI 設定檔放在子目錄,可以改成
my/path/ci.yml。 -
適合 Monorepo 管理多個 CI 配置。
-
6. Git strategy
-
選項:
-
git clone:每個 job 都會全新 clone 一份 repo。
-
git fetch(已勾選):重複使用上一次 job 的工作目錄(workspace),若不存在才 clone。
-
-
比較:
-
clone:乾淨,但速度較慢。 -
fetch:快,但可能殘留舊檔案(需注意 job 隔離)。
-
7. Git shallow clone
-
數值:
20 -
功能:限制 clone/fetch 的提交數(Depth)。
-
範例:
20代表只取最後 20 次 commit 歷史。 -
0 或空白 → 取全部 commit & tags。
-
-
好處:減少 clone 時間與流量。
8. Timeout
-
值:
1h(1 小時) -
功能:Job 最長允許執行時間。
-
到時動作:超時會被 GitLab 強制標記為 failed。
-
可用格式:秒數(
3600)、人類可讀(1h、30m)。
我看你的設定,Git strategy 用 fetch + shallow clone 20,這樣拉程式會比較快,但如果你有需要依賴完整 commit 歷史(例如 git describe、全量 tag 檢出),要把 shallow clone 設成 0。
✅ Pipeline status
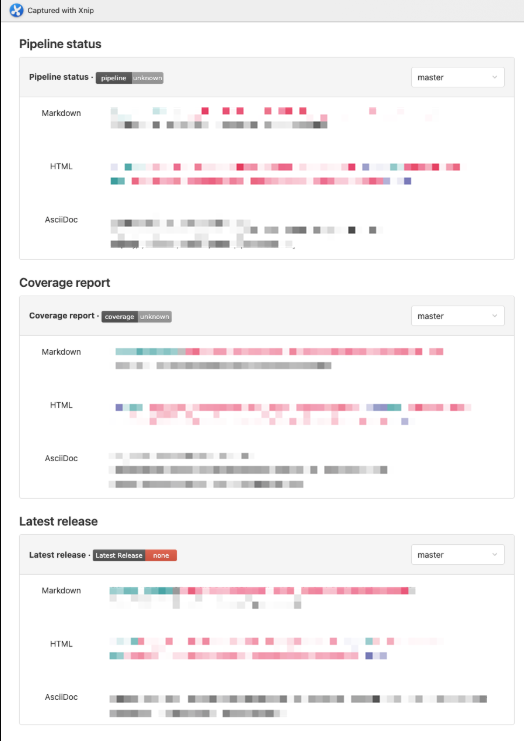
這張圖是 GitLab 專案的 CI/CD 狀態徽章(Badges)設定頁,它提供了一些可以放到 README 或網頁上的「狀態顯示圖示」,用來即時反映專案的 CI/CD 情況。
分三塊說明:
1. Pipeline status(流水線狀態)
-
顯示當前分支的 CI/CD Pipeline 狀態(成功、失敗、進行中等)。
-
會即時更新成對應的 SVG 圖示。
-
三種嵌入格式:
-
Markdown:給 README.md 用
[](http://10.2.2.3/user/k8s-deploy/-/commits/master) -
HTML:可用在網站或 Wiki
<a href="http://10.2.2.3/user/k8s-deploy/-/commits/master"> <img alt="pipeline status" src="http://10.2.11.139/srou/live-k8s-deploy/badges/master/pipeline.svg" /> </a> -
AsciiDoc:給 AsciiDoc 格式文件用
-
2. Coverage report(測試覆蓋率)
-
需要在
.gitlab-ci.yml內啟用測試覆蓋率計算(通常透過coverage:關鍵字解析測試輸出)。 -
顯示該分支最近一次 Pipeline 的測試覆蓋率百分比。
-
格式同上,也提供 Markdown / HTML / AsciiDoc 三種嵌入方式。
3. Latest release(最新版本)
-
會顯示專案的最新 Release(透過 GitLab Release 功能發佈的版本)。
-
如果沒有 Release,就會顯示
none(像你現在的狀態)。 -
格式同上,也提供三種嵌入方式。
4. 使用方式
-
你可以把 Markdown 格式複製到專案的
README.md,讓別人一眼看到專案的 CI/CD 狀態與測試覆蓋率。 -
如果有內部 Wiki、Confluence、或是外部網站,也可以用 HTML 格式嵌入。
-
例如放在 README.md:
# k8s-deploy [](http://10.2.2.3/user/k8s-deploy/-/commits/master) [](http://10.2.2.3/user/k8s-deploy/-/commits/master)
✅ Auto DevOps
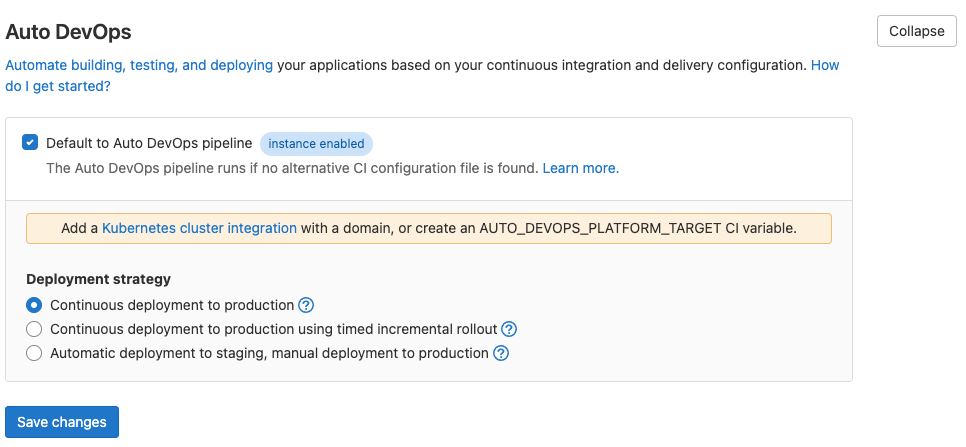
你這張圖是 GitLab Auto DevOps 的設定頁面,它是 GitLab 提供的一套「自動化 CI/CD Pipeline」功能,讓專案在沒有自訂 .gitlab-ci.yml 的情況下,也能自動完成建置、測試、部署等流程。
1. Default to Auto DevOps pipeline
-
啟用狀態(打勾)
表示如果專案 沒有.gitlab-ci.yml,GitLab 就會自動使用 Auto DevOps 預設流程。 -
instance enabled
表示這個功能已在 GitLab 系統層級啟用,專案可以直接用。 -
如果你已經在專案內放了
.gitlab-ci.yml,這個設定不會生效(因為會優先用自訂 Pipeline)。
2. 提示訊息
Add a Kubernetes cluster integration with a domain, or create an AUTO_DEVOPS_PLATFORM_TARGET CI variable.
-
Auto DevOps 預設會部署到 Kubernetes,所以 GitLab 建議:
-
整合 Kubernetes 叢集(在 GitLab CI/CD > Clusters 中設定)
-
或者在 CI/CD 變數中設定
AUTO_DEVOPS_PLATFORM_TARGET(指定部署平台)
-
3. Deployment strategy(部署策略)
三種選項:
-
Continuous deployment to production(持續部署到正式環境)
-
每次 Pipeline 成功就會自動部署到 Production。
-
-
Continuous deployment to production using timed incremental rollout(定時漸進式部署)
-
部署會分批釋出,逐漸更新所有節點(需要 Kubernetes 支援)。
-
-
Automatic deployment to staging, manual deployment to production(自動部署到測試環境,手動部署到正式環境)
-
先自動部署到 Staging 環境,Production 需要手動觸發。
-
4. 總結影響
-
如果勾選這個設定,且專案沒有
.gitlab-ci.yml,就會自動跑 GitLab 預設的 Auto DevOps 流程。 -
Auto DevOps 預設:
-
會進行 build → test → code quality → security scan → review app → deploy 等階段
-
預期環境是 Kubernetes
-
如果沒有 K8s,就需要自行設定變數(像
AUTO_DEVOPS_PLATFORM_TARGET)或調整成 Docker / VM 方式
-
✅ Runners
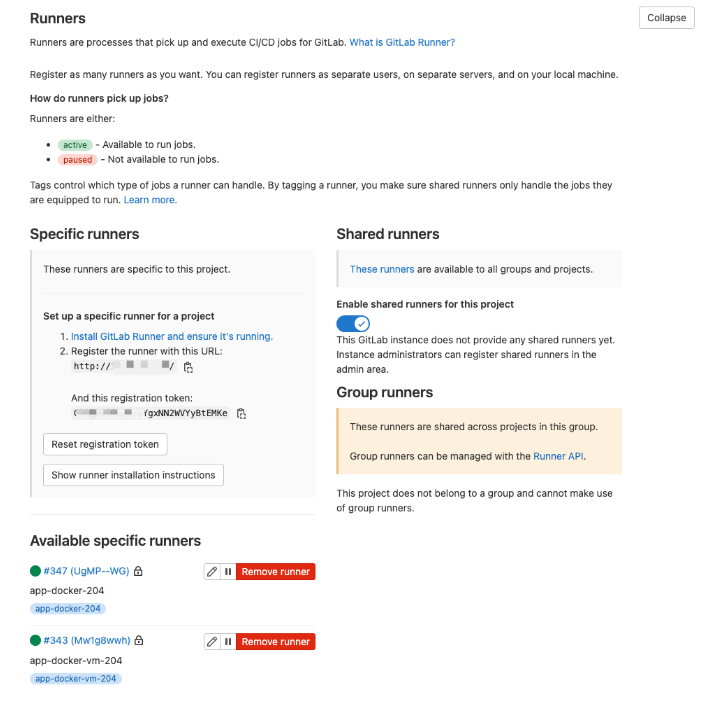
1. Runners 概念
-
Runner 是 GitLab CI/CD 的執行代理,用來接收並執行 pipeline job。
-
可以註冊在不同機器上(VM、Docker、K8s 等)。
-
有兩種主要分類:
-
Specific runners(專案專用)
-
Shared runners(全 GitLab 共用)
-
2. Specific runners
這個區塊是專屬於當前專案的 Runner。
圖片中有兩個 active 的 Runner:
| Runner 名稱 | 類型 | Tag | 狀態 |
|---|---|---|---|
| #347 (UgMp--WG) | Docker Executor | app-docker-204 |
🟢 active |
| #343 (Mw1g8wwh) | Shell/VM Executor | app-docker-vm-204 |
🟢 active |
Tag 作用:
-
.gitlab-ci.yml中tags: ["app-docker-204"]會指定 job 只能由對應的 Runner 執行。 -
如果 job 沒有
tags,而 Runner 又設定了「不允許 untagged job」,則不會被這個 Runner 接手。
3. Runner 註冊方式
左邊「Set up a specific runner for a project」提供:
-
GitLab 伺服器 URL:
http://10.X.X.X/ -
專案 Registration Token(圖片中有一段)
用gitlab-runner register時會用到。
4. Shared runners
-
當前 GitLab 沒有設定任何 Shared Runner(全域共用)。
-
「Enable shared runners for this project」是打開的,但因為 instance 沒有 shared runner,所以沒有作用。
5. Group runners
-
用於同一 GitLab group 底下多個專案共享 Runner。
-
目前這個專案不屬於任何 group,所以無法使用 group runner。
6. 運作重點
-
你有兩台 runner:
-
app-docker-204→ Docker executor,跑 job 時會用容器。 -
app-docker-vm-204→ Shell executor,直接在 VM 上跑。
-
-
兩者可以同時存在,但必須在
.gitlab-ci.yml指定正確的 tag,否則可能出現「no runner can run the job」的錯誤。
✅ Artifacts

這張圖是 GitLab 專案的 Artifact 保留設定。
-
Artifacts
-
Artifact 是 GitLab CI/CD 在 Job 結束後產生的檔案(例如:build 結果、測試報告、壓縮檔)。
-
這些檔案可以被下載、或傳到後續的 Job 使用。
-
-
Keep artifacts from most recent successful jobs(已勾選 ✅)
-
啟用後,系統會只保留最後一次成功的 Pipeline 所產生的 artifact。
-
舊的 artifact 會被自動刪掉,節省儲存空間。
-
適合只想保留最新版本的成果(例如:最後打包的 image、最後的前端編譯檔)。
-
-
作用機制
-
你的 pipeline 跑成功後 → Job 產生 artifact → 存下來。
-
下一次成功的 pipeline 出現 → GitLab 自動刪掉前一次成功的 artifact → 只留最新的。
-
使用情境
-
適合 持續整合/持續部署(CI/CD),因為通常只需要最新的 build 產物。
-
不適合需要保留歷史版本(例如回溯除錯、審計)的專案,此時應該在
.gitlab-ci.yml裡設定expire_in來控制保存期限。
這張圖是 GitLab CI/CD 專案層級的 Variables 設定頁面,主要是用來存放敏感資訊(例如密碼、金鑰、帳號等),在 Pipeline 中可以直接引用。
✅ Variables(變數)
1. Variables(變數)
-
存放的資料可以在
.gitlab-ci.yml的 job script 中透過$KEY方式存取,例如$PassWd、$UserName。 -
避免將敏感資料直接寫在
.gitlab-ci.yml裡。
2. 欄位說明
| 欄位 | 說明 |
|---|---|
| Type | 一般都是 Variable,也可能是 File(將值存成檔案再提供給 Job)。 |
| Key | 變數名稱(例如 PassWd、UserName),在 CI/CD job 中用 $PassWd 存取。 |
| Value | 變數值(已隱藏),只有有權限的使用者才能看到。 |
| Protected | ✅ 表示這個變數只會在 Protected branch 或 Protected tag 的 pipeline 中被注入。 |
| Masked | ✅ 代表在 Job log 中會以 ***** 隱藏,防止外洩(必須符合 GitLab Mask 規則)。 |
| Environments | 變數適用的環境,例如 All、production、staging 等。 |
3. 圖中範例
-
PassWd:
-
Protected ✅
-
Masked ✅(所以在 job log 裡看不到明碼)
-
適用於所有環境(All)。
-
-
UserName:
-
Protected ✅
-
Masked ❌(會以明碼顯示在 job log,如果有
echo $UserName會直接看見)。
-
4. 使用範例
假設你在 .gitlab-ci.yml 中要用這兩個變數:
stages:
  - test

show-vars:
  stage: test
  script:
    - echo "User: $UserName"
    - echo "Password: $PassWd"
-
如果 Masked 是 ✅ → job log 會看到
Password: ***** -
如果 Masked 是 ❌ → job log 會看到明碼
Password: mypassword
在 GitLab 裡,
Protected branch(受保護分支) 和 Protected tag(受保護標籤)
是用來防止重要分支或標籤被隨意修改、刪除、或由沒有權限的人 push 的安全機制。
Protected branch(受保護分支) 和 Protected tag (受保護標籤)
1. Protected branch(受保護分支)
主要特點:
-
只能特定角色(例如 Maintainer、Owner)push 及 merge。
-
一般用來保護 主要分支(例如
master、main、release)。 -
通常會搭配 Code Review / Merge Request 流程使用,避免直接修改。
-
也可以設定 誰可以直接 push、誰只能 merge。
範例情境
-
master分支設為 Protected → 只有 Maintainer 能 merge 到master。 -
Developer 想要改
master,必須透過 Merge Request 並經過審核。
2. Protected tag(受保護標籤)
主要特點:
-
限制誰可以建立或刪除特定的 Tag。
-
通常用來保護 版本發布標籤(例如
v1.0.0)。 -
避免有人隨便重建同名 Tag 導致部署混亂。
範例情境
-
v*標籤設為 Protected → 只有 Maintainer 可以建立v1.2.0這類 Tag。 -
防止 Developer 私自發佈或覆蓋版本。
3. 為什麼與 CI/CD Variables 有關
當你在 GitLab CI/CD 中將變數設定為 Protected = ✅ 時:
-
這個變數 只會注入 到針對 Protected branch 或 Protected tag 觸發的 Pipeline。
-
如果在非受保護分支(例如 feature/test)觸發 Pipeline,變數不會被注入,避免敏感資料外洩。
舉例
deploy:
  stage: deploy
  script:
    - echo $PROD_API_KEY
-
如果
$PROD_API_KEY是 Protected ✅:-
在
master(Protected branch) 觸發 → 可以用。 -
在
dev(非 Protected branch) 觸發 → 不會注入,變成空值。
-
這是 Protected Branch / Tag 與 CI/CD 變數注入邏輯對照表:
| Pipeline 觸發來源 | 變數 Protected 設定 | 變數是否注入 | 說明 |
|---|---|---|---|
Protected branch(例如 master) |
✅ Protected | ✅ 注入 | 變數只對受保護分支生效,符合條件可使用 |
非 Protected branch(例如 feature/test) |
✅ Protected | ❌ 不注入 | 變數不會被注入,避免敏感資料外洩 |
Protected tag(例如 v1.0.0) |
✅ Protected | ✅ 注入 | 變數會注入到受保護標籤的 Pipeline |
非 Protected tag(例如 test-1) |
✅ Protected | ❌ 不注入 | 變數不會被注入 |
| 任意 branch/tag | ❌ 未 Protected | ✅ 注入 | 不受限制,所有 Pipeline 都能用變數 |
💡 建議用法
-
部署金鑰 / 密碼 / Token → 設為 Protected ✅,避免在測試分支外洩。
-
測試環境參數 → 可以不 Protected ❌,讓所有分支都能測試。
✅ Pipeline triggers
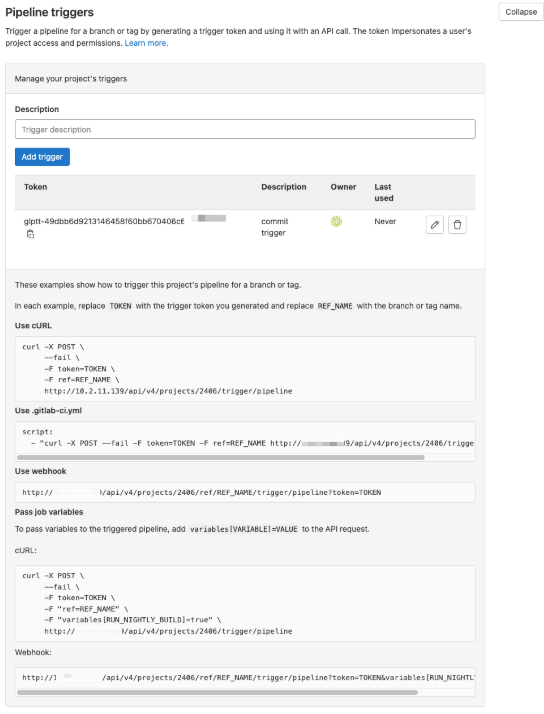
你這張圖是 GitLab Pipeline Trigger 設定頁面,它的用途是建立一組 Trigger Token,讓外部系統或腳本可以直接觸發專案的 CI/CD Pipeline,而不用透過 Git push 或 Merge Request。
1. Trigger Token
-
這是一組唯一的金鑰(圖中
glptt-49dbb6d...)。 -
持有這個 Token 的人,就能用 API 或 Webhook 觸發該專案的 Pipeline。
-
權限等同於建立它的帳號,但只能用來觸發 Pipeline,不能直接讀取或修改程式碼。
2. 觸發方式
(1) 用 cURL
curl -X POST --fail \
  -F token=YOUR_TOKEN \
  -F ref=分支或tag名稱 \
  http://10.10.10.10/api/v4/projects/2406/trigger/pipeline
-
ref:要在哪個 branch 或 tag 執行 Pipeline,例如master或release-v1.0。
(2) 在 .gitlab-ci.yml 裡呼叫
script:
  - "curl -X POST --fail -F token=YOUR_TOKEN -F ref=master http://10.10.10.10/api/v4/projects/2406/trigger/pipeline"
(3) 用 Webhook 直接 GET
http://10.10.10.10/api/v4/projects/2406/ref/master/trigger/pipeline?token=YOUR_TOKEN
-
適合用在簡單的 HTTP 呼叫(像是 Jenkins、監控系統、外部自動化工具)。
3. 傳入 Pipeline 變數
可以讓外部觸發時同時傳遞變數:
curl -X POST --fail \
  -F token=YOUR_TOKEN \
  -F ref=master \
  -F "variables[RUN_NIGHTLY_BUILD]=true" \
  http://10.10.10.10/api/v4/projects/2406/trigger/pipeline
-
這樣在
.gitlab-ci.yml中可以用$RUN_NIGHTLY_BUILD判斷。
4. 使用場景
-
定時觸發:配合 cron job,每天固定時間呼叫 API。
-
外部事件觸發:例如其他系統部署完成後自動通知 GitLab 進行後續工作。
-
跨專案觸發:一個專案完成後,透過 Token 觸發另一個專案的 Pipeline。
💡 建議:
-
不要把 Trigger Token 放在公開的地方(例如公開 repo)。
-
如果 Token 洩漏,任何人都可以觸發你的 Pipeline(甚至傳遞惡意變數)。
-
若外部要用,最好配合 Protected Branch 來限制觸發範圍。
✅ Deploy freezes(部署凍結)
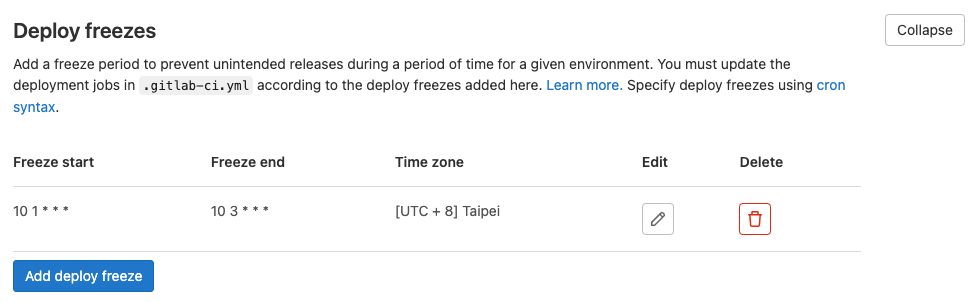
你這張圖是 GitLab 的 Deploy freezes(部署凍結)設定頁面,用來在特定時間區間禁止部署,避免在敏感時段(例如假日、系統維護時間、尖峰時段)誤發佈程式。
圖中設定解讀
-
Freeze start:
10 1 * * *
代表每天 01:10 開始凍結部署(Cron 語法:分 時 日 月 星期)。 -
Freeze end:
10 3 * * *
代表每天 03:10 結束凍結部署。 -
Time zone:
[UTC +8] Taipei
表示時間以台北時區計算。
功能運作方式
-
這裡的時間範圍只是定義凍結時段。
-
要生效,必須在
.gitlab-ci.yml的部署 job 中加上:deploy_job: stage: deploy script: - echo "Deploying..." rules: - if: $CI_DEPLOY_FREEZE == "true" when: never - when: on_success或使用 GitLab 內建的
deploy_freeze規則。 -
凍結期間,對應的部署 job 會直接跳過,不會觸發。
使用場景
-
避免在系統流量高峰期誤佈署造成中斷。
-
避免在假日、深夜維護窗口外誤觸部署。
-
防止新人誤觸 Pipeline 造成上線事故。
✅ Token Access
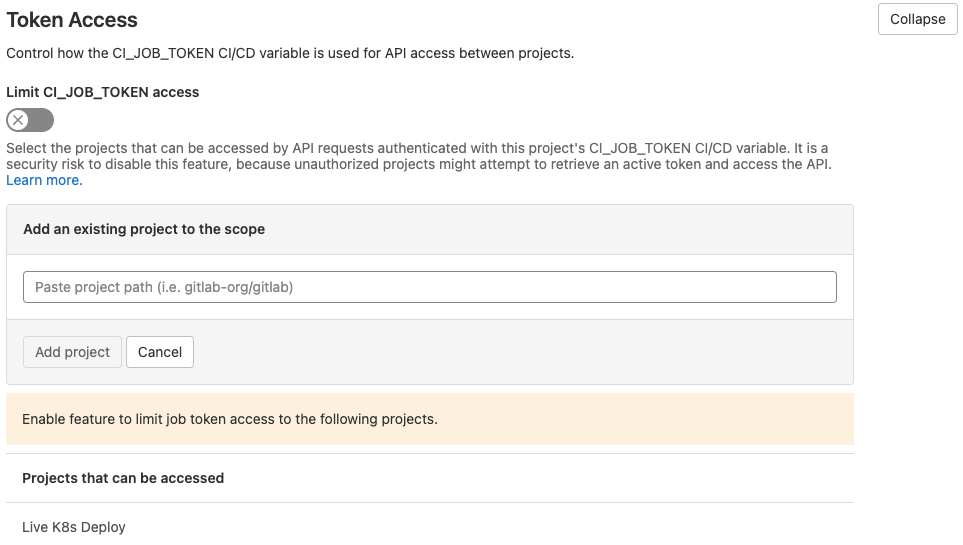
這是 GitLab 專案設定裡的 Token Access(CI_JOB_TOKEN 存取控制) 功能,主要用來限制 CI/CD 任務中 CI_JOB_TOKEN 變數可以存取的其他專案,避免被濫用。
-
Limit CI_JOB_TOKEN access(開關)
-
預設關閉(灰色),代表 任何專案 都能被這個專案的 CI_JOB_TOKEN 存取。
-
開啟後(藍色),就可以指定只有被列入清單的專案能被存取。
-
-
Add an existing project to the scope
-
在這裡輸入 GitLab 專案路徑(例如:
gitlab-org/gitlab),將其加入允許清單。 -
這樣 CI_JOB_TOKEN 就只能存取清單內的專案 API。
-
-
Projects that can be accessed
-
圖中顯示的
Live K8s Deploy就是允許被目前專案的 CI_JOB_TOKEN 直接存取的另一個專案。
-
用途
-
跨專案存取 API
在 CI/CD pipeline 中,可能需要用curl或wget呼叫其他 GitLab 專案的 API,例如下載 artifact、觸發 pipeline。 -
限制安全風險
如果沒有啟用限制,惡意程式碼可以利用 CI_JOB_TOKEN 存取同一 GitLab instance 中所有公開或有權限的專案。 -
最佳實務
-
如果專案需要 CI_JOB_TOKEN 存取別的專案 → 開啟並只加允許的專案。
-
如果專案不需要跨專案存取 → 建議直接開啟限制並不加任何專案。
-
範例:跨專案下載 Artifact
假設專案 A 的 pipeline 要下載專案 B 的最新 build:
script:
  - curl --header "JOB-TOKEN: $CI_JOB_TOKEN" \
         "https://gitlab.example.com/api/v4/projects/123/jobs/artifacts/main/download?job=build" \
         -o artifact.zip
如果你啟用了限制,就必須在專案 B 裡把專案 A 加進「Projects that can be accessed」清單,否則會 403 Forbidden。
【GitLab】使用ssh clone 專案
以下是在 GitLab 使用 SSH 方式 clone 專案的完整步驟,假設你的 GitLab 伺服器是公司內部或自架的,也適用:
1️⃣ 產生並設定 SSH Key
-
建立 SSH Key
ssh-keygen-
出現檔案路徑提示時直接按 Enter (預設~/.ssh/id_rsa.pub)
-
-
-
登入 GitLab → 右上角 使用者頭像 → Preferences → SSH Keys。
-
貼上 ~/.ssh/id_rsa.pub 內容。
-
2️⃣ 測試連線
確認 GitLab 可透過 SSH 連線:
ssh -T git@your.gitlab.host
-
第一次會詢問
Are you sure you want to continue connecting (yes/no)?→ 輸入yes。 -
成功訊息:
Welcome to GitLab, @你的帳號!
3️⃣ 取得專案的 SSH URL
在 GitLab 專案頁面:
-
點選 Code → Clone → 選 SSH。
-
範例 URL:
git@gitlab.example.com:group-name/project-name.git
4️⃣ 執行 Clone
git clone git@gitlab.example.com:group-name/project-name.git
-
會將程式碼拉到目前目錄下的
project-name資料夾。
5️⃣ 常見問題排查
| 問題 | 檢查方式 |
|---|---|
| Permission denied (publickey) | 確認 ssh-agent 有加入金鑰:ssh-add -l |
| 找不到 Host | 檢查網路、防火牆,或在 ~/.ssh/config 加入 Host 設定 |
| 公司內網 GitLab | 需確保內部 DNS 或 VPN 正確 |
範例 .ssh/config(可簡化命令)
Host gitlab-company
    HostName gitlab.example.com
    User git
    IdentityFile ~/.ssh/id_ed25519
然後可用:
git clone git@gitlab-company:group-name/project-name.git
以上步驟完成後,你就能用 SSH 方式安全地 git clone GitLab 專案並進行後續開發。