shell
- 【jq】 linux json 查詢工具(查詢篇)
- 【jq】 linux json 查詢工具(修改篇)
- 【jq】相關連結
- 【Shell】【tip】 找出目前誰使用swap
- 【Shell】【tip】使用暫存表,更新crontab
- 【Shell】【tip】使用 echo 輸出排程時間到log
- 【Shell】linux 下source、sh、bash、./執行指令碼的區別
- 【Shell】date 做 timestamp 格式轉換計算
- 【Shell】awk 取出特定欄位
- 【Shell】取得pubic ip
- 【shell】內建變數
- 【Shell】動態呼叫awk自訂函數
- 【 Shell】【Tool】測試機器防火牆是否開通
- 【Shell】【Tool】批次更新密碼
- 【Shell】【Tip】列出環境變數網址解析dns
- 【Shell】【Tool】call_api
【jq】 linux json 查詢工具(查詢篇)
- data
{
  "firstName": "John",
  "lastName": "Smith",
  "age": 25,
  "address": {
    "streetAddress": "21 2nd Street",
    "city": "New York",
    "state": "NY",
    "postalCode": "10021"
  },
  "phoneNumber": [
    {
      "type": "home",
      "number": "212 555-1234"
    },
    {
      "type": "fax",
      "number": "646 555-4567"
    }
  ],
  "gender": {
    "type": "male"
  }
}- 取得資料(age)
[root@jylee-stres-stest250 tmp]# cat data.json | jq .age

25- 取得資料(city) (addres > city)
[root@jylee-stres-stest250 tmp]# cat data.json | jq .address.city
"New York"- 輸出不帶雙引號 -r :
[root@jylee-stres-stest250 tmp]# cat data.json | jq .firstName
"John"

[root@jylee-stres-stest250 tmp]# cat data.json | jq -r .firstName
John- 取得資料(city) (addres > city)
[root@jylee-stres-stest250 tmp]# cat data.json | jq .address.city
"New York"- 取得電話
# 取得電話陣列
[root@jylee-stres-stest250 tmp]# cat data.json | jq .phoneNumber
[
  {
    "type": "home",
    "number": "212 555-1234"
  },
  {
    "type": "fax",
    "number": "646 555-4567"
  }
]


#取得第一組電話
[root@jylee-stres-stest250 tmp]# cat data.json | jq .phoneNumber[0]
{
  "type": "home",
  "number": "212 555-1234"
}

#取得第一組電話( type + number )
[root@jylee-stres-stest250 tmp]#cat data.json | jq -r '.phoneNumber[0] | .type+","+.number'
home,212 555-1234

#取得所有type
[root@jylee-stres-stest250 tmp]# cat data.json | jq '.phoneNumber[] | .type'
"home"
"fax"- 使用map,join重組資料
[root@jylee-stres-stest250 tmp]# cat data.json | jq '.phoneNumber | map(.type)'
[
  "home",
  "fax"
]
[root@jylee-stres-stest250 tmp]# cat data.json | jq '.phoneNumber | map(.type) | join(",")'
"home,fax"- 使用select 過濾資料
[root@jylee-stres-stest250 tmp]# cat sample.json | jq -r '.phoneNumber[] | select(.type == "home") '
{
  "type": "home",
  "number": "212 555-1234"
}

[root@jylee-stres-stest250 tmp]# cat sample.json | jq -r '.phoneNumber[] | select(.type == "home") | .number'
212 555-1234- 依key取出值
# 回傳物件
[root@jylee-stres-stest250 tmp]# echo '{"a":1, "ip":["10.10.10.1","10.10.10.2"], "c":3, "d":4}' | jq '{ip, d}'

{
  "ip": [
    "10.10.10.1",
    "10.10.10.2"
  ],
  "d": 4
}

# 回傳傳列
[root@jylee-stres-stest250 tmp]# echo '{"a":1, "ip":["10.10.10.1","10.10.10.2"], "c":3, "d":4}' | jq '[{ip, d}]'

[
  {
    "ip": [
      "10.10.10.1",
      "10.10.10.2"
    ],
    "d": 4
  }
]
# 綜合查詢
# @timestamp > 2025-08-20T16:, http_status 5開頭
jq -r 'select((.["@timestamp"] | startswith("2025-08-20T16:"))
and ((.http_status // .status | tostring) | test("^5")))
| [."@timestamp", (.http_status // .status | tostring), .request_uri] | @tsv' \
access.log-20250821
2025-08-20T16:15:59+08:00 500 /search/searchShop.jsp?keyword=%E6%A5%B5%E8%87%B4%E9%A2%A8%E6%A0%BC%20%E7%9A%AE%E8%B3%AA%E5%AE%A4%E5%85%A7%E6%8B%96%E9%9E%8B
2025-08-20T16:15:59+08:00 500 /search/_next/static/css/ed87e7f553f8bcd9.css
2025-08-20T16:16:00+08:00 500 /search/searchShop.jsp?keyword=%E5%B9%B3%E6%9D%BF%E9%9B%BB%E8%85%A6
2025-08-20T16:16:00+08:00 500 /search/_next/static/chunks/393-eda0e0e00dcf367e.js
2025-08-20T16:16:00+08:00 500 /search/_next/static/media/momo-icon.42337f3f.ttf
2025-08-20T16:16:00+08:00 500 /search/_next/static/chunks/webpack-b9b83558616d5724.js
2025-08-20T16:16:00+08:00 500 /search/_next/static/chunks/main-app-553b0eca9bdb3ac5.jsjq_array_to_shell
data
{
  "values": [
        {
          "email": "user1@domain.com",
          "id": "USER1_ID"
        },{
          "email": "user2@domain.com",
          "id": "USER2_ID"
        }
	]
}
ss.sh
while IFS=',' read -r email id; do
  echo "$email"
  echo "$id"
done <<EOF
$(jq -r '.values[] | "\(.email),\(.id)"' data2.json)
EOF
[root@jylee-stres-stest250 tmp]# sh ss.sh
user1@domain.com
USER1_ID
user2@domain.com
USER2_IDhttps://stedolan.github.io/jq/manual/#Invokingjq
【jq】 linux json 查詢工具(修改篇)
- 修改前節點資料
[root@jylee-stres-stest250 tmp]# echo '{"a":{"b":0, "c":1}}' | jq .
{
  "a": {
    "b": 0,
    "c": 1
  }
}- 新增 / 修改 : setpath([
路徑];值)
[root@jylee-stres-stest250 tmp]# echo '{"a":{"b":0, "c":1}}' | jq 'setpath(["a","b"];1)'
#修改 a . b ; 0 => 1
{
  "a": {
    "b": 1,
    "c": 1
  }
}

#修改 多筆值用 | 分開
#修改 a . b ; 0 => 1,
# 修改 a . c ;1=> array( 1,2)
[root@jylee-stres-stest250 tmp]# echo '{"a":{"b":0, "c":1}}' | jq 'setpath(["a","b"];1) | setpath(["a","c"];[1,2])'
{
  "a": {
    "b": 1,
    "c": [
      1,
      2
    ]
  }
}- 刪除 delpath
s([ [刪除節點1] ,[刪除節點2]...])
[root@jylee-stres-stest250 tmp]# echo '{"a":{"b":0, "c":1},"d": 111}' | jq .
{
  "a": {
    "b": 0,
    "c": 1
  },
  "d": 111
}

# 刪除d節點
[root@jylee-stres-stest250 tmp]# echo '{"a":{"b":0, "c":1},"d": 111}' | jq 'delpaths([["d"]])'
{
  "a": {
    "b": 0,
    "c": 1
  }
}

# 刪除d節點, a.b 節點
[root@jylee-stres-stest250 tmp]# echo '{"a":{"b":0, "c":1},"d": 111}' | jq 'delpaths([["d"],["a","b"]])'
{
  "a": {
    "c": 1
  }
}
【jq】相關連結
【Shell】【tip】 找出目前誰使用swap
who_use_swap.sh
#!/bin/bash
for p in /proc/[0-9]*; do
  pid=${p##*/}
  swap=$(awk '/VmSwap:/ {print $2}' $p/status 2>/dev/null)
  comm=$(tr -d '\0' < $p/comm 2>/dev/null)
  [ -n "$swap" ] && [ "$swap" -gt 0 ] && printf "%10s KiB  pid=%s  %s\n" "$swap" "$pid" "$comm"
done | sort -nr | head -20
[root@localhost shell]# bash who_use_swap.sh
508 KiB pid=31107 java
204 KiB pid=16675 java
136 KiB pid=30500 sentry
116 KiB pid=14021 sentry
104 KiB pid=1040 containerd
88 KiB pid=30650 sentry
72 KiB pid=30508 sentry
52 KiB pid=29817 sentry
52 KiB pid=10666 dockerd
44 KiB pid=30521 sentry
40 KiB pid=30491 sentry
40 KiB pid=12964 sentry
36 KiB pid=338 sentry
28 KiB pid=30082 sentry
24 KiB pid=30615 sentry
20 KiB pid=322 sentry
16 KiB pid=32662 containerd-shim
16 KiB pid=31934 sentry
16 KiB pid=30911 sentry
16 KiB pid=26832 sentry
【Shell】【tip】使用暫存表,更新crontab
#!/bin/bash
# $$ => pid,使暫存檔名不重複
tmp_file=/tmp/cron$$

# 利用trap 刪除暫存檔
#This installs a trap handler for exit (0) and signals 1 (SIGHUP), 3 (SIGQUIT) and 15 (SIGTERM)
# that removes a file presumably storing a process ID.
#See man 3 signal for details about signals.
trap "rm -rf $tmp_file" 0 1 3 15


cat > $tmp_file << EOF
*/10 * * * * echo "Hello World"
EOF

cat $tmp_file
cat $tmp_file | crontab
【Shell】【tip】使用 echo 輸出排程時間到log
# 使用 echo 輸出排程時間到log
# 測試輸出到 /tmp/crontab.log
0 8 * * *  echo "$(date '+\%Y-\%m-\%d \%H:\%M:\%S') - $(curl -s 'http://localhost:8080/api/schedule/sendSMS/sendDailySms'
--form "date=$(date -d 'yesterday' +\%Y-\%m-\%d)" --form 'onlyCheckData=true')"
>> /tmp/crontab_$(date '+\%Y-\%m').log
【Shell】linux 下source、sh、bash、./執行指令碼的區別
linux 下source、sh、bash、./執行指令碼的區別 - IT閱讀 (itread01.com)
bash shell的命令分為兩類:外部命令和內部命令。外部命令是通過系統呼叫或獨立的程式實現的,如sed、awk等等。內部命令是由特殊的檔案格式(.def)所實現,如cd、history、exec等等。
在說明exe和source的區別之前,先說明一下fork的概念。
fork是linux的系統呼叫,用來建立子程序(child process)。子程序是父程序(parent process)的一個副本,從父程序那裡獲得一定的資源分配以及繼承父程序的環境。子程序與父程序唯一不同的地方在於pid(process id)。
環境變數(傳給子程序的變數,遺傳性是本地變數和環境變數的根本區別)只能單向從父程序傳給子程序。不管子程序的環境變數如何變化,都不會影響父程序的環境變數。
shell script:
新產生一個shell然後再執行scripts的方法是在scripts檔案開頭加入以下語句
#!/bin/sh
一般的script檔案(.sh)即是這種用法。這種方法先啟用新的sub-shell(新的子程序),然後在其下執行命令。
另外一種方法就是上面說過的source命令,不再產生新的shell,而在當前shell下執行一切命令。
source:
source命令即點(.)命令。
在bash下輸入man source,找到source命令解釋處,可以看到解釋"Read and execute commands from filename in the current shell environment and ..."。從中可以知道,source命令是在當前程序中執行引數檔案中的各個命令,而不是另起子程序(或sub-shell)。
exec:
在bash下輸入man exec,找到exec命令解釋處,可以看到有"No new process is created."這樣的解釋,這就是說exec命令不產生新的子程序。那麼exec與source的區別是什麼呢?
* fork ( /directory/script.sh)
fork是最普通的, 就是直接在腳本里面用/directory/script.sh來呼叫script.sh這個指令碼.執行的時候開一個sub-shell執行呼叫的指令碼,sub-shell執行的時候, parent-shell還在。sub-shell執行完畢後返回parent-shell. sub-shell從parent-shell繼承環境變數.但是sub-shell中的環境變數不會帶回parent-shell
* source (source /directory/script.sh)
與fork的區別是不新開一個sub-shell來執行被呼叫的指令碼,而是在同一個shell中執行. 所以被呼叫的指令碼中宣告的變數和環境變數, 都可以在主指令碼中得到和使用.
* exec (exec /directory/script.sh)
exec與fork不同,不需要新開一個sub-shell來執行被呼叫的指令碼. 被呼叫的指令碼與父指令碼在同一個shell內執行。但是使用exec呼叫一個新指令碼以後, 父指令碼中exec行之後的內容就不會再執行了。這是exec和source的區別。
下面用一個例子來講解
1.sh
#!/bin/bash

A=B

echo "PID for 1.sh before exec/source/fork:$"
export A

echo "1.sh: \$A is $A"

case $1 in
        exec)
                echo "using exec..."
                exec ./2.sh ;;
        source)
                echo "using source..."
                . ./2.sh ;;
        *)
                echo "using fork by default..."
                ./2.sh ;;
esac

echo "PID for 1.sh after exec/source/fork:$"
echo "1.sh: \$A is $A"
2.sh
#!/bin/bash

echo "PID for 2.sh: $"
echo "2.sh get \$A=$A from 1.sh"

A=C

export A

echo "2.sh: \$A is $A" ./1.sh fork
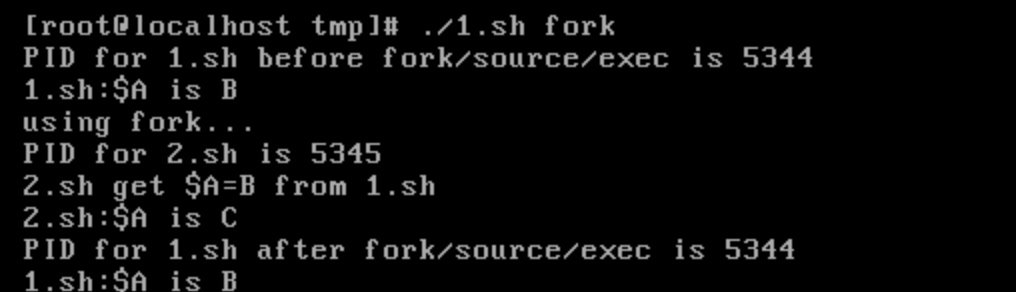
可以看到,1.sh是在父程序中執行,2.sh是在子程序中執行的,父程序的PID是5344,而子程序的是5345,當子程序執行完畢後,控制權返回到父程序。同時,在子程序改變環境變數A的值不會影響到父程序。
./1.sh source
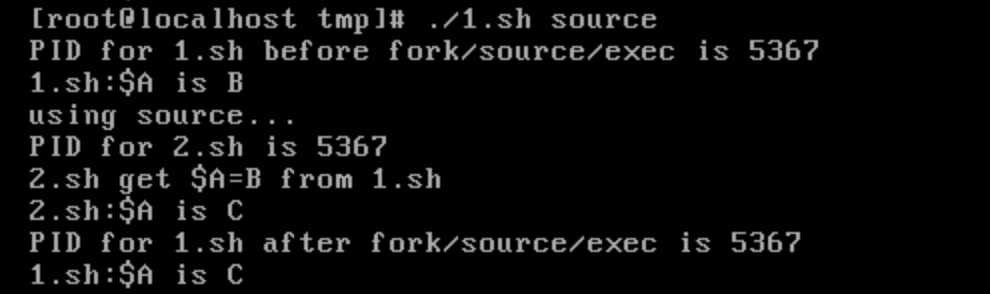
由結果可知,1.sh和2.sh都是在同一程序中執行的,PID為5367
./1.sh exec
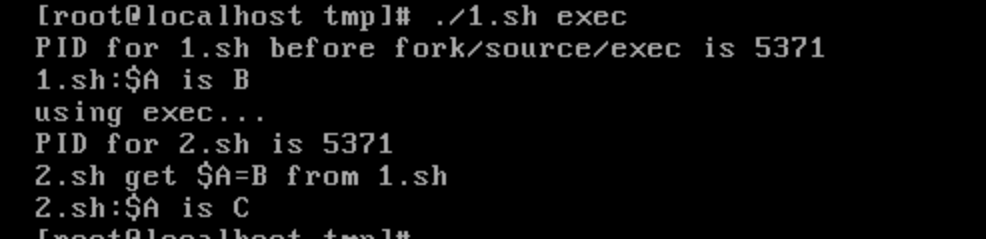
可知,兩個指令碼都是在同一程序中執行,但是請注意,使用exec終止了原來的父程序,因此,可以看到
echo "PID for 1.sh after exec/source/fork:$"

echo "1.sh: \$A is $A"
這兩個命令沒有執行
由這個例子,便大致可瞭解它們的區別了
【Shell】date 做 timestamp 格式轉換計算
要將日期與 timestamp 互相做格式轉換,只要使用 date 就可以達成,date 還可以順便做些日期的加減換算。
- 日期轉換成 timestamp
- $ date -d "2018-02-08" +%s
1518019200
- $ date -d "2018-02-08" +%s
- timestamp 轉換成可識別的時間
- $ date --date=@1518019200
四 2月 8 00:00:00 CST 2018 - $ date "+%Y-%m-%d" --date=@1518019200 # 指定格式
2018-02-08 - $ date "+%Y-%m-%d" # 直接秀今天的日期
- $ date --date=@1518019200
- 日期加減換算
- $ date -d "-5 day" "+%Y-%m-%d" # 5天前的日期
<來源>Linux 使用 date 做 timestamp 格式轉換計算 – Tsung's Blog (longwin.com.tw)
【Shell】awk 取出特定欄位
- AWK 要取得最後一個欄位的值是使用: $NF
- AWK 要取得倒數第二個欄位的值是使用: $(NF-1)
- 由後往前取,就繼續 -2、-3... 下去即可
- 範例:awk '{print $(NF - 2)}' # 從後面數來第二個
所以要抓 access.log 倒數第二欄 和 第二欄,範例如下:
- cat access.log | awk -F\" '{print $(NF-2),$2}' # 使用 " 切割
想要過濾掉其他欄位,主要就是把不要的欄位設定為「空」,再來印出 $0 就可以了~
- $ cat access.log | awk '{$1=$2=$8=""; print $0}'
cut 也可以達成:
- $ cat access.log | cut --complement -d" " -f 1,2,8
- 使用 AWK 過濾不要的欄位 – Tsung's Blog (longwin.com.tw)
- AWK 取得欄位的「最後」與「倒數第二個值」的方法 – Tsung's Blog (longwin.com.tw)
【Shell】取得pubic ip
#curl ifconfig.me; echo
175.99.111.111
【shell】內建變數
| $BASH_ENV | absolute path of startup file |
| $CDPATH | directories searched by cd |
| $FCEDIT | absolute path of history editor |
| $HISTCMD | the history number of the current command |
| $HISFILE | absolute path of history file |
| $HISTSIZE | number of remembered commands |
| $HOME | login directory |
| $IFS | token delimiters |
| $LINENO | current line number in shell script |
| $LINES | terminal height |
| absolute path of mailbox | |
| $MAILCHECK | number of seconds to check mail |
| $OLDPWD | absolute path of previous directory |
| $OPTARG | option set by getopt |
| $OPTIND | option's ordinal position set by getopt |
| $OSTYPE | the OS on which bash is executing |
| $PATH | command search path |
| $PPID | process ID of parent |
| $PS1 | primary prompt |
| $PS2 | secondary prompt |
| $PWD | absolute path of current directory |
| $RANDOM | random integer |
| $REPLY | default variable for read |
| $SECONDS | number of seconds since shell started |
| $SHELL | absolute pathname of preferred shell |
| $TMOUT | seconds to log out after lack of use |
| $UID | user ID of the current user |
| $$ | process ID of current shell |
| $? | exit status of most recent statement |
| $# | 參數的數目 |
| $* | 代表所有參數 |
| $! | PID of the most recently started backgroup job |
【Shell】動態呼叫awk自訂函數
*test.sh
#!/bin/bash
awkshell="/tmp/newdf.$$"
#awkshell="/tmp/newdf"
trap "rm -f $awkshell" exit

cat << EOF > $awkshell
function showunit(size){
        mb = size / 1024;
        gb = mb / 1024;
        if ( size < 1024 || substr(size,1,1) !~ "[0-9]" || substr(size,2,1) !~ "[0-9]" ){ return size }
        else if ( mb < 1 ){ return size"K" }
        else if ( gb < 1 ){ return (int(mb*100)/100)"M" }
        else { return (int(gb*100)/100)"G"}
}
!/Filesystem/{
        size=showunit($1)
        print size
}
EOF

#echo $awkshell
#cat $awkshell
echo $1 | awk -f $awkshell

exit 0
[root]$ sh test.sh 6666
6.5M
[root]$ sh test.sh 66666
65.1M
[root]$ sh test.sh 666666666
635.78G
【 Shell】【Tool】測試機器防火牆是否開通
#!/bin/bash
services=(
"gcr.io"
"checkpoint-api.hashicorp.com"
"storage.googleapis.com monitoring.googleapis.com"
"gkeconnect.googleapis.com"
"iam.googleapis.com"
"dl.google.com"
"gcr.io"
"googleusercontent.com"
"www.googleapis.com"
"accounts.google.com"
"cloudresourcemanager.googleapis.com"
"container.googleapis.com"
"gkeconnect.googleapis.com"
"gkehub.googleapis.com"
"iam.googleapis.com"
"iamcredentials.googleapis.com"
"logging.googleapis.com"
"monitoring.googleapis.com"
"oauth2.googleapis.com"
"securetoken.googleapis.com"
"servicecontrol.googleapis.com"
"serviceusage.googleapis.com"
"storage.googleapis.com"
"stackdriver.googleapis.com"
"sts.googleapis.com"
"checkpoint-api.hashicorp.com"
"releases.hashicorp.com"
"this-url-wont-work.comx"
)
for s in ${services[@]}; do
   nc -v -z -w 3 $s 443 &> /dev/null && echo "$s:443 Online" || echo "$s:443 Offline"
done
結果:
gcr.io:443 Online
checkpoint-api.hashicorp.com:443 Online
storage.googleapis.com:443 Online
monitoring.googleapis.com:443 Online
gkeconnect.googleapis.com:443 Online
iam.googleapis.com:443 Online
dl.google.com:443 Online
gcr.io:443 Online
googleusercontent.com:443 Offline
www.googleapis.com:443 Online
accounts.google.com:443 Online
cloudresourcemanager.googleapis.com:443 Online
container.googleapis.com:443 Online
gkeconnect.googleapis.com:443 Online
gkehub.googleapis.com:443 Online
iam.googleapis.com:443 Online
iamcredentials.googleapis.com:443 Online
logging.googleapis.com:443 Online
monitoring.googleapis.com:443 Online
oauth2.googleapis.com:443 Online
securetoken.googleapis.com:443 Online
servicecontrol.googleapis.com:443 Online
serviceusage.googleapis.com:443 Online
storage.googleapis.com:443 Online
stackdriver.googleapis.com:443 Online
sts.googleapis.com:443 Online
checkpoint-api.hashicorp.com:443 Online
releases.hashicorp.com:443 Online
this-url-wont-work.comx:443 Offline
【Shell】【Tool】批次更新密碼
如果有許多使用者需要批次重設密碼並強制其在下次登入時更新,可以使用一個簡單的 Shell 腳本來自動化這個過程。假設你有一個包含所有目標使用者名稱的文字檔,例如 users.txt,可以按照以下步驟操作:
-
建立使用者清單:
在
users.txt中列出所有需要重設密碼的使用者名稱,每行一個。例如:user1 user2 user3 -
編寫批次重設密碼的腳本:
建立一個 Shell 腳本,批次執行密碼重設並強制更新。例如,將以下內容儲存為
reset_password.sh:#!/bin/bash # 檢查 users.txt 是否存在 if [[ ! -f users.txt ]]; then echo "Error: users.txt not found!" exit 1 fi # 循環讀取每一個使用者 while IFS= read -r username; do # 跳過空行 if [[ -z "$username" ]]; then continue fi # 設定預設密碼或隨機密碼 new_password="DefaultPassword123" # 或使用 `new_password=$(openssl rand -base64 12)` 生成隨機密碼 echo "重設 $username 的密碼為 $new_password" # 重設密碼 echo "$username:$new_password" | sudo chpasswd # 強制下次登入時更改密碼 sudo chage -d 0 "$username" echo "$username 的密碼已重設並強制更新" done < users.txt -
執行腳本:
為腳本增加執行權限,然後執行:
chmod +x reset_password.sh sudo ./reset_password.sh -
檢查結果:
執行完成後,你可以再次使用
chage -l username指令逐一檢查使用者的密碼到期設定,確認是否成功。
這樣便可批次重設多位使用者的密碼,並強制其在下次登入時更新密碼。
【Shell】【Tip】列出環境變數網址解析dns

#!/bin/bash

export A_HOST="https://www.google.com/a/b"
export B_HOST="https://tw.yahoo.com/a?a=a&b=b"
export C_HOST="https://www.microsoft.com/zh-tw/#bb"

echo "列出所有環境變數並解析疑似網址的 IP:"
echo "========================================="

# 顯示目前 DNS server
# 嘗試從 systemd-resolved 的配置中找出真實 DNS
if command -v resolvectl >/dev/null 2>&1; then
  dns_servers=$(resolvectl status | grep 'DNS Servers' | head -n 1 | awk -F': ' '{print $2}')
#elif [ -f /run/systemd/resolve/resolv.conf ]; then
#  dns_servers=$(grep -E '^nameserver' /run/systemd/resolve/resolv.conf | awk '{print $2}')
else
  dns_servers=$(grep -E '^nameserver' /etc/resolv.conf | awk '{print $2}')
fi

echo "目前使用的 DNS server:$dns_servers"
echo "-----------------------------------------"

# 暫存解析過的域名,避免重複查詢
declare -A resolved

while IFS='=' read -r name value; do
  if [[ "$value" =~ ^https?://([^:/]+) ]]; then
    host="${BASH_REMATCH[1]}"
  elif [[ "$value" =~ ^([a-zA-Z0-9.-]+\.[a-zA-Z]{2,})$ ]]; then
    host="${BASH_REMATCH[1]}"
  else
    continue
  fi

  if [[ -n "$host" && -z "${resolved[$host]}" ]]; then
    ip=$(dig +short "$host" | grep -Eo '([0-9]{1,3}\.){3}[0-9]{1,3}' | head -n 1)
    resolved["$host"]="$ip"
    echo "$name=$value"
    if [[ -z "$ip" ]]; then
      echo " ↳ $host → [無法解析]"
    else
      echo " ↳ $host → $ip"
    fi
    echo "-----------------------------------------"
  fi
done < <(env)

echo ""
echo "系統 /etc/hosts 內容(不含註解與空行):"
echo "========================================="
grep -vE '^\s*#|^\s*$' /etc/hosts
【Shell】【Tool】call_api
call_api() {
  curl -fsS \
    --connect-timeout 2 \
    --max-time 5 \
    --retry 2 --retry-delay 1 \
    -w " [HTTP_CODE=%{http_code}]\n" \
    "$URL"
}
好的 👍 我來逐一說明 call_api() 這段裡面每個 curl 參數的作用,並且說明為什麼要加:
call_api() {
  curl -fsS \
    --connect-timeout 2 \
    --max-time 5 \
    --retry 2 --retry-delay 1 \
    -w " [HTTP_CODE=%{http_code}]\n" \
    "$URL"
}
參數逐一解析
-
-f/--fail-
作用:當 HTTP 狀態碼是 4xx / 5xx 時,不會把 HTML 錯誤頁輸出到 stdout,而是直接返回非零 exit code。
-
好處:可以在 script 判斷「這次呼叫失敗」,而不是誤以為拿到一大串錯誤 HTML 也算成功。
-
-
-s/--silent-
作用:靜默模式,不顯示下載進度條與錯誤訊息(錯誤還是會 exit code ≠ 0)。
-
好處:避免 cron job 或 log 裡塞滿進度百分比。
-
-
-S/--show-error-
作用:在
-s靜默模式下,仍然把錯誤訊息(例如 DNS 解析失敗、timeout)顯示出來。 -
好處:結合
-s使用,可以安靜但又不失錯誤訊息。
-
-
--connect-timeout 2-
作用:設定 TCP 連線的最大等待時間(單位:秒)。
-
例子:如果 API 服務根本沒在聽 port 8082,curl 會在 2 秒 內放棄。
-
-
--max-time 5-
作用:整個 request(連線、傳輸、讀取)的最長時間,超過就中斷。
-
好處:避免 API 掛住時,curl 一直卡在那裡。
-
-
--retry 2-
作用:遇到「暫時性錯誤」(像 DNS 解析失敗、timeout、connection reset by peer),會自動重試最多 2 次。
-
預設只會 retry network-level 的錯誤,不會 retry 4xx/5xx。
-
-
--retry-delay 1-
作用:每次 retry 前延遲 1 秒。
-
預設會 delay 1 秒,但這裡寫死確保一致。
-
-
-w " [HTTP_CODE=%{http_code}]\n"-
作用:在 response 輸出結尾,附加 HTTP 狀態碼。
-
例子:成功時會多一行
[HTTP_CODE=200] -
好處:log 裡可以直接看出 API 狀態。
-
-
"$URL"-
作用:實際要請求的 URL。
-
這裡設成變數,方便修改。
-
總結
這樣組合的意圖就是:
-
-fsS→ 安靜,但保留錯誤訊息,不要 HTML 錯誤頁 -
--connect-timeout/--max-time→ 控制時間上限,避免卡死 -
--retry/--retry-delay→ 短暫網路錯誤自動補救 -
-w %{http_code}→ log 裡清楚顯示 HTTP 狀態碼